 Hyundai Azera: Condenser Repair procedures
Fifth generation HG (2011–2026) / Hyundai Azera 2011-2026 Service Manual / Heating,Ventilation, Air Conditioning / Air Conditioning System / Condenser Repair procedures
Hyundai Azera: Condenser Repair procedures
Fifth generation HG (2011–2026) / Hyundai Azera 2011-2026 Service Manual / Heating,Ventilation, Air Conditioning / Air Conditioning System / Condenser Repair procedures
Fifth generation HG (2011–2026) / Hyundai Azera 2011-2026 Service Manual / Heating,Ventilation, Air Conditioning / Air Conditioning System / Condenser Repair procedures
| Inspection |
| 1. |
Check the condenser fins for clogging and damage. If clogged,
clean them with water, and blow them with compressed air. If bent,
gently bend them using a screwdriver or pliers. |
| 2. |
Check the condenser connections for leakage, and repair or replace it, if required. |
| Replacement |
| 1. |
Recover the refrigerant with a recovery/ recycling/ charging station. |
| 2. |
Disconnect the negative (-) battery terminal. |
| 3. |
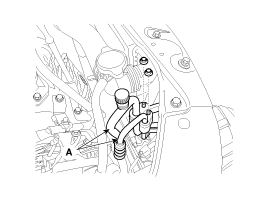
Remove the discharge line and liquid line (A) from the condenser.
|
| 4. |
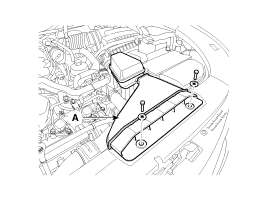
Remove the intake air duct (A).
|
| 5. |
Remove the front bumper.
|
| 6. |
Remove the hood latch.
|
| 7. |
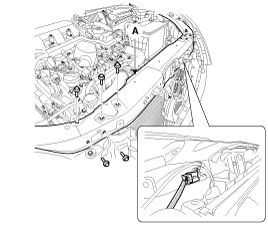
Remove the radiator support upper panel (A).
|
| 8. |
Disconnect the mounting clip and then remove the condenser air guard (A).
|

| 9. |
Remove the condenser (B) by lifting it up. Be careful not to damage the radiator and condenser fins when removing the condenser.
|

| 10. |
Install in the reverse order of removal, and note these items :
|
 Condenser Components and Components Location
Component Location
...
 Receiver-Drier Repair procedures
Replacement
1.
Remove the condenser, and then remove the bottom cap (B) with L wrench (A) from the condenser.
Tightening torque :
9.8~14.7N.m (1.0~1.5kgf.m, 7.2~10.8 lb-ft)
2.
Remove ...
See also:
Transaxle Oil Temperature Sensor Specifications
Specifications
? Type: Negative Thermal Coefficient(NTC) Type
Temp.[(°C)°F]Resistance (k?)(-40)-4048.1(-20)-4.015.6(0)32.05.88(20)68.02.51(40)104.01.11(60)140.00.61(80)176.00.32(100)212.00.18( ...
Repair procedures
Component Replacement After Deployment
Before doing any SRS repairs, use the GDS to check for DTCs.
Refer to the Diagnostic Trouble Code list for repairing of the related
...
Opening the trunk
Press the trunk unlock button for more than 1 second on the smart key.
Press the switch on the trunk handle with the smart key in your possession
(2).
Insert the mechanical key of the smar ...
Categories
Hyundai Azera Manuals

© 2011-2026 Copyright www.hgmanual.com