 Hyundai Azera: Evaporator Core Repair procedures
Fifth generation HG (2011–2026) / Hyundai Azera 2011-2026 Service Manual / Heating,Ventilation, Air Conditioning / Heater / Evaporator Core Repair procedures
Hyundai Azera: Evaporator Core Repair procedures
Fifth generation HG (2011–2026) / Hyundai Azera 2011-2026 Service Manual / Heating,Ventilation, Air Conditioning / Heater / Evaporator Core Repair procedures
Fifth generation HG (2011–2026) / Hyundai Azera 2011-2026 Service Manual / Heating,Ventilation, Air Conditioning / Heater / Evaporator Core Repair procedures
| Replacement |
| 1. |
Disconnect the negative (-) battery terminal. |
| 2. |
Recover the refrigerant with a recovery/ recycling/ charging station. |
| 3. |
When the engine is cool, drain the engine coolant from the radiator.
|
| 4. |
Remove the heater & blower assembly.
(Refer to Heating,Ventilation, Air Conditioning - "Heater Unit") |
| 5. |
Remove the blower unit (B) from heater unit after loosening 3 screws.
|
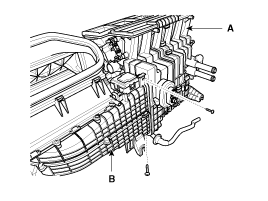
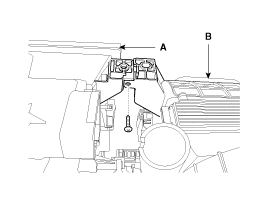
| 6. |
Loosen the heater unit lower case mount screw and then remove the heater unit lower case (A).
|
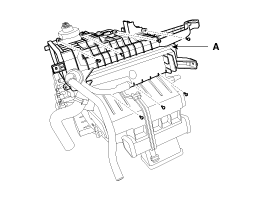
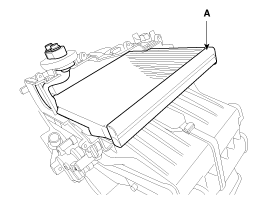
| 7. |
Remove the evaporator core (A).
|

| 8. |
Installation is the reverse order of removal
|
 Heater Core Repair procedures
Replacement
1.
Disconnect the negative (-) battery terminal.
2.
Recover the refrigerant with a recovery/ recycling/ charging station.
3.
When the engine is cool, drain the engine coola ...
 Temperature Control Actuator Components and Components Location
Component Location
...
See also:
Temperature Control Actuator Components and Components Location
Component Location
...
Hood Latch Repair procedures
Replacement
1.
Remove the front bumper cover.
(Refer to Front Bumper - "Front Bumper Cover")
2.
Detach the clips, then remove hood latch cover (A).
3.
Remove the hood latch (A) mounting b ...
Schematic Diagrams
Circuit Diagram (1)
Circuit Diagram (2)
Circuit Diagram (3)
SRSCM Connector terminal
Pin Function (Connector A)Pin Function (Connector B)1Ignition1Seat belt pretensioner [Driver] Hig ...
Categories
Hyundai Azera Manuals

© 2011-2026 Copyright www.hgmanual.com