 Hyundai Azera: Condenser Repair procedures
Fifth generation HG (2011–2026) / Hyundai Azera 2011-2026 Service Manual / Heating,Ventilation, Air Conditioning / Air Conditioning System / Condenser Repair procedures
Hyundai Azera: Condenser Repair procedures
Fifth generation HG (2011–2026) / Hyundai Azera 2011-2026 Service Manual / Heating,Ventilation, Air Conditioning / Air Conditioning System / Condenser Repair procedures
Fifth generation HG (2011–2026) / Hyundai Azera 2011-2026 Service Manual / Heating,Ventilation, Air Conditioning / Air Conditioning System / Condenser Repair procedures
| Inspection |
| 1. |
Check the condenser fins for clogging and damage. If clogged,
clean them with water, and blow them with compressed air. If bent,
gently bend them using a screwdriver or pliers. |
| 2. |
Check the condenser connections for leakage, and repair or replace it, if required. |
| Replacement |
| 1. |
Recover the refrigerant with a recovery/ recycling/ charging station. |
| 2. |
Disconnect the negative (-) battery terminal. |
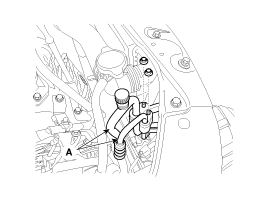
| 3. |
Remove the discharge line and liquid line (A) from the condenser.
|
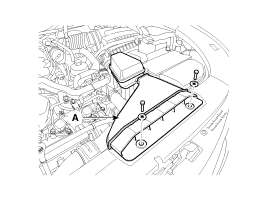
| 4. |
Remove the intake air duct (A).
|
| 5. |
Remove the front bumper.
|
| 6. |
Remove the hood latch.
|
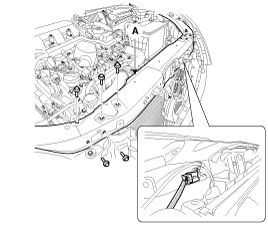
| 7. |
Remove the radiator support upper panel (A).
|
| 8. |
Disconnect the mounting clip and then remove the condenser air guard (A).
|

| 9. |
Remove the condenser (B) by lifting it up. Be careful not to damage the radiator and condenser fins when removing the condenser.
|

| 10. |
Install in the reverse order of removal, and note these items :
|
 Condenser Components and Components Location
Component Location
...
 Receiver-Drier Repair procedures
Replacement
1.
Remove the condenser, and then remove the bottom cap (B) with L wrench (A) from the condenser.
Tightening torque :
9.8~14.7N.m (1.0~1.5kgf.m, 7.2~10.8 lb-ft)
2.
Remove ...
See also:
Ignition Coil Components and Components Location
Components
1. Condensor2. Bracket3. Ignition coil4. Ignition coil harness
...
Specifications
Specifications
ItemsSpecificationsRated voltageDC +5VLoadMax. 1mA (When head lamp lighting)Illuminations50 LUX1.42 ± 0.31V50 LUX3.84 ± 0.84V
...
Blue Link®
Hyundai aims to offer differentiated customer values through a ‘Connected Car
Life,’ which is to provide consumers with fast and reliable IT technology. As consumers’
lifestyles become more an ...
Categories
Hyundai Azera Manuals

© 2011-2026 Copyright www.hgmanual.com