 Hyundai Azera: Head Unit

(1)  Press to turn power
on/off.
(2)  (EJECT)
Press to insert or eject disc. When press and held(3seconds) : energency eject.
(3)
Converts to Radio (FM, AM, XM) mode. Each time this key is pressed, the mode is changed in order of FM1, FM2, AM, XM1, XM2, XM3.
(4)
Starts Media mode.
Each time this key is pressed, the mode is changed in order of CD, USB(iPod®), AUX, My Music, BT Audio.
(5)
Converts to Phone mode.
(6)
Displays supported menus within each mode.
(7)
Used to select a setting/list/feature. Plays/Pauses or selects menu.
(8) VOLUME knob
 Volume : Turn left/right to control
volume.
(9)  ,
,

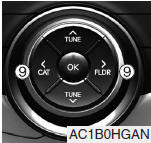
Within the mode menu displayed, moves menus focus to left/right.
- CD(MP3),USB mode : searches folders.
- XM mode : searches categories.
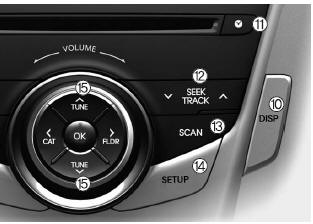
(10)
Turns the monitor display on/off.
(11)
Displays the time/date/day.
Press and hold the key (over 0.8 seconds) to setting the Clock/Calendar screen.
(12)
When pressed shortly (under 0.8 seconds).
- FM, AM mode : plays previous/next frequency.
- CD, USB, iPod®, My Music mode : changes the track, file.
When pressed and held (over 0.8 seconds).
- FM, AM mode : continuously changes the frequency until the key is released
and plays the current frequency.
- CD, USB, iPod®, My Music mode : rewinds or fast forwards the track or file.
- During a Handsfree call, controls the call volume.
(13)
FM, AM, XM mode : previews all receivable broadcasts for 5 seconds each.
CD, USB, iPod®, My Music mode : previews each song (file) for 10 seconds each.
(14)
Converts to Setup mode.
(15)  ,
,

FM, AM mode : turn to change broadcast frequencies.
CD, USB, iPod® mode : turn to search tracks/channels/files.
(16) PRESET
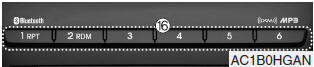
Radio mode : saves a frequency or receives saved frequencies.
MEDIA mode : press the  key to repeat
and  key to play in random order (shuffle).

 Steering wheel remote controller
(1) VOLUME Used to control volume.
(2) SEEK When pressed shortly (under 0.8 seconds).
- FM, AM, XM mode : searches broadcast frequencies saved to presets.
- CD, USB, iPod®, My Music, BT Audio mo ...
See also:
Rocking the vehicle
If it is necessary to rock the vehicle to free it from snow, sand, or mud, first
turn the steering wheel right and left to clear the area around your front wheels.
Then, shift back and forth between ...
Components and Components Location
Component Location
1. Panoramaroof2. Panoramaroof switch3. Panoramaroof motor & controller4. Roller blind motor & slave controller
...
Hood Weatherstrip Repair procedures
Replacement
1.
Remove the hood weatherstrip (A).
2.
Installation is the reverse of removal. ...
Categories
Hyundai Azera Manuals
