 Hyundai Azera: Parking brake
Fifth generation HG (2011–2024) / Hyundai Azera 2011-2024 Owners Manual / Driving your vehicle / Brake system / Parking brake
Hyundai Azera: Parking brake
Fifth generation HG (2011–2024) / Hyundai Azera 2011-2024 Owners Manual / Driving your vehicle / Brake system / Parking brake
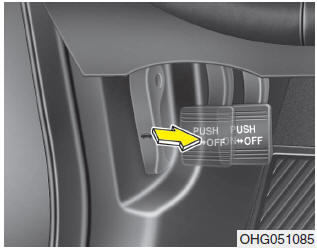
Applying the parking brake To engage the parking brake, first apply the foot brake and then depress the parking brake pedal down as far as possible.
In addition it is recommended that when parking the vehicle on a incline, the shift lever should be in the P (Park) position.
CAUTION - Parking brake
Driving with the parking brake applied will cause excessive brake pad (or lining) and brake rotor wear.
Releasing the parking brake
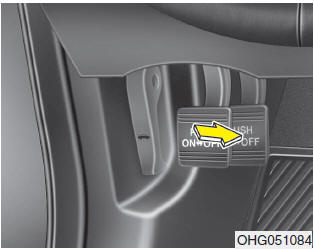
To release the parking brake, depress the parking brake pedal a second time while applying the foot brake. The pedal will automatically extend to the fully released position.
If the parking brake does not release or does not release all the way, have the system checked by an authorized HYUNDAI dealer.
WARNING - Parking brake use
- All vehicles should always have the parking brake fully engaged when parking to avoid inadvertent movement of the vehicle which can injure occupants or pedestrians.
- Never allow anyone who is unfamiliar with the vehicle to touch the parking brake. If the parking brake is released unintentionally, serious injury may occur.
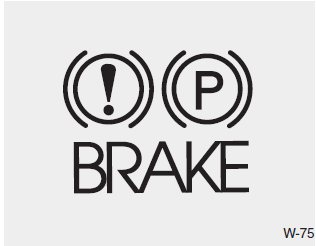
Check the brake warning light by changing the ignition switch to ON (do not start the engine). This light will be illuminated when the parking brake is applied with the ignition switch in the START or ON position. Before driving, be sure the parking brake is fully released and the brake warning light is off.
If the brake warning light remains on after the parking brake is released while the engine is running, there may be a malfunction in the brake system. Immediate attention is necessary. If at all possible, cease driving the vehicle immediately. If that is not possible, use extreme caution while operating the vehicle and only continue to drive the vehicle until you can reach a safe location or repair shop.
 Power brakes
Your vehicle has power-assisted brakes that adjust automatically through normal
usage.
In the event that the power-assisted brakes lose power because of a stalled engine
or some other reason, you c ...
 Anti-lock brake system (ABS)
ABS (or ESC) will not prevent accidents due to improper or dangerous driving
maneuvers. Even though vehicle control is improved during emergency braking, always
maintain a safe distance between you ...
See also:
Symbols used in this manual
Warnings, cautions and Notices
WARNING
A WARNING indicates a situation in which harm, serious bodily injury or death
could result if the warning is ignored.
CAUTION
A CAUTION indicates a situatio ...
Repair procedures
Adjustment
Glass Adjustment
•
Check the glass run channel for damage or deterioration, and replace them if necessary.
1.
Remove the rear door trim.
(Refer to Rear ...
Roller Blind Shoe Repair procedures
Replacement
1.
Remove the roof trim assembly.
(Refer to Roof Trim - "Roof Trim Assembly")
2.
Remove the movable glass.
3.
After loosening the mounting TORX screws, remove the roller blind ...
Categories
Hyundai Azera Manuals
