| 1. |
Remove the rear wheel & tire (A).
Tightening torque:
88.3 ~ 107.9N.m (9.0 ~ 11.0kgf.m, 65.1 ~ 79.6lb-ft)
|

|
Be careful not to damage to the hub bolts when removing the rear wheel & tire. |
|
| 2. |
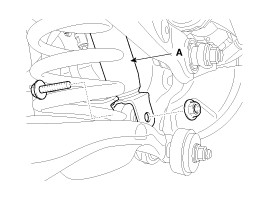
Loosen the bolt & nut and then disconnect the shock absorber (A) with the rear axle.
Tightening torque:
137.3~156.9N.m(14.0~16.0Kgf.m, 101.3~115.7lb-ft)
|
|
When removing the bolt, remove the shock absorber in no-load condition by using the transmission jack. 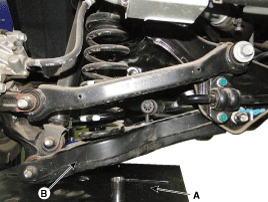
|
|
| 3. |
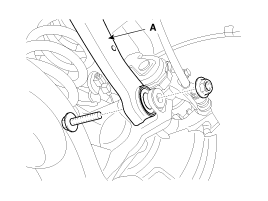
Loosen the bolt & nut and then remove the rear upper arm (A) with the rear axle.
Tightening torque:
137.3~156.9N.m(14.0~16.0Kgf.m, 101.3~115.7lb-ft)
|
|
Must be separate the upper arm & upper arm mounting bolt at the rear carrier assembly before remove the rear brake caliper.
When removing the bolt, remove the upper arm in no-load condition by using the transmission jack. |
|
| 4. |
Set up the transmission jack (A) under the lower arm (B).
|
| 5. |
Loosen the bolt & nut and then remove the rear upper arm (A) with the rear axle.
Tightening torque:
137.3~156.9N.m(14.0~16.0Kgf.m, 101.3~115.7lb-ft)
|
| • |
When removing the bolt, remove the upper arm in no-load condition by using the transmission jack. |
|
|
| 6. |
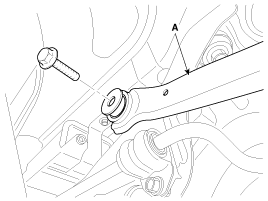
Loosen the bolt & nut and then remove the rear upper arm (A) with the sub frame.
Tightening torque:
156.9~176.5N.m(16.0~18.0Kgf.m, 115.7~130.2lb-ft)
|
| • |
When removing the bolt, remove the upper arm in no-load condition by using the transmission jack. |
|
|
| 1. |
Installation is the reverse of removal.
| • |
If you don't install the jack, the bolt may cut due to the high work load of upper arm mounting bolt. |
| • |
Install the component with the specified torques. |
| • |
When installing the bolt, install the upper arm in no-load condition by using the transmission jack. |
| • |
Install the rear upper arm to the sub frame using a bolt in horizontally aligned condition. |
| • |
If tightening the bolt without aligning the bolt holes of
rear upper arm and sub frame horizontally, the bolt securing the rear
upper arm to the sub frame may come loose and as a result of this, rust
and noise may be able to occur later. |
|
|
| 1. |
Check the bushing for wear and deterioration. |
| 2. |
Check the rear upper arm or damage and deformation. |
| 3. |
Check for all bolts and nut. |
Replacement
1.
Remove the rear wheel & tire (A).
Tightening torque:
88.3 ~ 107.9N.m (9.0 ~ 11.0kgf.m, 65.1 ~ 79.6lb-ft)
Be careful not to damage to the hub bolts w ...
Removal
1.
Remove the rear wheel & tire (A).
Tightening torque:
88.3 ~ 107.9N.m (9.0 ~ 11.0kgf.m, 65.1 ~ 79.6lb-ft)
•
Be careful not to damage to the hub bolt ...
 Hyundai Azera: Rear Upper Arm Repair procedures
Fifth generation HG (2011–2026) / Hyundai Azera 2011-2026 Service Manual / Suspension System / Rear Suspension System / Rear Upper Arm Repair procedures
Hyundai Azera: Rear Upper Arm Repair procedures
Fifth generation HG (2011–2026) / Hyundai Azera 2011-2026 Service Manual / Suspension System / Rear Suspension System / Rear Upper Arm Repair procedures


 Rear Shock Absorber Repair procedures
 Rear Lower Arm Repair procedures