 Hyundai Azera: Condenser Repair procedures
Fifth generation HG (2011–2024) / Hyundai Azera 2011-2024 Service Manual / Heating,Ventilation, Air Conditioning / Air Conditioning System / Condenser Repair procedures
Hyundai Azera: Condenser Repair procedures
Fifth generation HG (2011–2024) / Hyundai Azera 2011-2024 Service Manual / Heating,Ventilation, Air Conditioning / Air Conditioning System / Condenser Repair procedures
Fifth generation HG (2011–2024) / Hyundai Azera 2011-2024 Service Manual / Heating,Ventilation, Air Conditioning / Air Conditioning System / Condenser Repair procedures
| Inspection |
| 1. |
Check the condenser fins for clogging and damage. If clogged,
clean them with water, and blow them with compressed air. If bent,
gently bend them using a screwdriver or pliers. |
| 2. |
Check the condenser connections for leakage, and repair or replace it, if required. |
| Replacement |
| 1. |
Recover the refrigerant with a recovery/ recycling/ charging station. |
| 2. |
Disconnect the negative (-) battery terminal. |
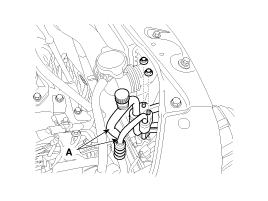
| 3. |
Remove the discharge line and liquid line (A) from the condenser.
|
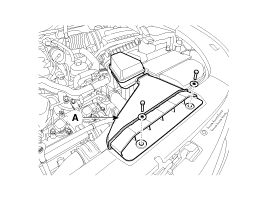
| 4. |
Remove the intake air duct (A).
|
| 5. |
Remove the front bumper.
|
| 6. |
Remove the hood latch.
|
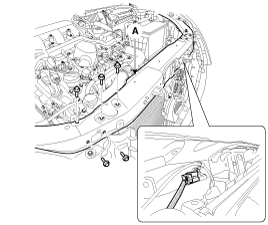
| 7. |
Remove the radiator support upper panel (A).
|
| 8. |
Disconnect the mounting clip and then remove the condenser air guard (A).
|

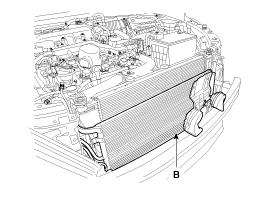
| 9. |
Remove the condenser (B) by lifting it up. Be careful not to damage the radiator and condenser fins when removing the condenser.
|
| 10. |
Install in the reverse order of removal, and note these items :
|
 Condenser Components and Components Location
Component Location
...
 Receiver-Drier Repair procedures
Replacement
1.
Remove the condenser, and then remove the bottom cap (B) with L wrench (A) from the condenser.
Tightening torque :
9.8~14.7N.m (1.0~1.5kgf.m, 7.2~10.8 lb-ft)
2.
Remove ...
See also:
Gate operator & Canadian programming
During programming, your handheld transmitter may automatically stop transmitting.
Continue to press the Integrated HomeLink® Wireless Control System button (note
steps 2 through 4 in the Standard P ...
ICM (Integrated Circuit Module) Relay Box Specifications
Specification
Rated voltageDC 12VOperating voltageDC 9 ~ 16VUse of temperature range-30°C ~ 75°CPreserve temperature range-40°C ~ 85°CInsulation resistance100M? MIN. / 500VM
...
Driver Airbag (DAB) Module and Clock Spring Components and Components Location
Components
1. Driver Airbag (DAB)2. Steering Wheel3. Clock Spring
...
Categories
Hyundai Azera Manuals

© 2011-2024 Copyright www.hgmanual.com