 Hyundai Azera: Floor Console Assembly Repair procedures
Fifth generation HG (2011–2024) / Hyundai Azera 2011-2024 Service Manual / Body (Interior and Exterior) / Floor Console / Floor Console Assembly Repair procedures
Hyundai Azera: Floor Console Assembly Repair procedures
Fifth generation HG (2011–2024) / Hyundai Azera 2011-2024 Service Manual / Body (Interior and Exterior) / Floor Console / Floor Console Assembly Repair procedures
Fifth generation HG (2011–2024) / Hyundai Azera 2011-2024 Service Manual / Body (Interior and Exterior) / Floor Console / Floor Console Assembly Repair procedures
| Replacement |
|

| 1. |
Using a screwdriver or remover, remove the center facia side garnish (A).
|

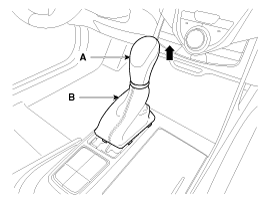
| 2. |
Remove the gear boots (B) and gear knob (A).
|
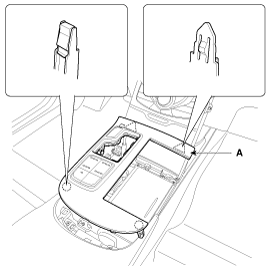
| 3. |
Using a screwdriver or remover, remove the console upper tray complete (A).
|
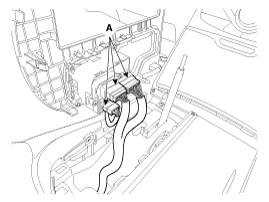
| 4. |
Disconnect the connectors (A).
|
| 5. |
Remove the console tray (A).
|

| 6. |
Remove the console tray met (A).
|

| 7. |
After loosening the mounting screws and bolts, then remove the console rear complete assembly (A).
|

| 8. |
Disconnect the connector (A).
|

| 9. |
Using a screwdriver or remover, remove the console extension cover (A).
|

| 10. |
After loosening the mounting screws, then remove the console front complete assembly (A).
|


| 11. |
Disconnect the connectors (A).
|

| 12. |
Installation is the reverse of removal.
|
 Floor Console Assembly Components and Components Location
Component Location
[Rear]
1. Console rear complete assembly
[Front]
1. Console front complete assembly
...
 Rear Console Cover Components and Components Location
Component Location
1. Rear console cover
...
See also:
Seat Heater Switch Schematic Diagrams
Circuit Diagram
...
Engine Cover Components and Components Location
Components Location
1. Engine cover
...
Drive belts
Inspect all drive belts for evidence of cuts, cracks, excessive wear or oil saturation
and replace if necessary. ...
Categories
Hyundai Azera Manuals

© 2011-2024 Copyright www.hgmanual.com