 Hyundai Azera: Seat Heater Repair procedures
Fifth generation HG (2011–2024) / Hyundai Azera 2011-2024 Service Manual / Body Electrical System / Seat Electrical / Seat Heater Repair procedures
Hyundai Azera: Seat Heater Repair procedures
Fifth generation HG (2011–2024) / Hyundai Azera 2011-2024 Service Manual / Body Electrical System / Seat Electrical / Seat Heater Repair procedures
Fifth generation HG (2011–2024) / Hyundai Azera 2011-2024 Service Manual / Body Electrical System / Seat Electrical / Seat Heater Repair procedures
| Inspection |
First Seat Heater
| 1. |
Check for continuity and measure the resistance between No.1 and NO.4 terminals.
|
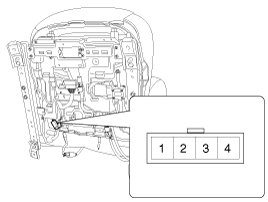
| 2. |
Operate the seat heater after connecting the connector, and
then check the thermostat by measuring the temperature of seat surface.
|
| 3. |
Check for continuity between the terminals after disconnecting the connector. |
2nd Seat Heater
| 1. |
Check for continuity and measure the resistance between No.1 and NO.4 terminals.
|
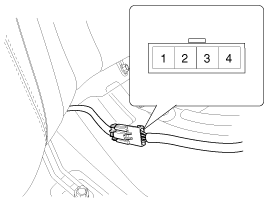
| 2. |
Operate the seat warmer after connecting the 3P connector,
and then check the thermostat by measuring the temperature of seat
surface.
|
 Seat Heater Schematic Diagrams
Circuit Diagram
...
 Seat Heater Switch Schematic Diagrams
Circuit Diagram
...
See also:
Front Strut Assembly Components and Components Location
Components
1. Dust cover2. Upper locking nut3. Self locking nut4. Space5. Insulator6. Spring upper seat7. Spring upper pad8. Strut dust cover & Bumper rubber9. Coil spring10. Spring lower pad ...
Ignition Coil Repair procedures
Removal and Installation
[LH]
1.
Disconnect the battery nagative terminal.
2.
Remove the engine cover.
3.
Disconnect the LH ignition coil connectors (A) and then remove the LH ignition ...
Parking Brake Assembly Repair procedures
Removal
Parking Brake Shoe
1.
Raise the vehicle, and make sure it is securely supported.
2.
Remove the rear tire and wheel.
3.
Remove the rear brake caliper and Rear disc brake.
(Refer ...
Categories
Hyundai Azera Manuals

© 2011-2024 Copyright www.hgmanual.com