 Hyundai Azera: Rear Upper Arm Repair procedures
Fifth generation HG (2011–2024) / Hyundai Azera 2011-2024 Service Manual / Suspension System / Rear Suspension System / Rear Upper Arm Repair procedures
Hyundai Azera: Rear Upper Arm Repair procedures
Fifth generation HG (2011–2024) / Hyundai Azera 2011-2024 Service Manual / Suspension System / Rear Suspension System / Rear Upper Arm Repair procedures
Fifth generation HG (2011–2024) / Hyundai Azera 2011-2024 Service Manual / Suspension System / Rear Suspension System / Rear Upper Arm Repair procedures
| Removal |
| 1. |
Remove the rear wheel & tire (A).
|


| 2. |
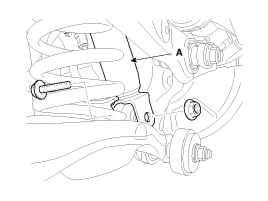
Loosen the bolt & nut and then disconnect the shock absorber (A) with the rear axle.
|

| 3. |
Loosen the bolt & nut and then remove the rear upper arm (A) with the rear axle.
|
| 4. |
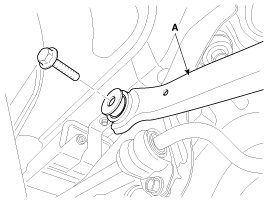
Set up the transmission jack (A) under the lower arm (B).
|
| 5. |
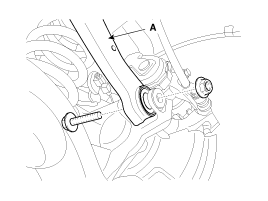
Loosen the bolt & nut and then remove the rear upper arm (A) with the rear axle.
|

| 6. |
Loosen the bolt & nut and then remove the rear upper arm (A) with the sub frame.
|
| Installation |
| 1. |
Installation is the reverse of removal.
|
| Inspection |
| 1. |
Check the bushing for wear and deterioration. |
| 2. |
Check the rear upper arm or damage and deformation. |
| 3. |
Check for all bolts and nut. |
 Rear Shock Absorber Repair procedures
Replacement
1.
Remove the rear wheel & tire (A).
Tightening torque:
88.3 ~ 107.9N.m (9.0 ~ 11.0kgf.m, 65.1 ~ 79.6lb-ft)
Be careful not to damage to the hub bolts w ...
 Rear Lower Arm Repair procedures
Removal
1.
Remove the rear wheel & tire (A).
Tightening torque:
88.3 ~ 107.9N.m (9.0 ~ 11.0kgf.m, 65.1 ~ 79.6lb-ft)
•
Be careful not to damage to the hub bolts ...
See also:
Description and Operation
OBD-II review
1. Overview
The California Air Resources Board (CARB) began regulation of
On Board Diagnostics (OBD) for vehicles sold in California beginning
with the 1988 model year. The first ...
Engine oil and filter
The engine oil and filter should be changed at the intervals specified in the
maintenance schedule. If the car is being driven in severe conditions, more frequent
oil and filter changes are required ...
Repair procedures
Removal
1.
Disconnect the battery negative cable from the battery and then wait for at least 30 seconds.
2.
Turn the steering wheel so that the front wheels can face straight ahead.
3.
R ...
Categories
Hyundai Azera Manuals

© 2011-2024 Copyright www.hgmanual.com