
 Hyundai Azera: Brake Line Repair procedures
Fifth generation HG (2011–2026) / Hyundai Azera 2011-2026 Service Manual / Brake System / Brake System / Brake Line Repair procedures
Hyundai Azera: Brake Line Repair procedures
Fifth generation HG (2011–2026) / Hyundai Azera 2011-2026 Service Manual / Brake System / Brake System / Brake Line Repair procedures
Fifth generation HG (2011–2026) / Hyundai Azera 2011-2026 Service Manual / Brake System / Brake System / Brake Line Repair procedures
| Removal |
| 1. |
Disconnect the brake fiuid level switch connector, and remove the reservoir cap. |
| 2. |
Remove the brake fluid from the master cylinder reservior with a syringe.
|

| 3. |
Remove the wheel & tire. |
| 4. |
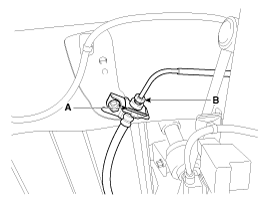
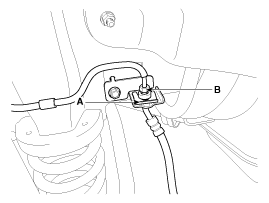
Disconnect the brake tube by loosening the tube flare nut (B).
Front
Rear
|
| 5. |
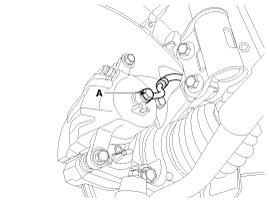
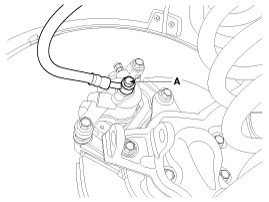
Remove the brake hose clip (A). |
| 6. |
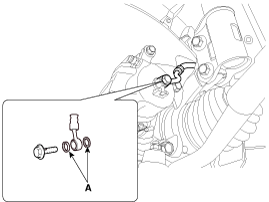
Disconnect the brake hose from the brake caliper by loosening the bolt (A).
Front
Rear
|
| Inspection |
| 1. |
Check the brake tubes for cracks, crimps and corrosion. |
| 2. |
Check the brake hoses for cracks, damage and fluid leakage. |
| 3. |
Check the brake tube flare nuts for damage and fluid leakage. |
| 4. |
Check brake hose mounting bracket for crack or deformation. |
| Installation |
| 1. |
Installation is the reverse of removal.
|
| 2. |
After installation, bleed the brake system.
(Refer to Brake system bleeding) |
| 3. |
Check the spilled brake oil. |
 Brake Line Components and Components Location
Components
...
 Brake Pedal Components and Components Location
Components
1. Cowl bracket2. Brake pedal member assembly3. Stop lamp switch4. Return spring5. Brake pedal stopper6. Clevis pin7. Snap pin8. Brake pedal
...
See also:
Components and Components Location
Components
1. Main crash pad assembly2. Side speaker grille [LH]3. Center speaker grille4. Side speaker grille [RH]5. Alarm speaker assembly6. Center speaker assembly7. Photo sensor 8. Crash pad ...
My Music Mode Menu
If you press the key, you will
have access to the Repeat, Shuffle, List, Info and Delete features.
Repeat
Press the key
Select
Repeat : Repeats the current file.
Shuffle
Press the key
...
CVVT Oil Control Valve (OCV) Schematic Diagrams
Circuit Diagram
...
Categories
Hyundai Azera Manuals

© 2011-2026 Copyright www.hgmanual.com