 Hyundai Azera: Engine Mounting Repair procedures
Fifth generation HG (2011–2026) / Hyundai Azera 2011-2026 Service Manual / Engine Mechanical System / Engine And Transmission Assembly / Engine Mounting Repair procedures
Hyundai Azera: Engine Mounting Repair procedures
Fifth generation HG (2011–2026) / Hyundai Azera 2011-2026 Service Manual / Engine Mechanical System / Engine And Transmission Assembly / Engine Mounting Repair procedures
Fifth generation HG (2011–2026) / Hyundai Azera 2011-2026 Service Manual / Engine Mechanical System / Engine And Transmission Assembly / Engine Mounting Repair procedures
| Removal and Installation |
| [Engine mounting support bracket] |
| 1. |
Install the jack to the edge of upper oil pan (A) to support the engine.
|
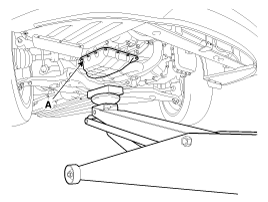

| 2. |
Disconnect the ground cable (A), and then remove the engine mounting support bracket (B).
|
| 3. |
Install in the reverse order of removal. |
| [Engine mounting bracket] |
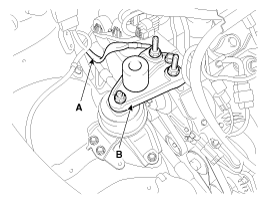
| 1. |
Remove the reservoir tank.
(Refer to Cooling System - "Reservoir Tank") |
| 2. |
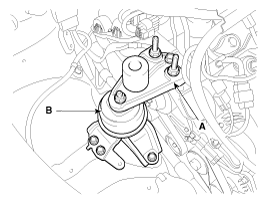
Remove the engine mounting support bracket (A).
|
| 3. |
Remove the engine mounting bracket (B).
|
| 4. |
Install in the reverse order of removal. |
| [Roll rod bracket] |
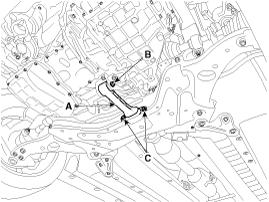
| 1. |
Remove the engine room under cover. |
| 2. |
Remove the roll rod bracket (A).
|

| 3. |
Install in the reverse order of removal. |
 Engine Mounting Components and Components Location
Components
1. Transaxle mounting bracket2. Roll road bracket3. Sub frame4. Engine mounting bracket5. Engine mounting support bracket
...
 Engine And Transmission Assembly Repair procedures
Removal
•
Use fender covers to avoid damaging painted surfaces.
•
To avoid damage, unplug the wiring connectors carefully while holding the connector portion.
...
See also:
Troubleshooting
Troubleshooting
SymptomSuspected areaRepairmentPressing power switch does not turn on systemAVN head unit receiver power source circuitR-2AVN monitorR-15Panel switch does not functionSteering pad ...
Rear Assist Arm Repair procedures
Replacement
1.
Remove the rear wheel & tire (A).
Tightening torque:
88.3 ~ 107.9N.m (9.0 ~ 11.0kgf.m, 65.1 ~ 79.6lb-ft)
•
Be careful not to damage to the hub ...
Output Speed Sensor Description and Operation
Description
The output speed sensor is a vital unit that measures the
rate of rotation of the transaxle's turbine shaft and output shaft, and
delivers the readings to the Transaxle Control Modu ...
Categories
Hyundai Azera Manuals

© 2011-2026 Copyright www.hgmanual.com