 Hyundai Azera: Timing Chain Cover Repair procedures
Fifth generation HG (2011–2026) / Hyundai Azera 2011-2026 Service Manual / Engine Mechanical System / Timing System / Timing Chain Cover Repair procedures
Hyundai Azera: Timing Chain Cover Repair procedures
Fifth generation HG (2011–2026) / Hyundai Azera 2011-2026 Service Manual / Engine Mechanical System / Timing System / Timing Chain Cover Repair procedures
Fifth generation HG (2011–2026) / Hyundai Azera 2011-2026 Service Manual / Engine Mechanical System / Timing System / Timing Chain Cover Repair procedures
| Removal |
| 1. |
Remove the LH/RH cylinder head cover.
(Refer to Cylinder Head Assembly - "Cylinder Head Cover") |
| 2. |
Remove the lower oil pan.
(Refer to Lubrication System - "Oil Pan") |
| 3. |
Remove the drive belt auto tensioner.
(Refer to Timing System - "Drive Belt Tensioner") |
| 4. |
Remove the crankshaft damper pulley.
(Refer to Timing System - "Crankshaft Damper Pulley") |
| 5. |
Remove the engine mounting bracket.
(Refer to Engine And Transmission Assembly - "Engine Mounting") |
| 6. |
Lift up the engine assembly slightly by using a jack to get access to the side of engine. |
| 7. |
Remove the water pump and gasket.
(Refer to Cooling System - "Water Pump") |
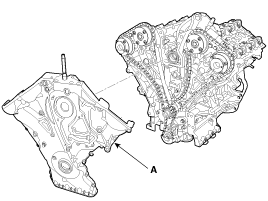
| 8. |
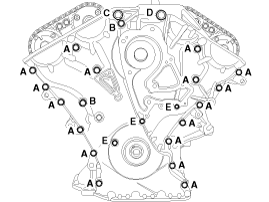
Remove the timing chain cover (A).
|

| Installation |
| 1. |
Install the timing chain cover.
|
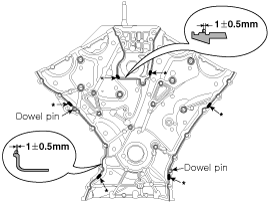

| 2. |
Install the front oil seal.
(Refer to Timing System - "Front Oil Seal") |
| 3. |
Install the other parts reverse order of removal.
|
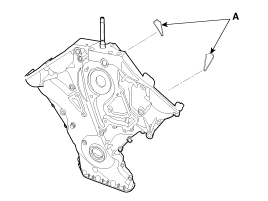
 Timing Chain Cover Components and Components Location
Components
1. Timing chain cover2. Gasket
...
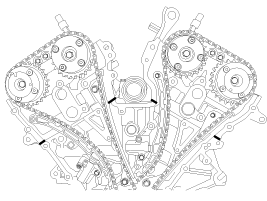
 Timing Chain Components and Components Location
Components
1. Oil pump chain cover2. Oil pump sprocket3. Oil pump chain 4. Oil pump tensioner assembly5. Crankshaft oil pump sprocket6. Crankshaft RH chain sprocket7. RH Timing chain auto tension ...
See also:
Smart key functions
1. Door lock
2. Door unlock
3. Trunk open
4. Alarm
With a smart key, you can lock or unlock a door (and trunk) and even start the
engine without inserting the key. Refer to the following, for mor ...
SS-A Solenoid Valve(ON/OFF) Repair procedures
Inspection
1.
Turn ignition switch OFF.
2.
Disconnect the solenoid valve connector.
3.
Measure resistance between sensor signal terminal and sensor ground terminal.
4.
Check that the ...
CVVT Oil Temperature Sensor (OTS) Schematic Diagrams
Circuit Diagram
...
Categories
Hyundai Azera Manuals

© 2011-2026 Copyright www.hgmanual.com