 Hyundai Azera: ESC Control Module Repair procedures
Fifth generation HG (2011–2026) / Hyundai Azera 2011-2026 Service Manual / Brake System / ESC(Electronic Stability Control) System / ESC Control Module Repair procedures
Hyundai Azera: ESC Control Module Repair procedures
Fifth generation HG (2011–2026) / Hyundai Azera 2011-2026 Service Manual / Brake System / ESC(Electronic Stability Control) System / ESC Control Module Repair procedures
Fifth generation HG (2011–2026) / Hyundai Azera 2011-2026 Service Manual / Brake System / ESC(Electronic Stability Control) System / ESC Control Module Repair procedures
| Removal |
| 1. |
Turn the ignition switch OFF. |
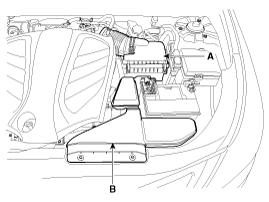
| 2. |
Remove the air duct (B) and air cleaner assembly (A).
|
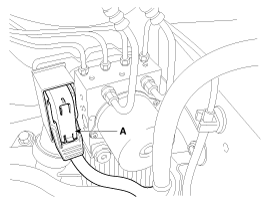
| 3. |
Remove the connector and then arrange the wiring harness (A).
|
| 4. |
Remove the brake fluid from the master cylinder reservoir with a syringe.
|

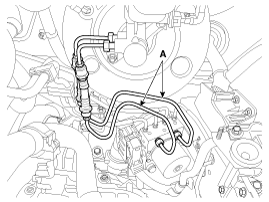
| 5. |
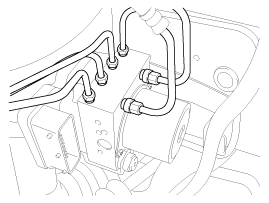
Loosen the flare nuts and then remove the brake tube (A).
|
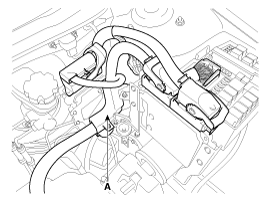
| 6. |
Pull up the lock of the HECU connector (A) and then disconnect the connector.
|
| 7. |
Disconnect the brake tubes from the HECU by unlocking the nuts counterclockwise with a spanner.
|
| 8. |
Loosen the HECU bracket bolts (A) and then remove HECU and bracket.
|

| 9. |
Remove the bolts and then remove the bracket from HECU.
|
| Installation |
| 1. |
Installation is the reverse of removal. |
| 2. |
Tighten the HECU mounting bolts and nuts to the specified torque. |
| 3. |
After installation, bleed the brake system.
(Refer to Brake system - "Bleeding") |
 ESC Control Module Components and Components Location
Components
1. Front - left tube2. Rear - right tube3. Rear - left tube4. Front - right tube5. MC26. MC17. ESC control module (HECU)8. Damper9. Bracket
...
 Front Wheel Speed Sensor Components and Components Location
Components
1. Front wheel speed sensor2. Front wheel speed sensor connector
...
See also:
Fuses
...
Vehicle identification number (VIN)
The vehicle identification number (VIN) is the number used in registering your
car and in all legal matters pertaining to its ownership, etc.
The number is punched on the engine compartment bulkhe ...
Components and Components Location
Component Location
1. Start Stop Button(SSB)2. FOB key3. Smart key unit4. RF receiver5. Interior antenna 16. Interior antenna 2 7. Trunk antenna8. Door handle & ...
Categories
Hyundai Azera Manuals

© 2011-2026 Copyright www.hgmanual.com