
 Hyundai Azera: Fuel Pump Repair procedures
Fifth generation HG (2011–2026) / Hyundai Azera 2011-2026 Service Manual / Engine Control/Fuel System / Fuel Delivery System / Fuel Pump Repair procedures
Hyundai Azera: Fuel Pump Repair procedures
Fifth generation HG (2011–2026) / Hyundai Azera 2011-2026 Service Manual / Engine Control/Fuel System / Fuel Delivery System / Fuel Pump Repair procedures
Fifth generation HG (2011–2026) / Hyundai Azera 2011-2026 Service Manual / Engine Control/Fuel System / Fuel Delivery System / Fuel Pump Repair procedures
| Inspection |
[Fuel pump]
| 1. |
Turn the ignition switch OFF, and then remove battery (-) cable. |
| 2. |
Remove the fuel pump assembly. |
| 3. |
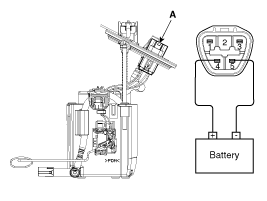
Check motor operation by fuel pump connector (A) connecting power (No.4) and ground (No.5).
|
[Fuel sender]
| 1. |
Turn the ignition switch OFF, and then remove battery (-) cable. |
| 2. |
Remove the fuel pump assembly. |
| 3. |
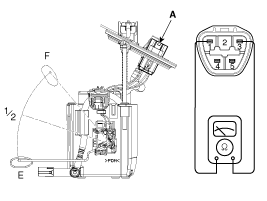
Using an ohmmeter, measure the resistance between terminals 1 and 3 of sender connector (A) at each float level.
|
| 4. |
Also check that the resistance changes smoothly when the float is moved from "E" to "F".
|
| Removal |
| 1. |
Release the residual pressure in fuel line.
(Refer to Fuel Delivery System - “Release Residual Pressure in Fuel Line�) |
| 2. |
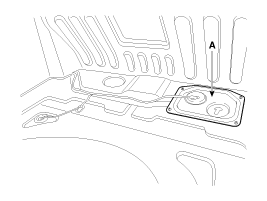
Remove the fuel pump service cover (A) in the trunk.
|
| 3. |
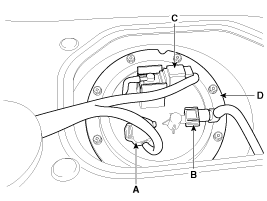
Disconnect the fuel pump connector (A) and the fuel tank pressure sensor connector (B). |
| 4. |
Disconnect the fuel feed tube quick connector (C). |
| 5. |
Remove the fuel pump plate cover (D) after removing the bolts.
|
| 6. |
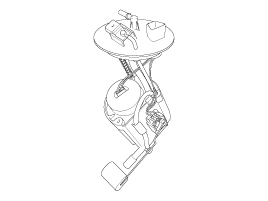
Remove the fuel pump from the fuel tank.
|
| Installation |
| 1. |
Installation is reverse of removal.
|

 Fuel Tank Repair procedures
Removal
1.
Release the residual pressure in fuel line.
(Refer to Fuel Delivery System - “Release Residual Pressure in Fuel Line�)
2.
Remove the fuel pump service cover (A) in the trunk.
...
 Fuel Filter Repair procedures
Removal
1.
Remove the fuel pump.
(Refer to Fuel Delivery System - “Fuel Pump�)
2.
Disconnect the electric pump wiring connector (A) and the fuel sender connector (B).
3.
Remove the c ...
See also:
Front Seat Shield Outer Cover Repair procedures
Replacement
•
Use a plastic panel removal tool to remove interior trim pieces to protect from marring the surface.
•
Take care not to bend or scratch the trim and ...
Vehicle break-in process
No special break-in period is needed. By following a few simple precautions for
the first 600 miles (1,000 km) you may add to the performance, economy and life
of your vehicle.
Do not race the e ...
Tire pressure monitoring system
(1) Low tire pressure telltale / TPMS malfunction indicator
(2) Low tire pressure position telltale (Shown on the LCD display)
Each tire, including the spare (if provided), should be checked month ...
Categories
Hyundai Azera Manuals

© 2011-2026 Copyright www.hgmanual.com