
 Hyundai Azera: Oil Cooler Repair procedures
Fifth generation HG (2011–2026) / Hyundai Azera 2011-2026 Service Manual / Automatic Transaxle System / Hydraulic System / Oil Cooler Repair procedures
Hyundai Azera: Oil Cooler Repair procedures
Fifth generation HG (2011–2026) / Hyundai Azera 2011-2026 Service Manual / Automatic Transaxle System / Hydraulic System / Oil Cooler Repair procedures
Fifth generation HG (2011–2026) / Hyundai Azera 2011-2026 Service Manual / Automatic Transaxle System / Hydraulic System / Oil Cooler Repair procedures
| Removal and Installation |
| 1. |
Remove the radiator upper hose and lower hose.
|
| 2. |
Remove the cooling fan assembly.
|
| 3. |
Disconnect the over flow hose.
|
| 4. |
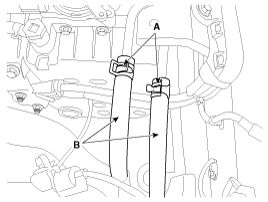
Disconnect the hose (B) after removing the automatic transaxle fluid cooler hose clamp (A).
|
| 5. |
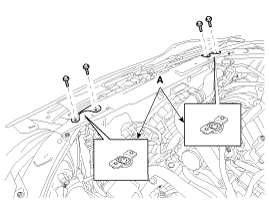
Remove the radiator mounting brackets (A).
|
| 6. |
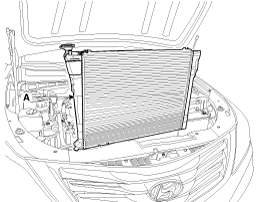
Separate the condenser from the radiator and then pull radiator (A) up and remove it from engine room.
|
| 7. |
Installation is in the reverse order of removal. |
| 8. |
Fill the radiator with coolant and check for leaks.
|

| Inspection |
Radiator Cap Testing
| 1. |
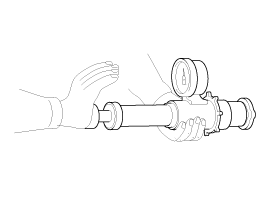
Remove the radiator cap, wet its seal with engine coolant, and then install it on a pressure tester.
|
| 2. |
Apply a pressure of 93.16 ~ 122.58kpa (0.95 ~ 1.25kg/cm?, 13.51 ~ 17.78psi). |
| 3. |
Check for a drop in pressure. |
| 4. |
If the pressure drops, replace the cap. |
Radiator Leakage Test
| 1. |
Wait until engine is cool, then carefully remove the radiator
cap and fill the radiator with engine coolant, then install it on the
pressure tester. |
| 2. |
Apply a pressure tester to the radiator and apply a pressure of 93.16 ~ 122.58kpa (0.95 ~ 1.25kg/cm?, 13.51 ~ 17.78psi). |
| 3. |
Inspect for engine coolant leaks and a drop in pressure. |
| 4. |
Remove the tester and reinstall the radiator cap.
|
 Oil Cooler Components and Components Location
Components
1. Radiator2. Radiator mounting bracket3. Radiator cap4. Drain plug5. Mounting insulator
...
 Oil Pump Description and Operation
Description
The oil pump is built-in as a single unit with the 26 Brake
chamber. Rotation of the pump builds the hydraulic pressure needed for
the lubrication of the various parts of the transa ...
See also:
Exterior care
Exterior general caution
It is very important to follow the label directions when using any chemical cleaner
or polish. Read all warning and caution statements that appear on the label.
Finish main ...
Emission control system
The emission control system of your vehicle is covered by a written limited warranty.
Please see the warranty information contained in the Owner’s Handbook & Warranty
Information booklet in yo ...
Rear Back Armrest Cup Holder Repair procedures
Replacement
•
Use a plastic panel removal tool to remove interior trim pieces to protect from marring the surface.
•
Take care not to bend or scratch the trim and ...
Categories
Hyundai Azera Manuals

© 2011-2026 Copyright www.hgmanual.com