 Hyundai Azera: Programming
To train most devices, follow these instructions:
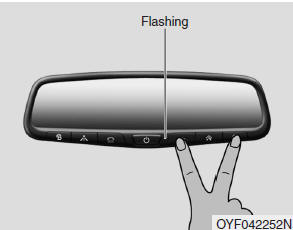
1. For first-time programming, press and hold the two outside buttons (
,  ), HomeLink® Channel 1 and Channel
3, until the indicator light begins to flash (after 10 seconds). Release both buttons.
Do not hold the buttons for longer than 20 seconds.
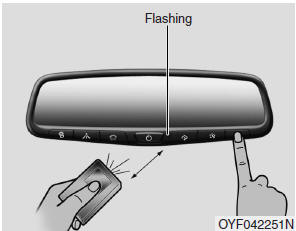
2. Position the end of your hand-held transmitter 1-3 inches (2-8 cm) away from
the HomeLink® button you wish to program while keeping the indicator light in view.
3. Simultaneously press and hold both the HomeLink® and handheld transmitter buttons
until the HomeLink® indicator light changes from a slow to a rapid blinking light.
Now you may release both the HomeLink® and hand-held transmitter buttons.
✽ NOTICE
Some devices may require you to replace this Programming step 3 with procedures noted in the "Gate Operator/Canadian Programming" section. If the HomeLink® indicator light does not change to a rapidly blinking light after performing these steps, contact HomeLink® at www.homelink.com.
4. Firmly press, hold for 5 seconds and release the programmed HomeLink® button up to two separate times to activate the door. If the door does not activate, press and hold the just-trained HomeLink® button and observe the indicator light.
- If the indicator light stays on constantly, programming is complete and your device should activate when the HomeLink® button is pressed and released.
- If the indicator light blinks rapidly for 2 seconds and then turns to a constant light, continue with "Programming" steps 5-7 to complete the programming of a rolling code equipped device (most commonly a garage door opener).
5. At the garage door opener receiver (motor-head unit) in the garage, locate
the "leam" or "smart" button. This can usually be found where the hanging antenna
wire is attached to the motor-head unit.
6. Firmly press and release the "leam" or "smart" button. (The name and color of
the button vary by manufacturer). There are 30 seconds to initiate step 7.
7. Return to the vehicle and firmly press, hold for 2 seconds and release the programmed
HomeLink® button. Repeat the "press/hold/release" sequence a second time, and, depending
on the brand of the garage door opener (or other rolling code equipped device),
repeat this sequence a third time to complete the programming process.
HomeLink® should now activate your rolling code equipped device.
 Integrated HomeLink® Wireless Control System
The HomeLink® Wireless Control System provides a convenient way to replace up
to three hand-held radiofrequency (RF) transmitters with a single built-in device.
This innovative feature will learn t ...
 Gate operator & Canadian programming
During programming, your handheld transmitter may automatically stop transmitting.
Continue to press the Integrated HomeLink® Wireless Control System button (note
steps 2 through 4 in the Standard ...
See also:
Recommended lubricants and capacities
To help achieve proper engine and powertrain performance and durability, use
only lubricants of the proper quality. The correct lubricants also help promote
engine efficiency that results in improve ...
Hazard Lamp Switch Repair procedures
Removal
1.
Disconnect the negative(-) battery terminal.
2.
Remove the center console upper assembly (A) with hazard lamp switch.
Apply the protective tapes to the center ...
Components and Components Location
Components
1. Headrest2. Headrest guide3. Front seat back cover4. Front seat back pad5. Front seat back warmer6. Front seat back board7. Front seat back frame assembly8. Front seat cushion frame ...
Categories
Hyundai Azera Manuals
