 Hyundai Azera: Dynamic Damper Repair procedures
Fifth generation HG (2011–2026) / Hyundai Azera 2011-2026 Service Manual / Driveshaft and axle / Driveshaft Assembly / Dynamic Damper Repair procedures
Hyundai Azera: Dynamic Damper Repair procedures
Fifth generation HG (2011–2026) / Hyundai Azera 2011-2026 Service Manual / Driveshaft and axle / Driveshaft Assembly / Dynamic Damper Repair procedures
Fifth generation HG (2011–2026) / Hyundai Azera 2011-2026 Service Manual / Driveshaft and axle / Driveshaft Assembly / Dynamic Damper Repair procedures
| Replacement |
| 1. |
Remove the front driveshaft.
(Refer to Driveshaft Assembly - “Front Driveshaft”) |
| 2. |
Remove the TJ joint assembly.
(Refer to Driveshaft Assembly - “TJ Joint”) |
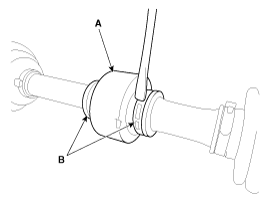
| 3. |
Using a pillar or flat-tipped(-) screwdriver, remove the both side of clamp(B) of the dynamic damper(A).
|
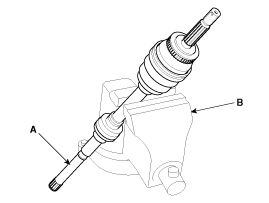
| 4. |
Fix the driveshaft (A) with a vice (B) as illustrated.
|
| 5. |
Apply soap powder on the shaft to prevent being damaged
between the shaft spline and the dynamic damper when the dynamic damper
is removed. |
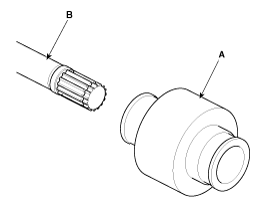
| 6. |
Seperate the dynamic damper (A) from the shaft (B) carefully.
|
| Installation |
| 1. |
Apply soap powder on the shaft to prevent being damaged between the shaft spline and the dynamic damper. |
| 2. |
Install the dynamic damper (A). |
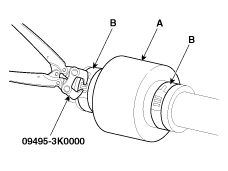
| 3. |
Using the SST(09495-3K000), secure the dynamic damper bands (B).
|
| 4. |
Install the TJ joint assembly.
(Refer to Driveshaft Assembly - “TJ Joint”) |
| 5. |
Install the front driveshaft.
(Refer to Driveshaft Assembly - “Front Driveshaft”) |
 Dynamic Damper Components and Components Location
Components
1. BJ assembly2. Circlip3. BJ boot band4. BJ boot 5. Dynamic damper band6. Dynamic damper7. Shaft8. TJ boot band 9. TJ boot10. Spider assembly11. Snap ring12. TJ case 13. Circlip
...
 BJ Boot Components and Components Location
Components
[LH]
1. BJ assembly2. Circlip3. BJ boot band4. BJ boot 5. Dynamic damper band6. Dynamic damper7. Shaft8. TJ boot band 9. TJ boot10. Spider assembly11. Snap ring12. TJ case 13. Circl ...
See also:
Use high quality ethylene glycol coolant
Your vehicle is delivered with high quality ethylene glycol coolant in the cooling
system. It is the only type of coolant that should be used because it helps prevent
corrosion in the cooling system ...
Tire specification and pressure label
The tires supplied on your new vehicle are chosen to provide the best performance
for normal driving.
The tire label located on the driver's side center pillar gives the tire pressures
recomm ...
Seat Belt Pretensioner (BPT) Description and Operation
Description
The Seat Belt Pretensioners (BPT) are installed inside Center
Pillar (LH & RH). When a vehicle crashes with a certain degree of
frontal impact, the pretensioner seat belt helps ...
Categories
Hyundai Azera Manuals

© 2011-2026 Copyright www.hgmanual.com