 Hyundai Azera: Valve Body Repair procedures
Fifth generation HG (2011–2026) / Hyundai Azera 2011-2026 Service Manual / Automatic Transaxle System / Hydraulic System / Valve Body Repair procedures
Hyundai Azera: Valve Body Repair procedures
Fifth generation HG (2011–2026) / Hyundai Azera 2011-2026 Service Manual / Automatic Transaxle System / Hydraulic System / Valve Body Repair procedures
Fifth generation HG (2011–2026) / Hyundai Azera 2011-2026 Service Manual / Automatic Transaxle System / Hydraulic System / Valve Body Repair procedures
| Removal |
| 1. |
Remove the battery and the battery tray.
|
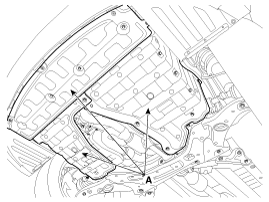
| 2. |
Remove the under cover (A).
|
| 3. |
Replace new gasket and the plug after draining the automatic transaxle fluid by removing the drain plug.
(Refer to Hydraulic System - "Fluid") |
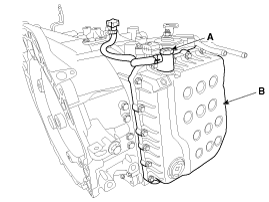
| 4. |
Remove the valve body cover (B) and eyebolt (A).
|

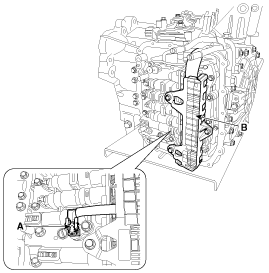
| 5. |
Remove the bolt (3ea) after disconnecting the solenoid valve connector (B) and the oil temperature sensor connector (A).
|
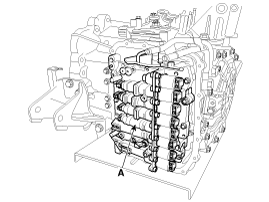
| 6. |
Remove the valve body assembly (A).
|
| Installation |
| 1. |
Installation is the reverse of removal. |
After replacement or reinstallation procedure of the valve body assembly, must perform procedures below. |
|

 Valve Body Components and Components Location
Components Location
1. PCV adjust screw2. Solenoid valve3. Oil temperature sensor4. Accumulator5. Low & reverse brake(LR/B) pressure flow hole6. Under drive brake (UD/B) pressure flow hole
...
 Clutch & Brake
...
See also:
Roof Trim Assembly Components and Components Location
Component Location
1. Roof Trim Assembly
...
Closing the trunk
To close, lower the trunk lid, then press down on it until it locks. To be sure
the trunk lid is securely fastened, always check by trying to pull it up again.
Once the trunk is opened and then clos ...
MTS Antenna Components and Components Location
Components
...
Categories
Hyundai Azera Manuals

© 2011-2026 Copyright www.hgmanual.com