 Hyundai Azera: Speakers Repair procedures
Fifth generation HG (2011–2026) / Hyundai Azera 2011-2026 Service Manual / Body Electrical System / AVN System / Speakers Repair procedures
Hyundai Azera: Speakers Repair procedures
Fifth generation HG (2011–2026) / Hyundai Azera 2011-2026 Service Manual / Body Electrical System / AVN System / Speakers Repair procedures
Fifth generation HG (2011–2026) / Hyundai Azera 2011-2026 Service Manual / Body Electrical System / AVN System / Speakers Repair procedures
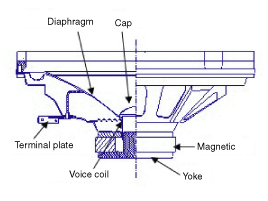
| Inspection |
| 1. |
Troubleshooting for Speaker
| ||||||||||||||||||||||||||||||||||||||


| Removal |
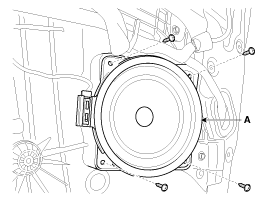
Front Speaker
| 1. |
Remove the front door trim panel.
|
| 2. |
Remove the front speaker (A) after loosening 4 screws.
|
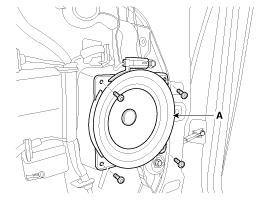
Rear Speaker
| 1. |
Remove the rear door trim panel.
|
| 2. |
Remove the rear speaker (A) after removing 4 screws.
|
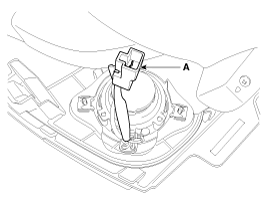
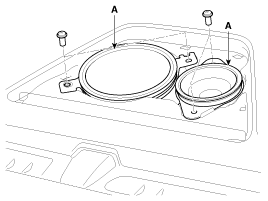
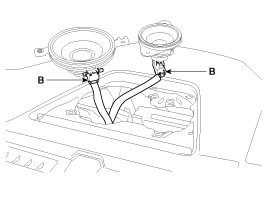
Crash Pad Midrange Speaker
| 1. |
Remove the main crash pad.
|
| 2. |
Disconnect the midrange speaker connector (A).
|
| 3. |
Remove the crash pad side speaker grill (A).
|
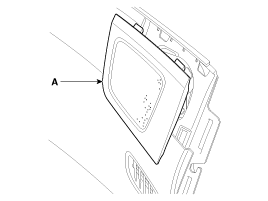
| 4. |
Remove the midrange speaker (A) after loosening the mounting screws.
|
Rear Tweeter Speaker
| 1. |
Remove the rear door trim.
|
| 2. |
Remove the rear tweeter speaker (A) after looseningthe screws (2EA).
|
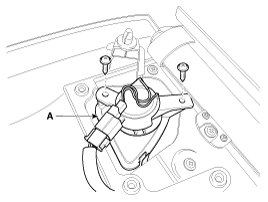
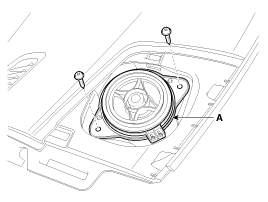
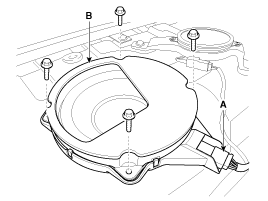
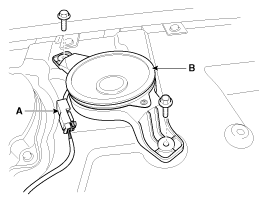
Subwoofer Speaker
| 1. |
Romove the rear seat.
|
| 2. |
Remove the rear package tray.
|
| 3. |
Disconnect the subwoofer speaker connector (A). |
| 4. |
Remove the subwoofer speaker (B) after removing 4 bolts.
|
Center Speaker
| 1. |
Remove the center speaker grill (A).
|
| 2. |
Remove the center speaker (A) after loosening the screws (2EA) and disconnecting the connector (B).
|
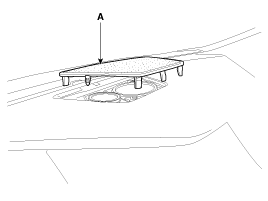
Rear Surround Speaker
| 1. |
Remove the rear seat.
|
| 2. |
Remove the rear package tray.
|
| 3. |
Disconnect the rear surround speaker connector (A). |
| 4. |
Remove the rear surround speaker (B) after removing 2 bolts.
|
| Installation |
Front Speaker
| 1. |
Install the front speaker. |
| 2. |
Install the front door trim. |
Rear Speaker
| 1. |
Install the rear speaker. |
| 2. |
Install the rear door trim. |
Midrange speaker
| 1. |
Install front the midrange speaker. |
| 2. |
Install front the midrange speaker connector. |
| 3. |
Install the speaker grill. |
Rear Tweeter Speaker
| 1. |
Install the rear tweeter speaker. |
| 2. |
Install the rear door trim. |
Subwoofer Speaker
| 1. |
Install the subwoofer speaker after connecting the connector. |
| 2. |
Install the rear package tray and rear seat assembly. |
Center Speaker
| 1. |
Connecting the center speaker connector. |
| 2. |
Install the center speaker. |
| 3. |
Install the crash pad center speaker grill. |
Rear Surround Speaker
| 1. |
Install the rear surround speaker. |
| 2. |
Connecting the connector. |
| 3. |
Install the rear package tray. |
| 4. |
Install the rear seat. |
 Multimedia Jack Repair procedures
Removal
1.
Remove the center fascia tray.
(Refer to Body - "Floor Console Assembly")
2.
Disconnect the connectors (A) from center fascia tray.
3.
Remove the multimedia jack (B) from the c ...
 AVN Remote Controller Components and Components Location
Components
...
See also:
Front Bumper Cover Repair procedures
Replacement
•
Use a plastic panel removal tool to remove interior trim pieces to protect from marring the surface.
•
Take care not to bend or scratch the trim and ...
Special Service Tools
Special Tools
Tool(Number and Name)IllustrationUse09495-3K000Band installerInstallation of ear type boot band09495-33000PullerRemove the spider assembly from the driveshaft
...
Rearview camera (If equipped)
The rearview camera will activate when the back-up light is ON with the ignition
switch ON and the shift lever in the R (Reverse) position.
This system is a supplemental system that shows behind t ...
Categories
Hyundai Azera Manuals

© 2011-2026 Copyright www.hgmanual.com