
 Hyundai Azera: AVN Head Unit Components and Components Location
Fifth generation HG (2011–2026) / Hyundai Azera 2011-2026 Service Manual / Body Electrical System / AVN System / AVN Head Unit Components and Components Location
Hyundai Azera: AVN Head Unit Components and Components Location
Fifth generation HG (2011–2026) / Hyundai Azera 2011-2026 Service Manual / Body Electrical System / AVN System / AVN Head Unit Components and Components Location
Fifth generation HG (2011–2026) / Hyundai Azera 2011-2026 Service Manual / Body Electrical System / AVN System / AVN Head Unit Components and Components Location
| Components |
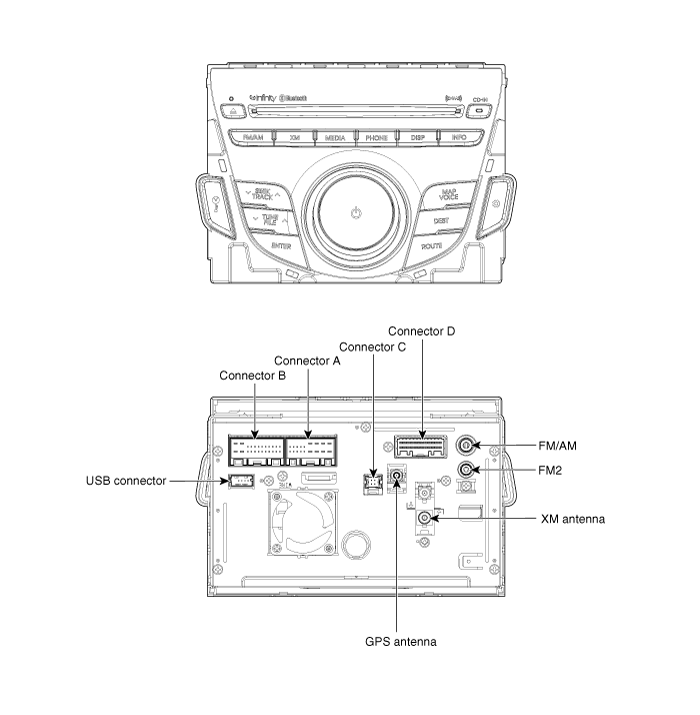
| AVN (A/V & Navigation) Head Unit Connector |
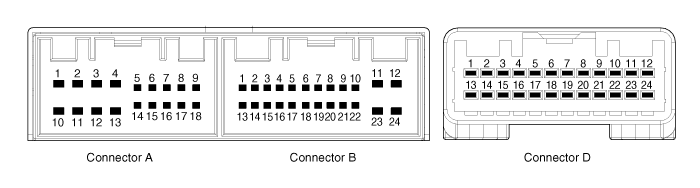
| Pin No. | Description | Comments |
| A1 | - | - |
| A2 | PARKING_V_VIDEO | Rear View Camera Video Signal |
| A3 | PARKING_V_GND | Rear View Camera Video Ground |
| A4 | R/C_SHIELD GND | Rear View Camera Video Shield Ground |
| A5 | SPDIF GND | SPDIF DIGITAL SIGNAL GND |
| A6 | SPDIF + | SPDIF DIGITAL SIGNAL POSITIVE |
| A7 | - | ALT Signal |
| A8 | ILL+ | Rheostat from vehicle + |
| A9 | R_POSITON | R Positon(TGS) signal from Vehicle |
| A10 | - | - |
| A11 | R/C POWER | Rear View Camera Power |
| A12 | NAVI_VOICE- | Navigation Voice channel - |
| A13 | NAVI_VOICE+ | Navigation Voice channel + |
| A14 | PGS/RC | PGS or AVM == GND / RC == No connection |
| A15 | SPDIF - | SPDIF DIGITAL SIGNAL NEGAITIVE |
| A16 | DR KEY UNLOCK | Door Unlock Signal |
| A17 | ILL- | Rheostat from vehicle - |
| A18 | REMOT ANT | Remote supply for motorised antenna |
| B1 | MM CAN HIGH | MM CAN-H I/F |
| B2 | NC (TEL_MUTE) | TELEPHONE MUTE |
| B3 | NC (TEMP) | Temp signal from vehicle |
| B4 | - | STEEL WHEEL REMOTE CONTROL INPUT |
| B5 | - | REAR REMOTE CONTROL INPUT |
| B6 | - | - |
| B7 | AUX_VIDEO | AUX Video Signal |
| B8 | AUX_R_IN | AUX ST SOUND R-CH INPUT |
| B9 | AUX GND | AUX ST SOUND GND |
| B10 | MIC+ | BLUETOOTH H/F VOICE INPUT PIN |
| B11 | ACC | ACC |
| B12 | B+ | Fused battery power supply (10A) |
| B13 | MM CAN LOW | CAN-L I/F |
| B14 | AUTO LIGHT | Automatic Light Signal from Vehicle |
| B15 | P_POSITION | P Positon(TGS) signal from Vehicle |
| B16 | SPEED | Speed signal from vehicle |
| B17 | - | REMOTE CONTROL GND |
| B18 | - | - |
| B19 | AUX_VIDEO_GND | AUX Video Signal GND |
| B20 | AUX_DETECT | AUX CONNECTION DETECT |
| B21 | AUX_L_IN | AUX ST SOUND L-CH INPUT |
| B22 | MIC- | BLUETOOTH H/F VOICE INPUT GND |
| B23 | POWER GND | Ground of Power Supply Line |
| B24 | POWER GND | Ground of Power Supply Line |
| D1 | - | - |
| D2 | - | - |
| D3 | - | - |
| D4 | - | - |
| D5 | - | - |
| D6 | - | - |
| D7 | - | - |
| D8 | - | - |
| D9 | LVDS_PDN | Communication between H/UNIT and Monitor |
| D10 | - | - |
| D11 | - | - |
| D12 | - | - |
| D13 | LVDS_LOCK | Communication between H/UNIT and Monitor |
| D14 | BL_ON | Communication between H/UNIT and Monitor |
| D15 | RS485_RX+ | Communication between H/UNIT and Monitor |
| D16 | RS485_RX- | Communication between H/UNIT and Monitor |
| D17 | GND | Ground of Power Supply Line |
| D18 | RS485_TX- | Communication between H/UNIT and Monitor |
| D19 | RS485_TX+ | Communication between H/UNIT and Monitor |
| D20 | - | - |
| D21 | - | - |
| D22 | - | - |
| D23 | - | - |
| D24 | - | - |
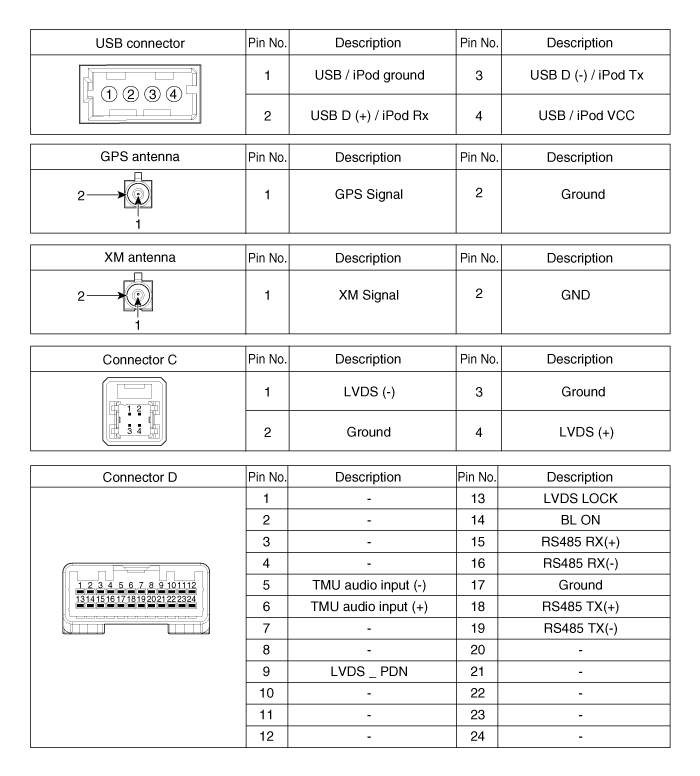
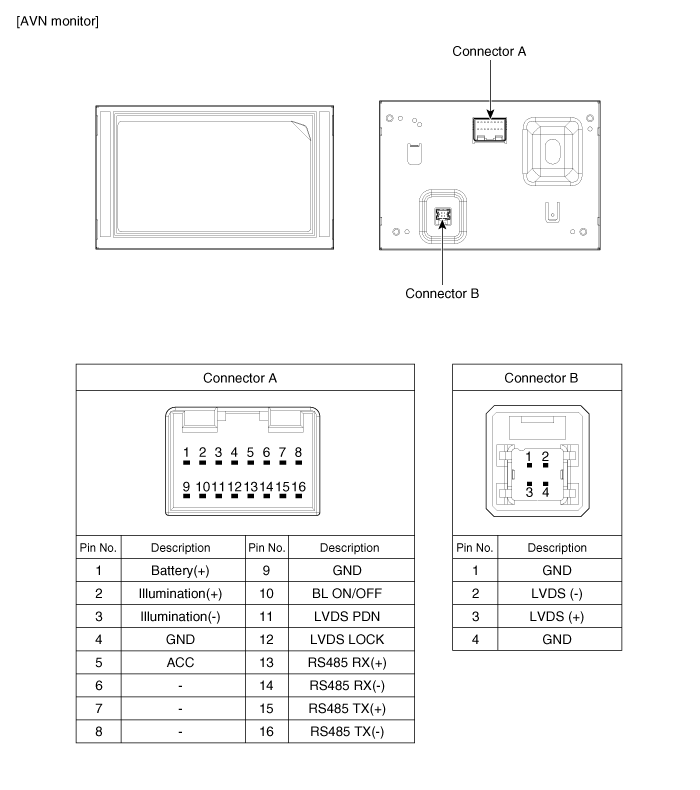
 Description and Operation
Description
Communication network diagram
AbbreviationExplanationC_CANChassis Controller Area NetworkB_CANBody Controller Area NetworkMM_CANMulti media Controller Area NetworkSMKSmart Key ECUDDM ...
 AVN Head Unit Repair procedures
Removal
AVN Head Unit
•
Take care not to scratch the center fascia panel and related parts.
•
Eject all the disc before removing the AVN head unit to prevent dam ...
See also:
Panorama sunroof (If equipped)
If your vehicle is equipped with a sunroof, you can slide or tilt your sunroof
with the sunroof control lever located on the overhead console. The sunroof can
only be opened, closed, or tilted w ...
Main Muffler Components and Components Location
Components
1. Main muffler
...
Knee Airbag (KAB) Module Components and Components Location
Components
...
Categories
Hyundai Azera Manuals

© 2011-2026 Copyright www.hgmanual.com