 Hyundai Azera: Clock/Calendar Setting
Fifth generation HG (2011–2026) / Hyundai Azera 2011-2026 Owners Manual / Features of your vehicle / Using setup / Clock/Calendar Setting
Hyundai Azera: Clock/Calendar Setting
Fifth generation HG (2011–2026) / Hyundai Azera 2011-2026 Owners Manual / Features of your vehicle / Using setup / Clock/Calendar Setting
Clock Setting
Press the ![Select [Clock/ Calendar]](images/books/6/1/page.h542.gif) key
key
![Select [Clock Settings]](images/books/6/1/page.h543.gif) Select [Clock/ Calendar]
Select [Clock/ Calendar]
 Select [Clock Settings]
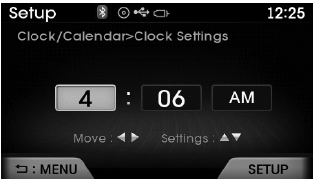
Use  ,
,
 keys to select the Hour, Minutes and
AM/PM setting and use  ,
,
keys to change settings.
Calendar Setting
Press the ![Select [Clock/ Calendar]](images/books/6/1/page.h550.gif) key
key
![Select [Calendar Settings]](images/books/6/1/page.h551.gif) Select [Clock/ Calendar]
Select [Clock/ Calendar]
 Select [Calendar Settings]
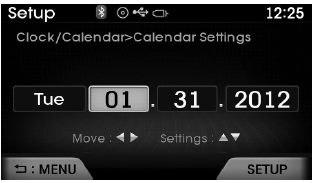
Use  ,
,
 keys to select the Month, Day, and
Year and use  ,
,
 keys to change settings.
Time Format
Press the ![Select [Clock/ Calendar]](images/books/6/1/page.h558.gif) key
key
![Select [Time Format]](images/books/6/1/page.h559.gif) Select [Clock/ Calendar]
Select [Clock/ Calendar]
 Select [Time Format]

This feature is used to change the clock format between 12hr or 24hr.
Clock Display
Press the ![Select [Clock/ Calendar]](images/books/6/1/page.h562.gif) key
key
![Select [Clock Display (Power off)]](images/books/6/1/page.h563.gif) Select [Clock/ Calendar]
Select [Clock/ Calendar]
 Select [Clock Display (Power off)]
This feature is used to display a clock on the screen when the audio system is turned off.
 Sound Settings
Sound Settings
Press the key
Select [Sound]
Select [Sound Setting]
Use ,
keys to adjust the Bass/Middle/Treble
and Fader/ Balance settings.
After selecting the Bass / Mid ...
 Bluetooth® Wireless Technology Setting
Pairing a New Device
Press the key
Select [Phone]
Select [Pair Phone]
Bluetooth® Wireless Technology devices can be paired with the audio system.
For more information, refer to the “Pairi ...
See also:
Canister Close Valve (CCV) Description and Operation
Description
Canister Close Valve (CCV) is installed on the canister
ventilation line. It seals evaporative emission control system by
shutting the canister from the atmosphere when leakage dete ...
Digital clock (if equipped)
WARNING
Do not adjust the clock while driving. You may lose your steering control
and cause an accident that results in severe personal injury or death.
Whenever the battery terminals or relate ...
SS-A Solenoid Valve(ON/OFF) Repair procedures
Inspection
1.
Turn ignition switch OFF.
2.
Disconnect the solenoid valve connector.
3.
Measure resistance between sensor signal terminal and sensor ground terminal.
4.
Check that the ...
Categories
Hyundai Azera Manuals
