 Hyundai Azera: Cylinder Head Cover Repair procedures
Fifth generation HG (2011–2026) / Hyundai Azera 2011-2026 Service Manual / Engine Mechanical System / Cylinder Head Assembly / Cylinder Head Cover Repair procedures
Hyundai Azera: Cylinder Head Cover Repair procedures
Fifth generation HG (2011–2026) / Hyundai Azera 2011-2026 Service Manual / Engine Mechanical System / Cylinder Head Assembly / Cylinder Head Cover Repair procedures
Fifth generation HG (2011–2026) / Hyundai Azera 2011-2026 Service Manual / Engine Mechanical System / Cylinder Head Assembly / Cylinder Head Cover Repair procedures
| Removal |
| [LH] |
| 1. |
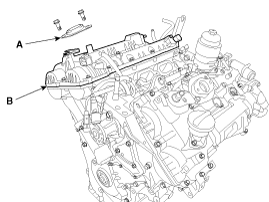
Remove the Intake manifold.
(Refer to Intake And Exhaust System - "Intake Manifold") |
| 2. |
Remove the high pressure fuel pump.
|
| 3. |
Remove the LH ignition coils.
|
| 4. |
Remove the front engine hanger.
(Refer to Engine And Transmission Assembly - "Engine Hanger") |
| 5. |
Remove the LH cylinder head cover.
|


| [RH] |
| 1. |
Remove the surge tank.
(Refer to Intake And Exhaust System - "Surge Tank") |
| 2. |
Remove the RH ignition coils.
|
| 3. |
Remove the RH cylinder head cover.
|
| Installation |
| [LH] |
| 1. |
Install the LH cylinder head cover.
|

| 2. |
Install the other parts reverse order of removal. |
| [RH] |
| 1. |
Install the RH cylinder head cover.
|

| 2. |
Install the other parts reverse order of removal. |
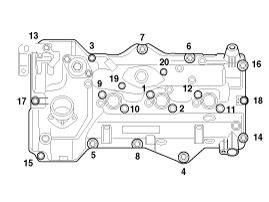
 Cylinder Head Cover Components and Components Location
Components
1. LH cylinder head cover2. LH cylinder head cover gasket3. RH cylinder head cover4. RH cylinder head cover gasket5. Exhaust CVVT OCV cap
...
 CVVT Assembly Components and Components Location
Components
1. RH exhaust CVVT2. RH intake CVVT3. LH intake CVVT4. LH exhaust CVVT
...
See also:
Good driving practices
Never move the shift lever from P (Park) or N (Neutral) to any other position
with the accelerator pedal depressed.
Never move the shift lever into P (Park) when the vehicle is in motion.
Be ...
35R Clutch Control Solenoid Valve(35R/C_VFS) Description and Operation
Description
35R clutch control solenoid valve(35R/C) is attached to the
valve body. This variable force solenoid valve directly controls the
hydraulic pressure inside the 35R clutch. ...
Components and Components Location
Components
1. HECU module2. Front wheel speed sensor3. Rear wheel speed sensor4. Yaw rate & Lateral G sensor5. Steering angle sensor6. ABS Warning lamp7. Parking brake/EBD warning lamp8. ESC ...
Categories
Hyundai Azera Manuals

© 2011-2026 Copyright www.hgmanual.com