 Hyundai Azera: Front seat
Automatic adjustment
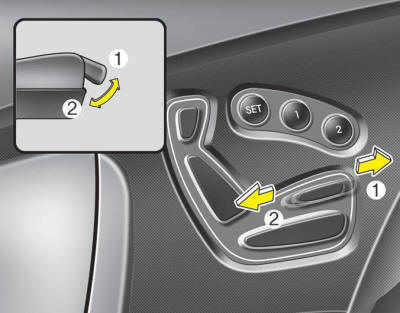
The front seat can be adjusted by using the control switch located on the door and outside of the seat cushion. Before driving, adjust the seat to the proper position so as to easily control the steering wheel, pedals and switches on the instrument panel.
WARNING
The power seat is operable with the ignition OFF. Therefore, children should never be left unattended in the vehicle.
CAUTION
- The power seat is driven by an electric motor. Stop the motor operation once the adjustment is completed. Excessive operation may damage the electrical equipment.
- When in operation, the power seat consumes a large amount of electrical power. To prevent unnecessary charging system drain, do not adjust the power seat longer than necessary while the engine is not running.
- Do not operate two or more power seat control switches at the same time. Doing so may result in power seat motor or electrical component malfunction.
Forward and rearward
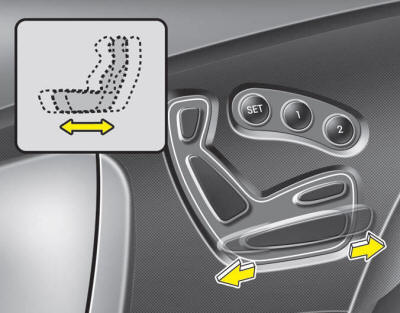
1. Push the control switch forward or rearward to move the seat to the desired
position.
2. Release the switch once the seat reaches the desired position.
Seatback angle
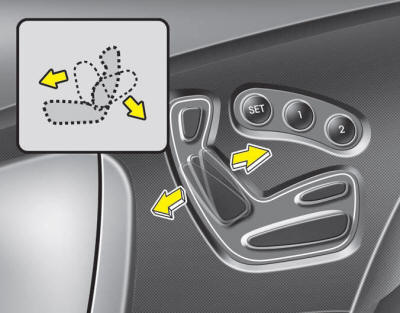
1. Push the upper part of the control switch forward or rearward to move the
seatback to the desired angle.
2. Release the switch once the seat reaches the desired position.
Seat cushion height
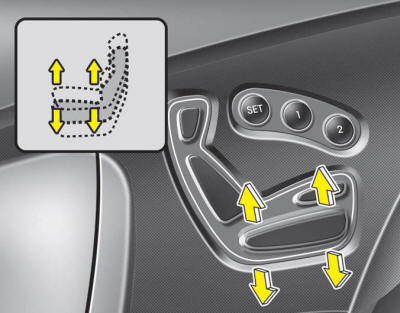
1. Push the front portion of the control switch up to raise or down to lower
the front part of the seat cushion. Push the rear portion of the control switch
up to raise or down to lower the rear part of the seat cushion.
2. Release the switch once the seat reaches the desired position.
Lumbar support (for driver’s seat)
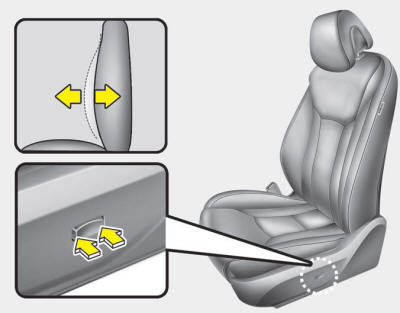
1. Press the front portion of the switch to increase support or the rear portion
of the switch to decrease support.
2. Release the switch once it reaches the desired position.
Cushion extension (for driver's seat, if equipped)
1. Push the switch forward to raise the cushion extension. Push the switch rearward
to lower the cushion extension.
2. Release the switch once the cushion extension reaches the desired position.
Headrest
The driver's and front passenger's seats are equipped with a headrest for the occupant's safety and comfort. The headrest not only provides comfort for the driver and front passenger, but also helps to protect the head and neck in the event of a collision.
For maximum effectiveness in case of an accident, the headrest should be adjusted so the middle of the headrest is at the same height of the center of gravity of an occupant's head. Generally, the center of gravity of most people's head is similar with the height of the top of their eyes.
Also, adjust the headrest as close to your head as possible.
For this reason, the use of a cushion that holds the body away from the seatback is not recommended.
WARNING
- Do not operate the vehicle with the headrests removed as severe injury to the occupants may occur in the event of an accident. Headrests can provide critical neck and head support in a crash.
- Do not adjust the headrest height while the vehicle is in motion. Driver may lose control of the vehicle.
Forward and rearward adjustment
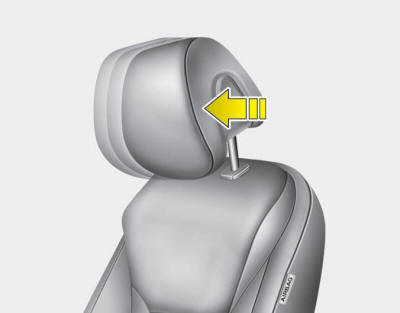
The headrest may be adjusted forward to 4 different positions by pulling the headrest forward to the desired detent. To adjust the headrest to it’s furthest rearward position, pull it fully forward to the farthest position and release it. Adjust the headrest so that it properly supports the head and neck.
Adjusting the height up and down

To raise the headrest, pull it up to the desired position (1). To lower the headrest, push and hold the release button (2) on the headrest support and lower the headrest to the desired position (3).
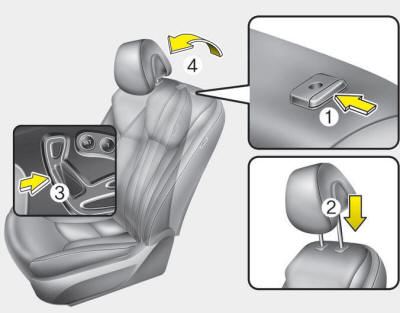
Removal
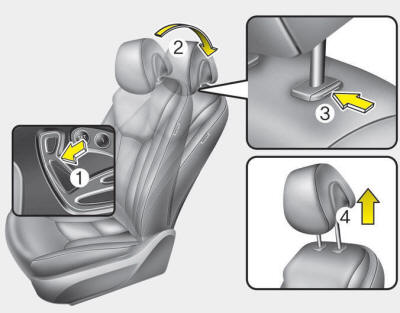
To remove the headrest:
1. Recline the seatback (2) with the recline switch (1).
2. Raise headrest as far as it can go.
3. Press the headrest release button (3) while pulling the headrest up (4).
WARNING
NEVER allow anyone to ride in a seat with the headrest removed.
Reinstall
To reinstall the headrest:
1. Put the headrest poles (2) into the holes while pressing the release button
(1).
2. Recline the seatback (4) with the recline switch (3).
3. Adjust the headrest to the appropriate height.
WARNING
Always make sure the headrest locks into position after reinstalling and adjusting it properly.
Seat warmer (if equipped)
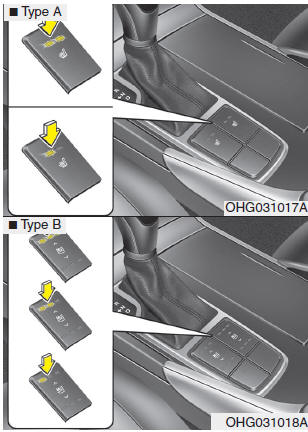
The seat warmer is provided to warm the front seats during cold weather. With the ignition switch in the ON position, push either of the switches to warm the driver's seat or the front passenger's seat.
During mild weather or under conditions where the operation of the seat warmer is not needed, keep the switches in the "OFF" position.
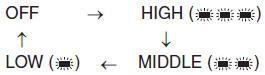
- Each time you press the button, the temperature setting of the seat will change as follows :
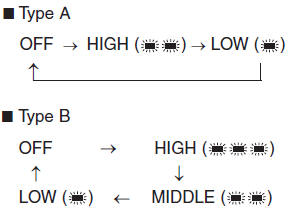
- The seat warmer defaults to the OFF position whenever the ignition switch is turned on.
- With the seat warmer switch in the ON position, the heating system in the seat turns off or on automatically depending on the seat temperature.
CAUTION
- When cleaning the seats, do not use an organic solvent such as paint thinner, benzene, alcohol and gasoline. Doing so may damage the surface of the heater or seats.
- To prevent overheating the seat warmer, do not place anything on the seats that insulates against heat, such as blankets, cushions or seat covers while the seat warmer is in operation.
- Do not place heavy or sharp objects on seats equipped with seat warmers. Damage to the seat warming components could occur.
WARNING - Seat warmer burns
Never allow passengers who may not be able to take care of themselves to be
exposed to the risk of seat heater burns. These include: 1. Infants, children, elderly
or disabled persons, or hospital outpatients
2. Persons with sensitive skin or those that burn easily
3. Fatigued individuals
4. Intoxicated individuals
5. Individuals taking medication that can cause drowsiness or sleepiness (sleeping
pills, cold tablets, etc.)
Air ventilation seat (if equipped)
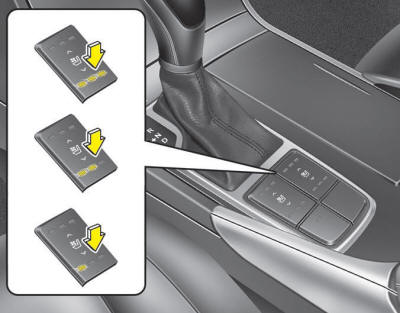
The air ventilation is provided to cool the front seats during hot weather by blowing air through small vent holes on the surface of the seats and seatbacks.
While the engine is running, press the rear portion of the switch to cool the driver's seat or the front passenger's seat.
When the operation of the air ventilation is not needed, keep the switches in the OFF position.
- Each time you press the switch, the airflow changes as follows:
- When the air ventilation seat is turned on, the seat may get cooler after about 5 minutes.
- The air ventilation seat defaults to the OFF position whenever the ignition switch is turned to the ON position.
Seatback pockets
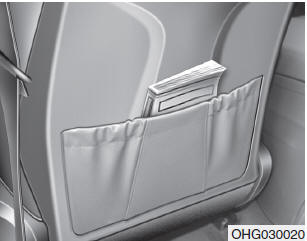
WARNING - Seatback pockets
Do not put heavy or sharp objects in the seatback pocket. An occupant could contact such objects in a crash. Heavy objects in the front passenger seatback could also interfere with the occupant sensing system.
WARNING
For proper operation of the occupant classification system:
- Do not place any items cumulatively weighing over 2.2 lbs (1 kg) in the passenger’s seatback pocket or on the passenger’s seat.
- Do not hang onto the front passenger seatback.
 Seats
Seats
Driver’s seat
(1) Forward and rearward
(2) Seatback angle
(3) Seat cushion height
(4) Lumbar support
(5) Cushion extension
(6) Driver position memory system
(7) Seat warmer/ Seat warmer wit ...
 Rear seat
Headrest
The rear seat is equipped with headrests for the occupant's safety and comfort.
The headrest not only provides comfort for passengers, but also helps to protect
the head and neck i ...
See also:
IMS Power Seat Control Repair procedures
Inspection
1.
It will be able to diagnose defects of IMS with GDS quickly.
GDS can operates actuator forcefully, input/output value monitoring and
self diagnosis.
2.
Select model and "IPM ...
Barometric Pressure Sensor (BPS) Specifications
Specification
Pressure [kPa (kgf/cm?, psi)]Output Voltage (V)10.0 (0.01, 0.15)0.5055.0 (0.56, 7.98)2.21100.0 (1.01, 14.5)3.93115.0 (1.17, 16.9)4.50
...
Underdrive Brake Control Solenoid Valve(UD/B_VFS) Schematic Diagrams
Circuit Diagram
...
Categories
Hyundai Azera Manuals
