 Hyundai Azera: Seats
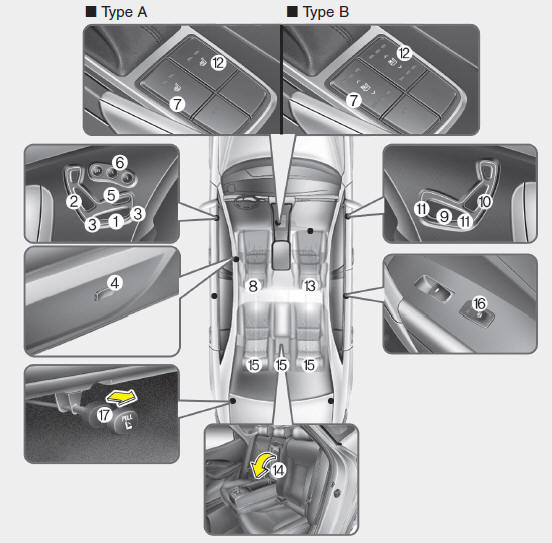
DriverŌĆÖs seat
(1) Forward and rearward
(2) Seatback angle
(3) Seat cushion height
(4) Lumbar support
(5) Cushion extension
(6) Driver position memory system
(7) Seat warmer/ Seat warmer with air ventilation
(8) Headrest
Front passengerŌĆÖs seat
(9) Forward and rearward
(10) Seatback angle
(11) Seat cushion height
(12) Seat warmer /Seat warmer with air ventilation
(13) Headrest
Rear seat
(14) Armrest
(15) Headrest
(16) Seat warmer
(17) Seat folding
WARNING - Loose objects
Loose objects in the driverŌĆÖs foot area could interfere with the operation of the foot pedals, possibly causing an accident. Do not place anything under the front seats.
WARNING - Driver responsibility for passengers
The driver must advise the passenger to keep the seatback in an upright position whenever the vehicle is in motion. If a seat is reclined during an accident, the occupantŌĆÖs hips may slide under the lap portion of the seat belt applying great force to the unprotected abdomen. Serious or fatal internal injuries could result.
WARNING
Occupants should never sit on seat cushions. The passenger's hips may slide under the lap portion of the seat belt during an accident or a sudden stop. Serious or fatal internal injuries could result because the seat belt cannot operate normally.
WARNING - DriverŌĆÖs seat
To avoid serious injury or death:
- Never attempt to adjust the seat while the vehicle is moving. This could result in loss of control, and an accident causing death, serious injury, or property damage.
- Do not allow anything to interfere with the normal position of the seatback. Storing items against a seatback or in any other way interfering with proper locking of a seatback could result in serious or fatal injury in a sudden stop or collision.
- In order to avoid unnecessary and perhaps severe air bag injuries, always sit as far back as possible from the steering wheel while maintaining comfortable control of the vehicle. A distance of at least 10 inches from your chest to the steering wheel is recommended.
WARNING - Rear seatbacks
Always lock the rear seatback before driving. Failure to do so could result in passengers or objects being thrown forward injuring vehicle occupants.
WARNING - Seat adjustment
- Do not adjust the seat while wearing seat belts.Moving the seat cushion forward may cause strong pressure on the abdomen.
- Use extreme caution so that hands or other objects are not caught in the seat mechanisms while the seat is moving.

 Front seat
Automatic adjustment
The front seat can be adjusted by using the control switch located on the door
and outside of the seat cushion. Before driving, adjust the seat to the proper position
so as to ...
See also:
Fuel Pressure Regulator Repair procedures
Removal
1.
Remove the fuel pump.
(Refer to Fuel Delivery System - ŌĆ£Fuel PumpŌĆØ)
2.
Disconnect the electric pump wiring connector (A) and the fuel sender connector (B).
3.
Remove the c ...
Filter replacement
It must be replaced when necessary, and should not be washed.
You can clean the filter when inspecting the air cleaner element.
1. Loosen the air cleaner cover attaching clips and open the cover ...
Schematic Diagrams
Circuit Diagram
...
Categories
Hyundai Azera Manuals
