 Hyundai Azera: AVN Head Unit Components and Components Location
Fifth generation HG (2011–2026) / Hyundai Azera 2011-2026 Service Manual / Body Electrical System / AVN System / AVN Head Unit Components and Components Location
Hyundai Azera: AVN Head Unit Components and Components Location
Fifth generation HG (2011–2026) / Hyundai Azera 2011-2026 Service Manual / Body Electrical System / AVN System / AVN Head Unit Components and Components Location
Fifth generation HG (2011–2026) / Hyundai Azera 2011-2026 Service Manual / Body Electrical System / AVN System / AVN Head Unit Components and Components Location
| Components |

| AVN (A/V & Navigation) Head Unit Connector |
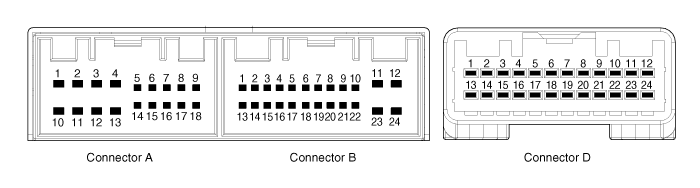
| Pin No. | Description | Comments |
| A1 | - | - |
| A2 | PARKING_V_VIDEO | Rear View Camera Video Signal |
| A3 | PARKING_V_GND | Rear View Camera Video Ground |
| A4 | R/C_SHIELD GND | Rear View Camera Video Shield Ground |
| A5 | SPDIF GND | SPDIF DIGITAL SIGNAL GND |
| A6 | SPDIF + | SPDIF DIGITAL SIGNAL POSITIVE |
| A7 | - | ALT Signal |
| A8 | ILL+ | Rheostat from vehicle + |
| A9 | R_POSITON | R Positon(TGS) signal from Vehicle |
| A10 | - | - |
| A11 | R/C POWER | Rear View Camera Power |
| A12 | NAVI_VOICE- | Navigation Voice channel - |
| A13 | NAVI_VOICE+ | Navigation Voice channel + |
| A14 | PGS/RC | PGS or AVM == GND / RC == No connection |
| A15 | SPDIF - | SPDIF DIGITAL SIGNAL NEGAITIVE |
| A16 | DR KEY UNLOCK | Door Unlock Signal |
| A17 | ILL- | Rheostat from vehicle - |
| A18 | REMOT ANT | Remote supply for motorised antenna |
| B1 | MM CAN HIGH | MM CAN-H I/F |
| B2 | NC (TEL_MUTE) | TELEPHONE MUTE |
| B3 | NC (TEMP) | Temp signal from vehicle |
| B4 | - | STEEL WHEEL REMOTE CONTROL INPUT |
| B5 | - | REAR REMOTE CONTROL INPUT |
| B6 | - | - |
| B7 | AUX_VIDEO | AUX Video Signal |
| B8 | AUX_R_IN | AUX ST SOUND R-CH INPUT |
| B9 | AUX GND | AUX ST SOUND GND |
| B10 | MIC+ | BLUETOOTH H/F VOICE INPUT PIN |
| B11 | ACC | ACC |
| B12 | B+ | Fused battery power supply (10A) |
| B13 | MM CAN LOW | CAN-L I/F |
| B14 | AUTO LIGHT | Automatic Light Signal from Vehicle |
| B15 | P_POSITION | P Positon(TGS) signal from Vehicle |
| B16 | SPEED | Speed signal from vehicle |
| B17 | - | REMOTE CONTROL GND |
| B18 | - | - |
| B19 | AUX_VIDEO_GND | AUX Video Signal GND |
| B20 | AUX_DETECT | AUX CONNECTION DETECT |
| B21 | AUX_L_IN | AUX ST SOUND L-CH INPUT |
| B22 | MIC- | BLUETOOTH H/F VOICE INPUT GND |
| B23 | POWER GND | Ground of Power Supply Line |
| B24 | POWER GND | Ground of Power Supply Line |
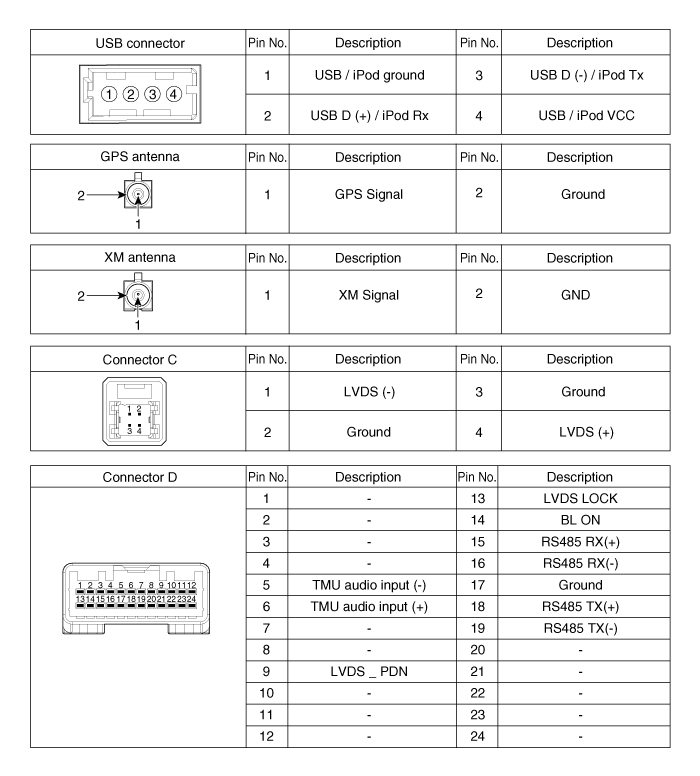
| D1 | - | - |
| D2 | - | - |
| D3 | - | - |
| D4 | - | - |
| D5 | - | - |
| D6 | - | - |
| D7 | - | - |
| D8 | - | - |
| D9 | LVDS_PDN | Communication between H/UNIT and Monitor |
| D10 | - | - |
| D11 | - | - |
| D12 | - | - |
| D13 | LVDS_LOCK | Communication between H/UNIT and Monitor |
| D14 | BL_ON | Communication between H/UNIT and Monitor |
| D15 | RS485_RX+ | Communication between H/UNIT and Monitor |
| D16 | RS485_RX- | Communication between H/UNIT and Monitor |
| D17 | GND | Ground of Power Supply Line |
| D18 | RS485_TX- | Communication between H/UNIT and Monitor |
| D19 | RS485_TX+ | Communication between H/UNIT and Monitor |
| D20 | - | - |
| D21 | - | - |
| D22 | - | - |
| D23 | - | - |
| D24 | - | - |

 Description and Operation
Description
Communication network diagram
AbbreviationExplanationC_CANChassis Controller Area NetworkB_CANBody Controller Area NetworkMM_CANMulti media Controller Area NetworkSMKSmart Key ECUDDM ...
 AVN Head Unit Repair procedures
Removal
AVN Head Unit
•
Take care not to scratch the center fascia panel and related parts.
•
Eject all the disc before removing the AVN head unit to prevent dam ...
See also:
Engine oil and filter
The engine oil and filter should be changed at the intervals specified in the
maintenance schedule. If the car is being driven in severe conditions, more frequent
oil and filter changes are required ...
Repair procedures
On-vehicle Inspection
•
Check that the battery cables are connected to the correct terminals.
•
Disconnect the battery cables when the battery is given a quick ch ...
Rear Curtain Switch Repair procedures
Removal
1.
Disconnect the negative(-) battery terminal.
2.
Remove the floor console upper cover.
(Refer to Body - "Floor Console Assembly")
3.
Remove the rear curtain switch connector (A) ...
Categories
Hyundai Azera Manuals

© 2011-2026 Copyright www.hgmanual.com