 Hyundai Azera: Speakers Repair procedures
Fifth generation HG (2011–2026) / Hyundai Azera 2011-2026 Service Manual / Body Electrical System / AVN System / Speakers Repair procedures
Hyundai Azera: Speakers Repair procedures
Fifth generation HG (2011–2026) / Hyundai Azera 2011-2026 Service Manual / Body Electrical System / AVN System / Speakers Repair procedures
Fifth generation HG (2011–2026) / Hyundai Azera 2011-2026 Service Manual / Body Electrical System / AVN System / Speakers Repair procedures
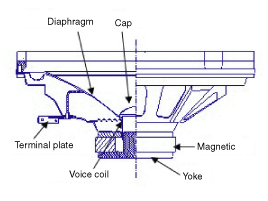
| Inspection |
| 1. |
Troubleshooting for Speaker
| ||||||||||||||||||||||||||||||||||||||


| Removal |
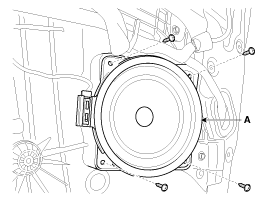
Front Speaker
| 1. |
Remove the front door trim panel.
|
| 2. |
Remove the front speaker (A) after loosening 4 screws.
|
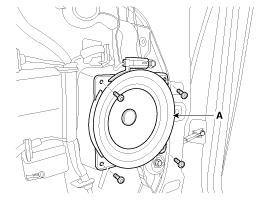
Rear Speaker
| 1. |
Remove the rear door trim panel.
|
| 2. |
Remove the rear speaker (A) after removing 4 screws.
|
Crash Pad Midrange Speaker
| 1. |
Remove the main crash pad.
|
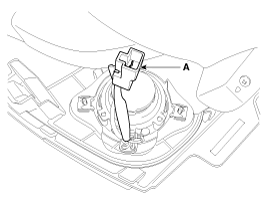
| 2. |
Disconnect the midrange speaker connector (A).
|
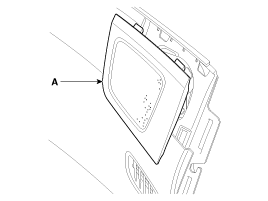
| 3. |
Remove the crash pad side speaker grill (A).
|
| 4. |
Remove the midrange speaker (A) after loosening the mounting screws.
|
Rear Tweeter Speaker
| 1. |
Remove the rear door trim.
|
| 2. |
Remove the rear tweeter speaker (A) after looseningthe screws (2EA).
|
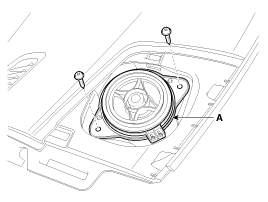
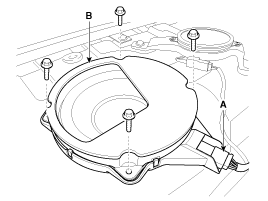
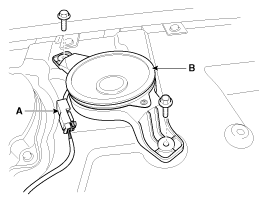
Subwoofer Speaker
| 1. |
Romove the rear seat.
|
| 2. |
Remove the rear package tray.
|
| 3. |
Disconnect the subwoofer speaker connector (A). |
| 4. |
Remove the subwoofer speaker (B) after removing 4 bolts.
|
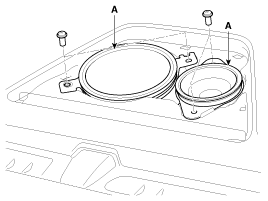
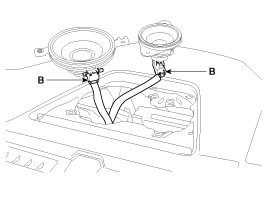
Center Speaker
| 1. |
Remove the center speaker grill (A).
|
| 2. |
Remove the center speaker (A) after loosening the screws (2EA) and disconnecting the connector (B).
|
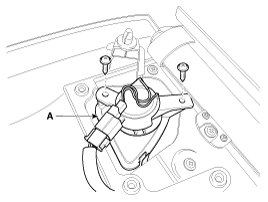
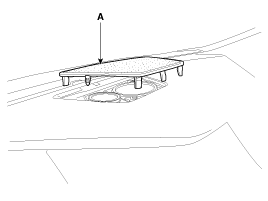
Rear Surround Speaker
| 1. |
Remove the rear seat.
|
| 2. |
Remove the rear package tray.
|
| 3. |
Disconnect the rear surround speaker connector (A). |
| 4. |
Remove the rear surround speaker (B) after removing 2 bolts.
|
| Installation |
Front Speaker
| 1. |
Install the front speaker. |
| 2. |
Install the front door trim. |
Rear Speaker
| 1. |
Install the rear speaker. |
| 2. |
Install the rear door trim. |
Midrange speaker
| 1. |
Install front the midrange speaker. |
| 2. |
Install front the midrange speaker connector. |
| 3. |
Install the speaker grill. |
Rear Tweeter Speaker
| 1. |
Install the rear tweeter speaker. |
| 2. |
Install the rear door trim. |
Subwoofer Speaker
| 1. |
Install the subwoofer speaker after connecting the connector. |
| 2. |
Install the rear package tray and rear seat assembly. |
Center Speaker
| 1. |
Connecting the center speaker connector. |
| 2. |
Install the center speaker. |
| 3. |
Install the crash pad center speaker grill. |
Rear Surround Speaker
| 1. |
Install the rear surround speaker. |
| 2. |
Connecting the connector. |
| 3. |
Install the rear package tray. |
| 4. |
Install the rear seat. |
 Multimedia Jack Repair procedures
Removal
1.
Remove the center fascia tray.
(Refer to Body - "Floor Console Assembly")
2.
Disconnect the connectors (A) from center fascia tray.
3.
Remove the multimedia jack (B) from the c ...
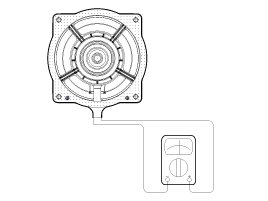
 AVN Remote Controller Components and Components Location
Components
...
See also:
Outside rearview mirror
Be sure to adjust mirror angles before driving.
Your vehicle is equipped with both left-hand and right-hand outside rearview
mirrors. The mirrors can be adjusted remotely with the remote switch. The ...
Filler-Neck Assembly Repair procedures
Removal
1.
Lift the vehicle.
2.
Disconnect the fuel filler hose (A).
3.
Disconnect the ventilation hose (B) from the fuel tank air filter.
4.
Open the fuel filler door and then remove ...
Windshield wiper/washer
A :Wiper speed control
MIST – Single wipe
OFF – Off
INT – Intermittent wipe
LO – Normal wiper speed
HI – Fast wiper speed
B : Intermittent wipe time adjustment
C :Wash with b ...
Categories
Hyundai Azera Manuals

© 2011-2026 Copyright www.hgmanual.com