 Hyundai Azera: Smart key unit Repair procedures
Fifth generation HG (2011–2026) / Hyundai Azera 2011-2026 Service Manual / Body Electrical System / Smart key System / Smart key unit Repair procedures
Hyundai Azera: Smart key unit Repair procedures
Fifth generation HG (2011–2026) / Hyundai Azera 2011-2026 Service Manual / Body Electrical System / Smart key System / Smart key unit Repair procedures
Fifth generation HG (2011–2026) / Hyundai Azera 2011-2026 Service Manual / Body Electrical System / Smart key System / Smart key unit Repair procedures
| Removal |
|

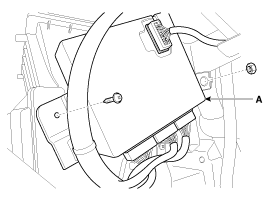
Smart key unit
| 1. |
Disconnect the negative (-) battery terminal. |
| 2. |
Remove the accelerator pedal module.
|
| 3. |
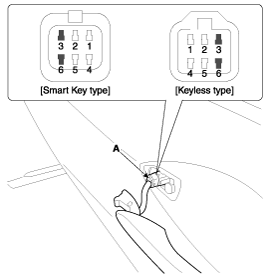
Disconnect the smart key unit conector, and then remove the bracket and smart key unit (A) after loosening the screw and nut.
|
Door Outside Handle
| 1. |
Disconnect the negative (-) battery terminal. |
| 2. |
Disconnect the connector after removing the door trim.
|
| 3. |
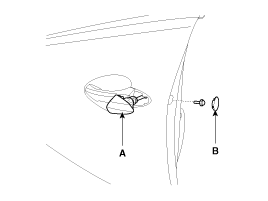
Loosen the mounting bolt, then remove the door handle cover (B) and door lock (A).
|
| 4. |
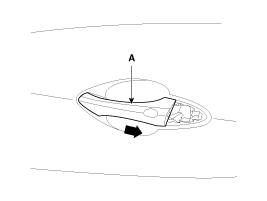
Remove the outside handle (A) by sliding it rearward.
|
| 5. |
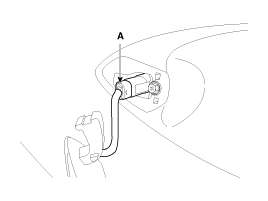
Disconnect the door outside handle connector (A).
|
Trunk lid open switch
| 1. |
Disconnect the negative(-) battery terminal. |
| 2. |
Remove the trunk door trim.
|
| 3. |
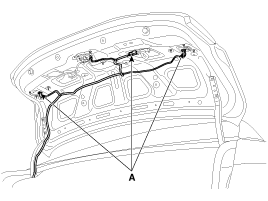
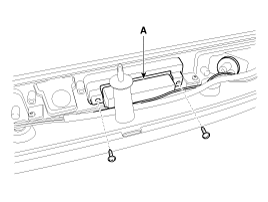
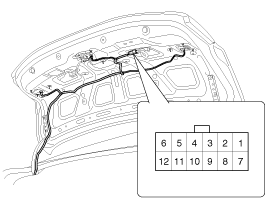
Disconnect the trunk lid open switch connector (A).
|
| 4. |
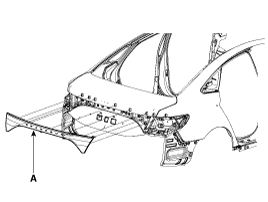
Remove the rear combination lamp assembly (A) after loosening the nuts (9EA).
|
| 5. |
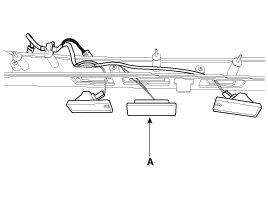
Remove the out side handle assembly (A) after removing the mounting screws and license lamps.
|
| Inspection |
Smart Key Unit
| - |
Refer to Lighting System - "Inspection/Self Diagnosis" |
Smart Key Switch
| - |
Refer to Lighting System - "Inspection/Switch Diagnosis" |
Antenna
| - |
Refer to Lighting System - "Inspection/Antenna Actuation Diagnosis" |
Door Outside Handle
| 1. |
Disconnect the front door outside handle connector (A).
|
| 2. |
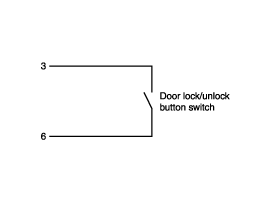
Check for continuity between terminals No 3 and No 6.
|

Trunk Lid Open Switch
| 1. |
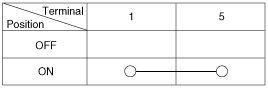
Check for continuity between the Trunk lid open switch terminals.
|
| 2. |
If continuity is not specified, inspect the switch.
|
| Installation |
Smart Key Unit
| 1. |
Install the smart key unit. |
| 2. |
Install the smart key unit mounting nuts and screw and connector. |
| 3. |
Install the glove accelerator pedal. |
| 4. |
Install the negative (-) battery terminal and check the smart key system. |
Trunk Lid Open Switch
| 1. |
Install the trunk lid open switch on the rear combination lamp assebly. |
| 2. |
Install the rear combination lamp assembly. |
| 3. |
Install the negative (-) battery terminal and check the smart key system. |
Door Outside Handle
| 1. |
Install the outside handle. |
| 2. |
Install the door trim. |
| 3. |
Install the negative (-) battery terminal and check the smart key system. |
 Smart key unit Schematic Diagrams
Circuit Diagram
...
 Smart key antenna Specifications
Specification
Antenna
ItemsSpecificationRated voltageDC 12VOperating voltageDC 9 ~ 16VOperating temperature-30°C ~ 75°C (-22°F ~ 167°F)Frequency134.2kHzNumbersInterior(3EA), Door(2EA), Bumper( ...
See also:
Rear Pillar Trim Components and Components Location
Component Location
1. Rear pillar trim
...
Console Armrest Components and Components Location
Component Location
1. Console armrest
...
Heater & A/C Control Unit(Full Automatic) Components and Components Location
Components
Connector pin function
ConnectorPIN NoFunctionConnectorPIN NoFunctionConnector (A)1Tail (+)Connector (A)27Evaporator Sensor (+)2Sensor REF (+5V)28-3CAN HIGH29Incar Sensor (+)4CAN LOW30D ...
Categories
Hyundai Azera Manuals

© 2011-2026 Copyright www.hgmanual.com