 Hyundai Azera: Cylinder Head Cover Repair procedures
Fifth generation HG (2011–2026) / Hyundai Azera 2011-2026 Service Manual / Engine Mechanical System / Cylinder Head Assembly / Cylinder Head Cover Repair procedures
Hyundai Azera: Cylinder Head Cover Repair procedures
Fifth generation HG (2011–2026) / Hyundai Azera 2011-2026 Service Manual / Engine Mechanical System / Cylinder Head Assembly / Cylinder Head Cover Repair procedures
Fifth generation HG (2011–2026) / Hyundai Azera 2011-2026 Service Manual / Engine Mechanical System / Cylinder Head Assembly / Cylinder Head Cover Repair procedures
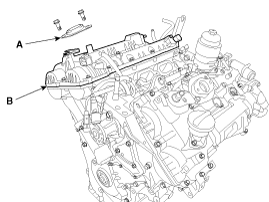
| Removal |
| [LH] |
| 1. |
Remove the Intake manifold.
(Refer to Intake And Exhaust System - "Intake Manifold") |
| 2. |
Remove the high pressure fuel pump.
|
| 3. |
Remove the LH ignition coils.
|
| 4. |
Remove the front engine hanger.
(Refer to Engine And Transmission Assembly - "Engine Hanger") |
| 5. |
Remove the LH cylinder head cover.
|


| [RH] |
| 1. |
Remove the surge tank.
(Refer to Intake And Exhaust System - "Surge Tank") |
| 2. |
Remove the RH ignition coils.
|
| 3. |
Remove the RH cylinder head cover.
|
| Installation |
| [LH] |
| 1. |
Install the LH cylinder head cover.
|

| 2. |
Install the other parts reverse order of removal. |
| [RH] |
| 1. |
Install the RH cylinder head cover.
|

| 2. |
Install the other parts reverse order of removal. |
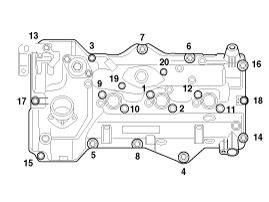
 Cylinder Head Cover Components and Components Location
Components
1. LH cylinder head cover2. LH cylinder head cover gasket3. RH cylinder head cover4. RH cylinder head cover gasket5. Exhaust CVVT OCV cap
...
 CVVT Assembly Components and Components Location
Components
1. RH exhaust CVVT2. RH intake CVVT3. LH intake CVVT4. LH exhaust CVVT
...
See also:
Wheel replacement
When replacing the metal wheels for any reason, make sure the new wheels are
equivalent to the original factory units in diameter, rim width and offset.
WARNING
A wheel that is not the correct size ...
On-board Refueling Vapor Recovery (ORVR) valve Repair procedures
Removal
1.
Turn the ignition switch OFF, and then remove battery (-) cable.
2.
Remove the fuel tank.
(Refer to Fuel System - "Fuel Tank")
3.
Disconnect the vapor hose (A).
4.
Remove ...
Special Service Tools
Special Service Tools
Tool (Number and Name)IllustrationApplicationRKE Battery Checker(09954-2P100)Measuring the RKE batteryvoltageCorrection jig for LDWS or LKAS(09890-3V100)Correction of LDWS ( ...
Categories
Hyundai Azera Manuals

© 2011-2026 Copyright www.hgmanual.com