 Hyundai Azera: Shift Cable Repair procedures
Fifth generation HG (2011–2026) / Hyundai Azera 2011-2026 Service Manual / Automatic Transaxle System / Automatic Transaxle Control System / Shift Cable Repair procedures
Hyundai Azera: Shift Cable Repair procedures
Fifth generation HG (2011–2026) / Hyundai Azera 2011-2026 Service Manual / Automatic Transaxle System / Automatic Transaxle Control System / Shift Cable Repair procedures
Fifth generation HG (2011–2026) / Hyundai Azera 2011-2026 Service Manual / Automatic Transaxle System / Automatic Transaxle Control System / Shift Cable Repair procedures
| Removal |
| 1. |
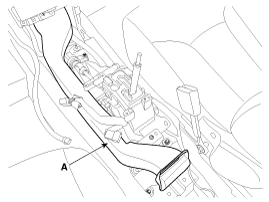
Remove the center console assembly.
|
| 2. |
Remove the duct (A).
|
| 3. |
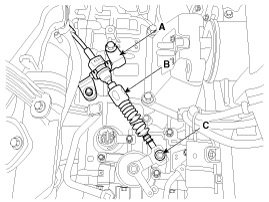
Remove the control cable (B).
|

| 4. |
Remove the control cable assembly in the vehicle after removing the nuts (B) and the retainer (A).
|

| 5. |
Remove the nut (C). |
| 6. |
Remove the cable (B) from the bracket (A) at transaxle assembly side.
(Refer to Automatic Transaxle System - "Automatic Transaxle")
|
| 7. |
Remove the control cable inside of cab.
|
| Installation |
| 1. |
Installation is the reverse of removal.
|

| Adjustment |
| Adjusting method for T/M control cable |
| 1. |
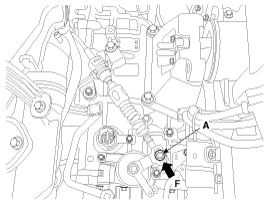
Make sure vehicle does not roll before setting room side
shift lever and Automatic Transaxle(AT) side manual control lever to "N"
position. |
| 2. |
Connect room side shift lever and control cable. |
| 3. |
Push cable to "F" direction shown to eliminate FREE PLAY. |
| 4. |
Tighten adjusting nut (A).
|
| 5. |
After adjusting, check to be sure that this part operates as
designed at each range of Automatic Transaxle(AT) side corresponding to
each position of room lever. |
 Shift Cable Components and Components Location
Components
1. Shift lever knob2. Shift lever assembly 3. Control cable assembly4. Manual control lever (T/M side)
...

See also:
Heater Unit Repair procedures
Replacement
1.
Disconnect the negative (-) battery terminal.
2.
Recover the refrigerant with a recovery/ recycling/ charging station.
3.
When the engine is cool, drain the engine coola ...
Variable Intake Solenoid (VIS) Valve Specifications
Specification
ItemSpecificationCoil Resistance (?)30.0 ~ 35.0 [20°C(68°F)]
...
Specifications
Specifications
Purge Control Solenoid Valve (PCSV)
? Specification
ItemSpecificationCoil Resistance (?)22.0 ~ 26.0 [20°C(68°F)]
Fuel Tank Pressure Sensor (FTPS)
? Type: Piezo-Resistive ...
Categories
Hyundai Azera Manuals

© 2011-2026 Copyright www.hgmanual.com