 Hyundai Azera: Parking Brake Assembly Repair procedures
Fifth generation HG (2011–2026) / Hyundai Azera 2011-2026 Service Manual / Brake System / Parking Brake System / Parking Brake Assembly Repair procedures
Hyundai Azera: Parking Brake Assembly Repair procedures
Fifth generation HG (2011–2026) / Hyundai Azera 2011-2026 Service Manual / Brake System / Parking Brake System / Parking Brake Assembly Repair procedures
Fifth generation HG (2011–2026) / Hyundai Azera 2011-2026 Service Manual / Brake System / Parking Brake System / Parking Brake Assembly Repair procedures
| Removal |
Parking Brake Shoe
| 1. |
Raise the vehicle, and make sure it is securely supported. |
| 2. |
Remove the rear tire and wheel. |
| 3. |
Remove the rear brake caliper and Rear disc brake.
(Refer to "Rear disc brake removal") |
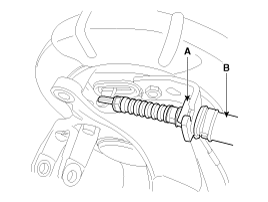
| 4. |
Remove the parking brake cable (B), after removing the fixing clip (A).
|
| 5. |
Remove the hub assembly.
|
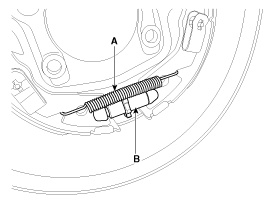
| 6. |
Remove the adjuster assembly (B) and the lower return spring (A).
|

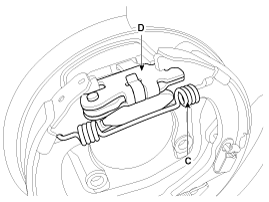
| 7. |
Remove the upper return spring (C) operating lever assembly (D).
|

| 8. |
Remove the shoe hold down pin (A) and the spring (B) by pressing and rotating the spring.
|
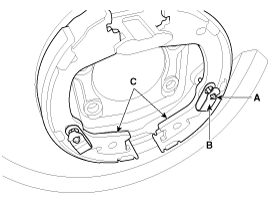
| 9. |
Remove the brake shoes (C). |
| Installation |
Parking Brake Shoe
| 1. |
Install the shoe hold down pin (A) and spring (B) by pressing and rotating the spring.
|
| 2. |
Install the operating lever assembly (D) and the upper return spring (C).
|
| 3. |
Install the adjuster assembly (B) and the lower return spring (A).
|
| 4. |
Install the hub assembly.
|
| 5. |
Install the parking brake cable (B), and then install the fixing clip (A).
|
| 6. |
Install the rear brake disc, then adjust the rear brake shoe clearance.
|
| 7. |
Install the brake caliper assembly.
(Refer to "Rear brake installation") |
| 8. |
Install the tire and wheel, after installing the plug on the disc. |
| 9. |
If the parking brake shoe or the brake disc are replaced a newly one, perform the brake shoe bed-in procedure.
|

 Components and Components Location
Components (1)
1. Parking brake pedal2. Parking brake cable3. Equalizer assembly
Components (2)
1. Backing plate2. Operating lever3. Upper spring4. Lower spring5. Adjuster6. Shoe hold down ...
 Parking Brake Pedal Assembly Repair procedures
Removal
1.
Turn ignition switch OFF and disconnect the negative (-) battery cable.
2.
Remove the crash pad lower panel.
(Refer to Body - "Crash pad lower panel")
3.
Remove the junction b ...
See also:
Fuses
...
Refrigerant line Repair procedures
Replacement
1.
Discharge refrigerant from refrigeration system.
2.
Replace faulty tube or hose.
Cap the open fittings immediately to keep moisture or dirt out of the s ...
Schematic Diagrams
Circuit Diagram (1)
Circuit Diagram (2)
...
Categories
Hyundai Azera Manuals

© 2011-2026 Copyright www.hgmanual.com