 Hyundai Azera: Repair procedures
Fifth generation HG (2011–2026) / Hyundai Azera 2011-2026 Service Manual / Body (Interior and Exterior) / Rear Window Glass / Repair procedures
Hyundai Azera: Repair procedures
Fifth generation HG (2011–2026) / Hyundai Azera 2011-2026 Service Manual / Body (Interior and Exterior) / Rear Window Glass / Repair procedures
| Replacement |
|

| 1. |
Remove the roof side molding.
(Refer to Body Side Moldings - "Roof Side Moldings") |
| 2. |
Remove the rear package tray trim.
(Refer to Interior Trim - "Rear Package Tray Trim") |
| 3. |
Disconnect the rear window glass defogger connector. |
| 4. |
Spread the WD-40 on the side of rear window glass. |
| 5. |
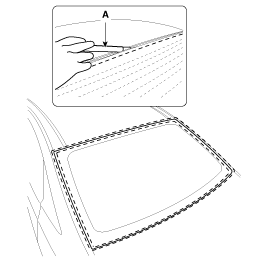
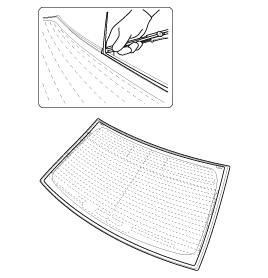
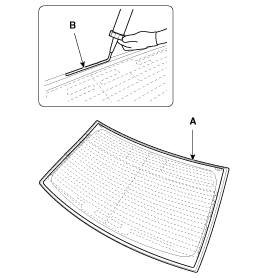
Cut out the adhesive using the cutter (A).
|

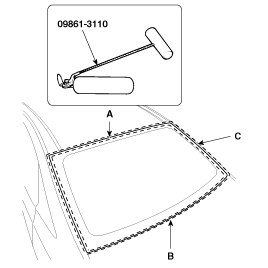
| 6. |
Enough on the upper (A) and lower (B) side (C) of rear window
glass. and then cut out the adhesive using the cutter tool
(09861-31100).
|
| 7. |
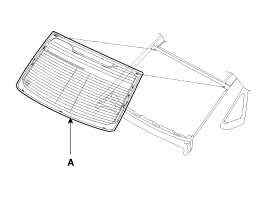
Remove the rear window glass (A).
|
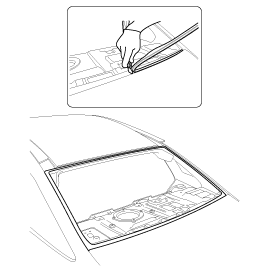
| 1. |
With a knife, scrape the old adhesive smooth to a thickness
of about 2mm (0.08 in.) on the bonding surface around the entire rear
window glass opening flange :
|
| 2. |
Clean the body bonding surface with a sponge dampened in
alcohol. After cleaning, keep oil, grease and water from getting on the
clean surface.
|
| 3. |
With a sponge, apply a light coat of body primer to the
original adhesive remaining around the windshield opening flange. Let
the body primer dry for at least 10 minutes.
|
| 4. |
Apply a light coat of glass primer to the outside of the fasteners.
|
| 5. |
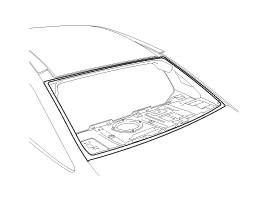
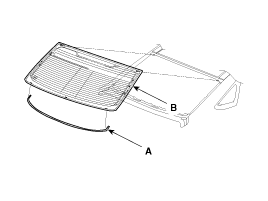
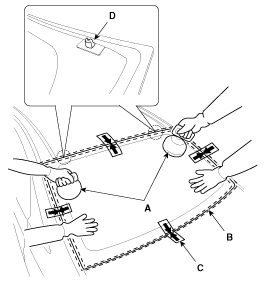
Paste the rear window glass molding (A), and then install the rear window glass (B).
|
| 6. |
Pack adhesive into the cartridge without air pockets to
ensure continuous delivery. Put the cartridge in a caulking gun, and run
a bead of sealant (B) around the edge of the rear window glass (A) as
shown. Apply the adhesive within 30 minutes after applying the glass
primer. Make a slightly thicker bead at each corner.
|
| 7. |
Use suction cups (A) to hold the rear window glass (B) over
the opening, align it with the alignment marks (C) made in step 15, and
set it down on the adhesive. Lightly push on the windshield until its
edges are fully seated on the adhesive all the way around. Do not open
or close the doors until the adhesive is dry.
|
| 8. |
Let the adhesive dry for at least 3-4 hour, then spray water over the glass and check for leaks.
|
| 9. |
Areas may leak. Let the glass dry, then seal with adhesive.
|
| 10. |
Install the rear window glass defogger connector. |
| 11. |
Install the rear package tray trim. |
| 12. |
Install the roof side molding. |
 Components and Components Location
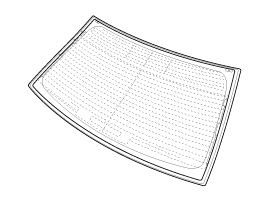
Components
1. Rear window glass2. Rear window glass molding
...
 Front Bumper
...
See also:
Components and Components Location
Components
1. Hands free call switch2. Mic3. Front left speaker4. Front right speaker5. Audio head unit (hands free control)
? There is no hands free jack. This system supports Bluetooth(wir ...
Passenger Airbag (PAB) Module Description and Operation
Description
Passenger Airbag (PAB) module is located in the passenger
crash pad. This PAB contains 2 firing squibs of airbag and 1 firing
squib of active vent. Depending of crash speed or the t ...
Purge Control Solenoid Valve (PCSV) Repair procedures
Inspection
1.
Turn the ignition switch OFF.
2.
Disconnect the PCSV connector.
3.
Measure resistance between the PCSV terminals 1 and 2.
4.
Check that the resistance is within the speci ...
Categories
Hyundai Azera Manuals
