 Hyundai Azera: Repair procedures
Fifth generation HG (2011–2026) / Hyundai Azera 2011-2026 Service Manual / Brake System / Brake System / Repair procedures
Hyundai Azera: Repair procedures
Fifth generation HG (2011–2026) / Hyundai Azera 2011-2026 Service Manual / Brake System / Brake System / Repair procedures
Fifth generation HG (2011–2026) / Hyundai Azera 2011-2026 Service Manual / Brake System / Brake System / Repair procedures
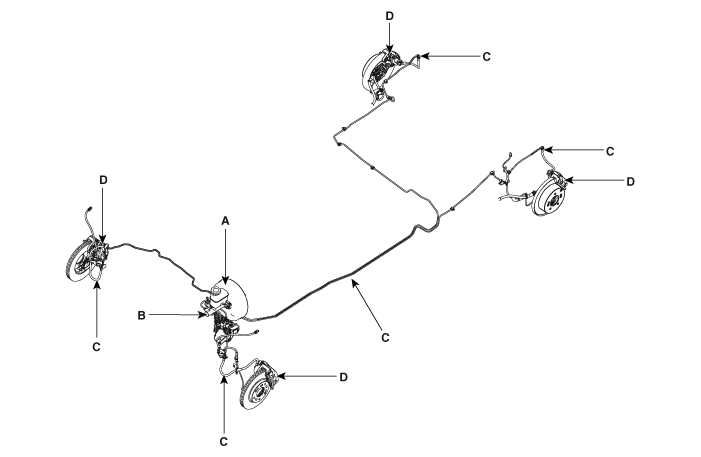
| Operation and Leakage Check |
Check all of the following items:
| Component | Procedure | ||||
| Brake Booster (A) | Check brake operation by applying the brakes during a test
drive. If the brakes do not work properly, check the brake booster.
Replace the brake booster as an assembly if it does not work properly or
if there are signs of leakage. | ||||
| Piston cup and pressure cup inspection (B) |
| ||||
| Brake hoses (C) | Look for damage or signs of fluid leakage. Replace the brake hose with a new one if it is damaged or leaking. | ||||
| Caliper piston seal and piston boots (D) | Check brake operation by applying the brakes. Look for damage or signs of fluid leakage. If the pedal does not work properly, the brakes drag, or there is damage or signs of fluid leakage, disassemble and inspect the brake caliper. Replace the boots and seals with new ones whenever the brake caliper is disassembled. |
Brake System Bleeding
|

| 1. |
Make sure the brake fluid in the reservoir is at the MAX(upper) level line. |
| 2. |
Have someone slowly pump the brake pedal several times, and then apply pressure. |
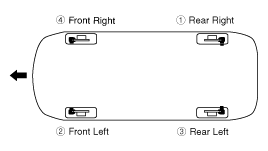
| 3. |
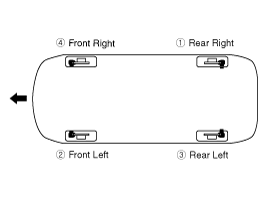
Loosen the right-rear brake bleed screw (A) to allow air to escape from the system. Then tighten the bleed screw securely.
Front
Rear
|
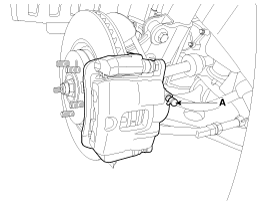
| 4. |
Repeat the procedure for wheel in the sequence shown below until air bubbles no longer appear in the fluid.
|
| 5. |
Refill the master cylinder reservoir to MAX(upper) level line. |
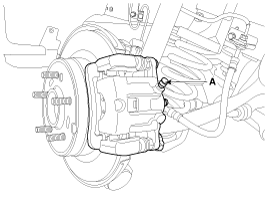
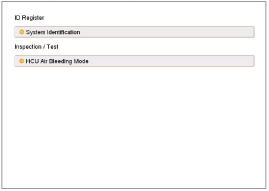
ESC Bleeding of Brake System
This procedure should be followed to ensure adequate bleeding
of air and filling of the ESC unit, brake lines and master cylinder
with brake fluid.
| 1. |
Remove the reservoir cap and fill the brake reservoir with brake fluid.
|

| 2. |
Connect a clear plastic tube to the wheel cylinder bleeder
plug and insert the other end of the tube into a half filled clear
plastic bottle. |
| 3. |
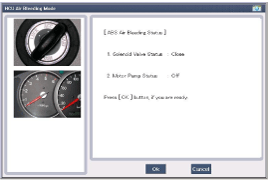
Connect the GDS to the data link connector located underneath the dash panel. |
| 4. |
Select and operate according to the instructions on the GDS screen.
|
| 5. |
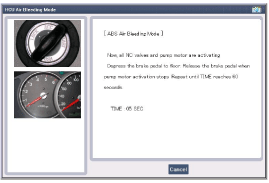
Pump the brake pedal several times, and then loosen the
bleeder screw until fluid starts to run out without bubbles. Then close
the bleeder screw (A).
Front
Rear
|
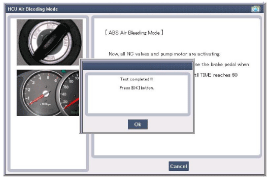
| 6. |
Repeat step 5 following the order described below until there are no more bubbles in the fluid for each wheel.
|
| 7. |
Tighten the bleeder screw.
|
 Brake System
...
 Brake Booster Components and Components Location
Components
1. Brake booster2. Master cylinder assembly3. O-ring
...
See also:
Blade inspection
Commercial hot waxes applied by automatic car washes have been known to make
the windshield difficult to clean.
Contamination of either the windshield or the wiper blades with foreign matter
can re ...
Hazard Lamp Switch Repair procedures
Removal
1.
Disconnect the negative(-) battery terminal.
2.
Remove the center console upper assembly (A) with hazard lamp switch.
Apply the protective tapes to the center ...
Side impact air bag
Your vehicle is equipped with a side impact air bag in each front and outboard
rear seat. The purpose of the air bag is to provide occupants with additional protection
than that offered by the sea ...
Categories
Hyundai Azera Manuals

© 2011-2026 Copyright www.hgmanual.com