 Hyundai Azera: Shift Cable Repair procedures
Fifth generation HG (2011–2026) / Hyundai Azera 2011-2026 Service Manual / Automatic Transaxle System / Automatic Transaxle Control System / Shift Cable Repair procedures
Hyundai Azera: Shift Cable Repair procedures
Fifth generation HG (2011–2026) / Hyundai Azera 2011-2026 Service Manual / Automatic Transaxle System / Automatic Transaxle Control System / Shift Cable Repair procedures
Fifth generation HG (2011–2026) / Hyundai Azera 2011-2026 Service Manual / Automatic Transaxle System / Automatic Transaxle Control System / Shift Cable Repair procedures
| Removal |
| 1. |
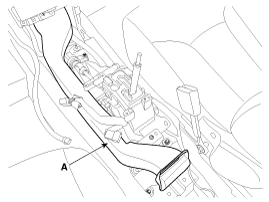
Remove the center console assembly.
|
| 2. |
Remove the duct (A).
|
| 3. |
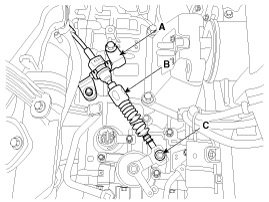
Remove the control cable (B).
|

| 4. |
Remove the control cable assembly in the vehicle after removing the nuts (B) and the retainer (A).
|

| 5. |
Remove the nut (C). |
| 6. |
Remove the cable (B) from the bracket (A) at transaxle assembly side.
(Refer to Automatic Transaxle System - "Automatic Transaxle")
|
| 7. |
Remove the control cable inside of cab.
|
| Installation |
| 1. |
Installation is the reverse of removal.
|

| Adjustment |
| Adjusting method for T/M control cable |
| 1. |
Make sure vehicle does not roll before setting room side
shift lever and Automatic Transaxle(AT) side manual control lever to "N"
position. |
| 2. |
Connect room side shift lever and control cable. |
| 3. |
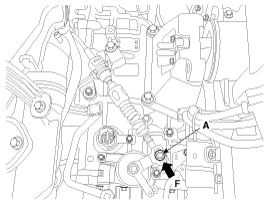
Push cable to "F" direction shown to eliminate FREE PLAY. |
| 4. |
Tighten adjusting nut (A).
|
| 5. |
After adjusting, check to be sure that this part operates as
designed at each range of Automatic Transaxle(AT) side corresponding to
each position of room lever. |
 Shift Cable Components and Components Location
Components
1. Shift lever knob2. Shift lever assembly 3. Control cable assembly4. Manual control lever (T/M side)
...

See also:
Schematic Diagrams
Circuit Diagram
...
Description and Operation
Description
The starting system includes the battery, starter, solenoid
switch, ignition switch, inhibitor switch (A/T), clutch pedal switch
(M/T), ignition lock switch, connection wires and th ...
Specifications
Specifications
ItemSpecificationsTransmission typeA6LF2Engine modelGasoline 3.3 GDITorque converter type3-element, 1-stage, 2-phase typeTorque converter sizeO260 mm (10.2362 in.)Oil pump sy ...
Categories
Hyundai Azera Manuals

© 2011-2026 Copyright www.hgmanual.com