 Hyundai Azera: Speakers Repair procedures
Fifth generation HG (2011–2025) / Hyundai Azera 2011-2025 Service Manual / Body Electrical System / AVN System / Speakers Repair procedures
Hyundai Azera: Speakers Repair procedures
Fifth generation HG (2011–2025) / Hyundai Azera 2011-2025 Service Manual / Body Electrical System / AVN System / Speakers Repair procedures
Fifth generation HG (2011–2025) / Hyundai Azera 2011-2025 Service Manual / Body Electrical System / AVN System / Speakers Repair procedures
| Inspection |
| 1. |
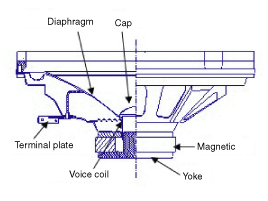
Troubleshooting for Speaker
| ||||||||||||||||||||||||||||||||||||||


| Removal |
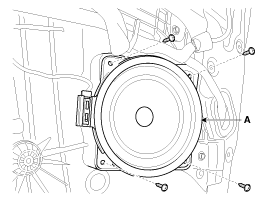
Front Speaker
| 1. |
Remove the front door trim panel.
|
| 2. |
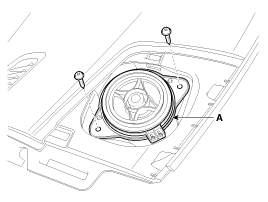
Remove the front speaker (A) after loosening 4 screws.
|
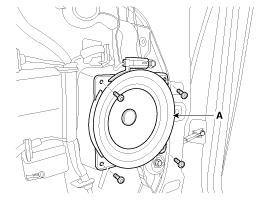
Rear Speaker
| 1. |
Remove the rear door trim panel.
|
| 2. |
Remove the rear speaker (A) after removing 4 screws.
|
Crash Pad Midrange Speaker
| 1. |
Remove the main crash pad.
|
| 2. |
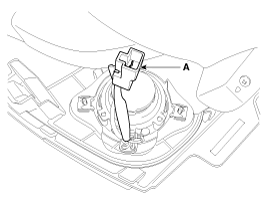
Disconnect the midrange speaker connector (A).
|
| 3. |
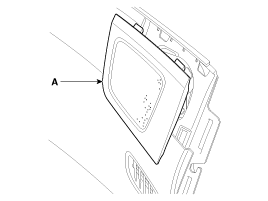
Remove the crash pad side speaker grill (A).
|
| 4. |
Remove the midrange speaker (A) after loosening the mounting screws.
|
Rear Tweeter Speaker
| 1. |
Remove the rear door trim.
|
| 2. |
Remove the rear tweeter speaker (A) after looseningthe screws (2EA).
|
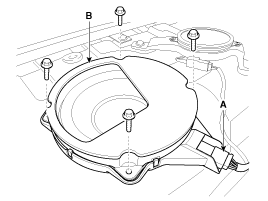
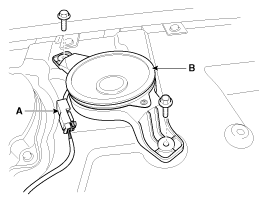
Subwoofer Speaker
| 1. |
Romove the rear seat.
|
| 2. |
Remove the rear package tray.
|
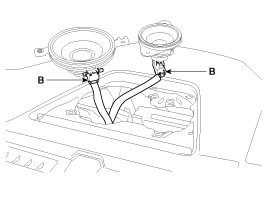
| 3. |
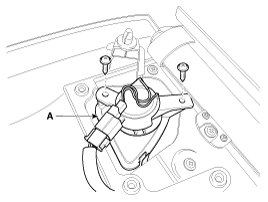
Disconnect the subwoofer speaker connector (A). |
| 4. |
Remove the subwoofer speaker (B) after removing 4 bolts.
|
Center Speaker
| 1. |
Remove the center speaker grill (A).
|
| 2. |
Remove the center speaker (A) after loosening the screws (2EA) and disconnecting the connector (B).
|
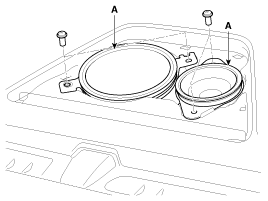
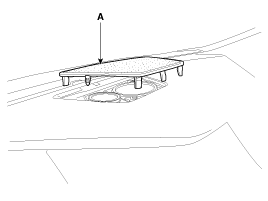
Rear Surround Speaker
| 1. |
Remove the rear seat.
|
| 2. |
Remove the rear package tray.
|
| 3. |
Disconnect the rear surround speaker connector (A). |
| 4. |
Remove the rear surround speaker (B) after removing 2 bolts.
|
| Installation |
Front Speaker
| 1. |
Install the front speaker. |
| 2. |
Install the front door trim. |
Rear Speaker
| 1. |
Install the rear speaker. |
| 2. |
Install the rear door trim. |
Midrange speaker
| 1. |
Install front the midrange speaker. |
| 2. |
Install front the midrange speaker connector. |
| 3. |
Install the speaker grill. |
Rear Tweeter Speaker
| 1. |
Install the rear tweeter speaker. |
| 2. |
Install the rear door trim. |
Subwoofer Speaker
| 1. |
Install the subwoofer speaker after connecting the connector. |
| 2. |
Install the rear package tray and rear seat assembly. |
Center Speaker
| 1. |
Connecting the center speaker connector. |
| 2. |
Install the center speaker. |
| 3. |
Install the crash pad center speaker grill. |
Rear Surround Speaker
| 1. |
Install the rear surround speaker. |
| 2. |
Connecting the connector. |
| 3. |
Install the rear package tray. |
| 4. |
Install the rear seat. |
 Multimedia Jack Repair procedures
Removal
1.
Remove the center fascia tray.
(Refer to Body - "Floor Console Assembly")
2.
Disconnect the connectors (A) from center fascia tray.
3.
Remove the multimedia jack (B) from the c ...
 AVN Remote Controller Components and Components Location
Components
...
See also:
Crash Pad Lower Panel Components and Components Location
Component Location
1. Crash pad lower panel
...
Output Speed Sensor Specifications
Specifications
? Type: Hall effect sensor
Operation condition [°C(°F)](-40~150) -40~302Air gap(mm)in.(0.8~1.25) 0.032~0.049Output voltageHigh1.18~1.68Low0.59~0.84
...
Description and Operation
Description
The hydraulic system consists of oil, an oil filter, an oil
pump, and a valve body (valves and solenoid valves). The oil pump is
powered by the engine. ATF passes through the oil fi ...
Categories
Hyundai Azera Manuals

© 2011-2025 Copyright www.hgmanual.com