
 Hyundai Azera: Front Seat Frame Assembly Repair procedures
Fifth generation HG (2011–2026) / Hyundai Azera 2011-2026 Service Manual / Body (Interior and Exterior) / Front Seat / Front Seat Frame Assembly Repair procedures
Hyundai Azera: Front Seat Frame Assembly Repair procedures
Fifth generation HG (2011–2026) / Hyundai Azera 2011-2026 Service Manual / Body (Interior and Exterior) / Front Seat / Front Seat Frame Assembly Repair procedures
Fifth generation HG (2011–2026) / Hyundai Azera 2011-2026 Service Manual / Body (Interior and Exterior) / Front Seat / Front Seat Frame Assembly Repair procedures
| Replacement |
|

| 1. |
Remove the front seat back cover.
(Refer to Front Seat - "Front Seat Back Cover") |
| 2. |
Remove the front seat cushion cover.
(Refer to Front Seat - "Front Seat Cushion Cover") |
| 3. |
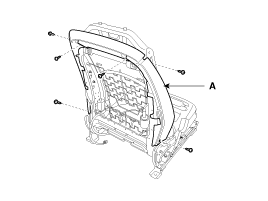
After loosening the mounting screws, then remove the front seat back frame cover (A).
|
| 4. |
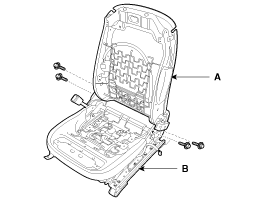
After loosening the mounting bolts, then disconnect the front
seat back frame assembly (A) and front seat cushion frame assembly (B).
|
| 5. |
Installation is the reverse of removal.
|

 Front Seat Frame Assembly Components and Components Location
Component Location
1. Front seat back frame assembly2. Front seat cushion frame assembly
...
 Rear Seat
...
See also:
Tire replacement
If the tire is worn evenly, a tread wear indicator will appear as a solid band
across the tread. This shows there is less than 1/16 inch (1.6 mm) of tread left
on the tire. Replace the tire when t ...
Oil Level Gauge & Pipe Repair procedures
Removal and Installation
1.
Remove the oil level gauge (A).
Tightening torque:
18.6 ~ 22.6N.m (1.9 ~ 2.3kgf.m, 13.7 ~ 16.6lb-ft)
When installing, apply engine oil to t ...
Rear Door Latch Repair procedures
Replacement
1.
Remove the rear door module.
(Refer to Rear Door - "Rear Door Module")
2.
Disconnect the rear door latch connector (A).
3.
Remove the rear door latch assembly (A).
4.
I ...
Categories
Hyundai Azera Manuals

© 2011-2026 Copyright www.hgmanual.com