 Hyundai Azera: AVN Head Unit Repair procedures
Fifth generation HG (2011–2026) / Hyundai Azera 2011-2026 Service Manual / Body Electrical System / AVN System / AVN Head Unit Repair procedures
Hyundai Azera: AVN Head Unit Repair procedures
Fifth generation HG (2011–2026) / Hyundai Azera 2011-2026 Service Manual / Body Electrical System / AVN System / AVN Head Unit Repair procedures
Fifth generation HG (2011–2026) / Hyundai Azera 2011-2026 Service Manual / Body Electrical System / AVN System / AVN Head Unit Repair procedures
| Removal |
AVN Head Unit
|

| 1. |
Disconnect the negative (-) battery terminal. |
| 2. |
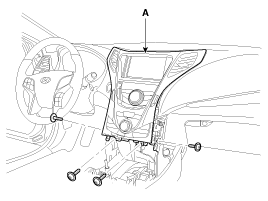
Remove the crash pad center fascia panel (A).
|
| 3. |
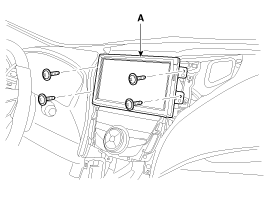
Remove the monitor (A) after loosening the mounting screws.
|
| 4. |
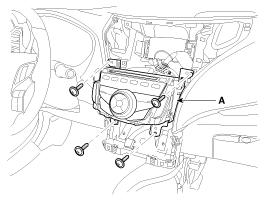
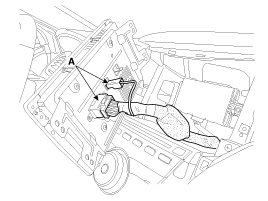
Remove the AVN head unit (A) after loosening the mounting screws.
|
| 5. |
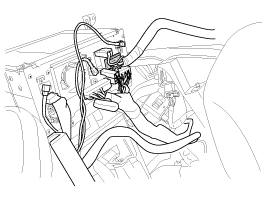
Remove the AVN head unit connectors and cables.
|
AVN monitor
| 1. |
Remove the center fascia panel.
(Refer to AVN System - "AVN Head Unit") |
| 2. |
Remove the monitor (A) after loosening the mounting screws.
|
| 3. |
Remove the AVN monitor connectors and cables (A).
|
| Installation |
AVN Head Unit
| 1. |
Connect the AVN head unit connectors and cable. |
| 2. |
Install the AVN head unit. |
| 3. |
Install the center fascia panel. |
| 4. |
Connet the battery (-) terminal.
|
AVN monitor
| 1. |
Install the AVN monitor. |
| 2. |
Install the center fascia panel. |
 AVN Head Unit Components and Components Location
Components
AVN (A/V & Navigation) Head Unit Connector
Pin No.DescriptionCommentsA1--A2PARKING_V_VIDEORear View Camera Video SignalA3PARKING_V_GNDRear View Camera Video GroundA4R/C_SHIELD G ...
 Multimedia Jack Schematic Diagrams
Circuit Diagram
...
See also:
Water pump Components and Components Location
Components
1. Water pump pulley2. Water pump 3. Water pump gasket
...
Description and Operation
Description
Evaporative Emission Control System prevents fuel vapor
stored in fuel tank from vaporizing into the atmosphere. When the fuel
evaporates in the fuel tank, the vapor passes through ...
Trunk Trim Repair procedures
Replacement
•
Use a plastic panel removal tool to remove interior trim pieces to protect from marring the surface.
•
Take care not to bend or scratch the trim and ...
Categories
Hyundai Azera Manuals

© 2011-2026 Copyright www.hgmanual.com