 Hyundai Azera: Smart key antenna Repair procedures
Fifth generation HG (2011–2026) / Hyundai Azera 2011-2026 Service Manual / Body Electrical System / Smart key System / Smart key antenna Repair procedures
Hyundai Azera: Smart key antenna Repair procedures
Fifth generation HG (2011–2026) / Hyundai Azera 2011-2026 Service Manual / Body Electrical System / Smart key System / Smart key antenna Repair procedures
Fifth generation HG (2011–2026) / Hyundai Azera 2011-2026 Service Manual / Body Electrical System / Smart key System / Smart key antenna Repair procedures
| Removal |
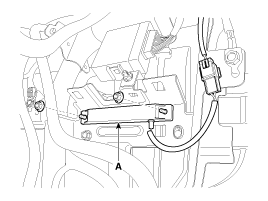
Interior 1 Antenna
| 1. |
Disconnect the negative(-) battery terminal. |
| 2. |
Remove the main crash pad.
|
| 3. |
Remove the interior 1 antenna (A) after disconnecting the connector and loosening the mounting nuts (2EA).
|
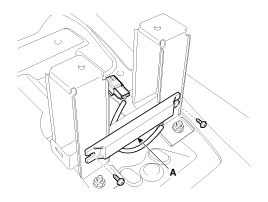
Interior 2 Antenna
| 1. |
Disconnect the negative(-) battery terminal. |
| 2. |
Remove the center console.
|
| 3. |
Remove the interior 1 antenna (A) after loosening the mounting nuts (2EA).
|
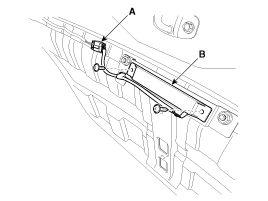
Trunk Antenna
| 1. |
Disconnect the negative(-) battery terminal. |
| 2. |
Remove the trunk transverse trim.
|
| 3. |
Disconnect the trunk antenna connector (A) and remove the trunk antenna (B) after loosening screws (2EA).
|
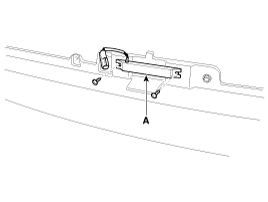
Exterior Bumper Antenna
| 1. |
Disconnect the negative(-) battery terminal. |
| 2. |
Remove the rear bumper.
|
| 3. |
Disconnect the exterior bumper antenna connector on rear bumper center part. |
| 4. |
Disconnect the antenna connector and remove the exterior bumper antenna (A) after loosening the screws (2EA).
|
| Installation |
Interior 1 Antenna
| 1. |
Install the interior 1 antenna. |
| 2. |
Install the main crash pad. |
| 3. |
Install the negative (-) battery terminal and check the smart key system. |
Interior 2 Antenna
| 1. |
Install the interior 2 antenna. |
| 2. |
Install the center console. |
| 3. |
Install the negative (-) battery terminal and check the smart key system. |
Trunk Antenna
| 1. |
Install the trunk antenna. |
| 2. |
Install the trunk tranverse trim. |
| 3. |
Install the negative (-) battery terminal and check the smart key system. |
Exterior Bumper Antenna
| 1. |
Install the exterior bumper antenna. |
| 2. |
Install the rear bumper. |
| 3. |
Install the negative (-) battery terminal and check the smart key system. |
 Smart key antenna Specifications
Specification
Antenna
ItemsSpecificationRated voltageDC 12VOperating voltageDC 9 ~ 16VOperating temperature-30°C ~ 75°C (-22°F ~ 167°F)Frequency134.2kHzNumbersInterior(3EA), Door(2EA), Bumper( ...
 Smart key receiver Specifications
Specification
RF Receiver
ItemsSpecificationFrequency433.92 MHzAntenna typeFSK (Frequency Shift Keying)
...
See also:
Washer fluid
...
Components and Components Location
Component Location
Components
1. Heater Case (LH)2. Heater Case (RH)3. Separator4. Heater Case (Lower)5. Drain Hose6. Insulation7.Shower Duct (RH)8. Temp Actuator(PA)9. Temp Door Cam10. Evapora ...
Battery
...
Categories
Hyundai Azera Manuals

© 2011-2026 Copyright www.hgmanual.com