 Hyundai Azera: CVVT Oil Control Valve (OCV) Repair procedures
Fifth generation HG (2011–2026) / Hyundai Azera 2011-2026 Service Manual / Engine Control/Fuel System / Engine Control System / CVVT Oil Control Valve (OCV) Repair procedures
Hyundai Azera: CVVT Oil Control Valve (OCV) Repair procedures
Fifth generation HG (2011–2026) / Hyundai Azera 2011-2026 Service Manual / Engine Control/Fuel System / Engine Control System / CVVT Oil Control Valve (OCV) Repair procedures
Fifth generation HG (2011–2026) / Hyundai Azera 2011-2026 Service Manual / Engine Control/Fuel System / Engine Control System / CVVT Oil Control Valve (OCV) Repair procedures
| Inspection |
| 1. |
Turn the ignition switch OFF. |
| 2. |
Disconnect the OCV connector. |
| 3. |
Measure resistance between the OCV terminals 1 and 2. |
| 4. |
Check that the resistance is within the specification.
|
| Removal |
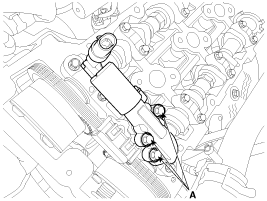
| [CVVT Oil Control Valve (Intake)] |
| 1. |
Turn the ignition switch OFF and disconnect the battery negative (-) cable. |
| 2. |
Remove the intake manifold.
|
| 3. |
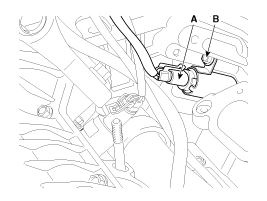
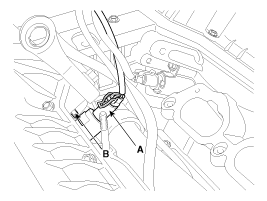
Disconnect the CVVT oil control valve connector (A). |
| 4. |
Remove the installation bolt (B), and then remove the valve from the engine.
[Bank 1]
[Bank 2]
|
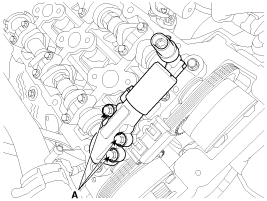
| [CVVT Oil Control Valve (Exhaust)] |
| 1. |
Turn the ignition switch OFF and disconnect the battery negative (-) cable. |
| 2. |
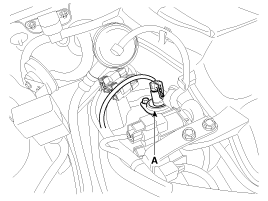
Disconnect the CVVT oil control valve connector (A).
[Bank 1]
[Bank 2]
|
| 3. |
Remove the cylinder head cover.
|
| 4. |
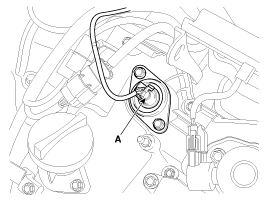
Remove the installation bolt (A), and then remove the valve from the engine.
[Bank 1]
[Bank 2]
|
| Inatallation |
|

|
|
| Items | Component Side | Harness Side |
| Bank 1 (RH) | Grey | |
| Bank 2 (LH) | Black | |
| 1. |
Installation is reverse of removal.
|
 CVVT Oil Control Valve (OCV) Schematic Diagrams
Circuit Diagram
...
 Variable Intake Solenoid (VIS) Valve Description and Operation
Description
Variable Intake manifold Solenoid (VIS) valves are installed
on the intake manifold (VIS Valve 1) and the surge tank (VIS Valve 2).
These VIS valve 1 and 2 control vacuum modulators ...
See also:
Positive Crankcase Ventilation (PCV) Valve Repair procedures
Removal
1.
Disconnect the vapor hose (A).
2.
Remove the PCV valve (B).
Inspection
1.
Insert a thin stick (A) into the PCV valve (B) from the threaded side to check that the plunger moves ...
Occupation classification system
Your vehicle is equipped with an occupant classification system in the front
passenger's seat.
The occupant classification system is designed to detect the presence of a properly-seated
front ...
Seat Heater Schematic Diagrams
Circuit Diagram
...
Categories
Hyundai Azera Manuals

© 2011-2026 Copyright www.hgmanual.com