 Hyundai Azera: Front Driveshaft Repair procedures
Fifth generation HG (2011–2026) / Hyundai Azera 2011-2026 Service Manual / Driveshaft and axle / Driveshaft Assembly / Front Driveshaft Repair procedures
Hyundai Azera: Front Driveshaft Repair procedures
Fifth generation HG (2011–2026) / Hyundai Azera 2011-2026 Service Manual / Driveshaft and axle / Driveshaft Assembly / Front Driveshaft Repair procedures
Fifth generation HG (2011–2026) / Hyundai Azera 2011-2026 Service Manual / Driveshaft and axle / Driveshaft Assembly / Front Driveshaft Repair procedures
| Replacement |
| 1. |
Loosen the wheel lug nuts slightly.
Raise the vehicle, and make sure it is securely supported. |
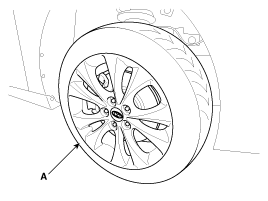
| 2. |
Remove the front wheel and tire (A) from front hub.
|

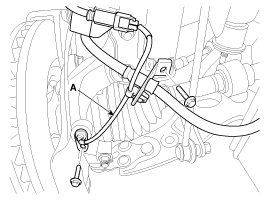
| 3. |
Loosen the wheel speed sensor mount bolt and then remove the wheel speed sensor (A) from knuckle.
|
| 4. |
Remove the tie rod end ball joint (A) from the knuckle.
|
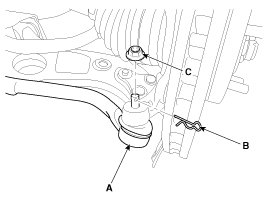
| 5. |
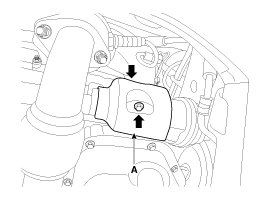
Remove driveshaft coking nut(A) from the front hub under applying the brake.
|


| 6. |
Remove the lower arm (A) from the knuckle.
|
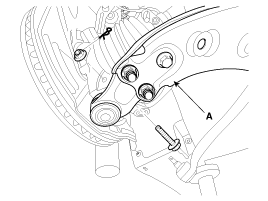
| 7. |
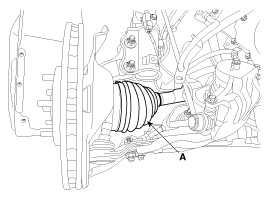
Disconnect the driveshaft (A) from the front hub assembly.
|
| 8. |
Remove the driveshaft cover (A).
|
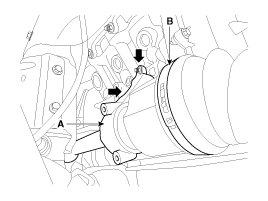
| 9. |
Loosen the mounting bolts and then remove the inner shaft (A) & driveshaft assembly (B). [RH]
|
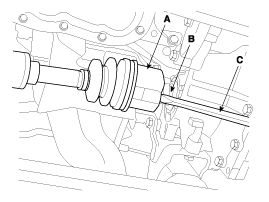
| 10. |
Removing the driveshaft (A) from the transaxle (B) by using a pry bar (C) as shown below. [LH]
|
| 11. |
Inatall in the reverse order of removal. |
| 12. |
Chek the alignment.
(Refer to Suspension System - "Alignment")
|
 Front Driveshaft Components and Components Location
Component Location
1. Driveshaft(LH)2. Inner shaft bearing bracket assembly3. Driveshaft(RH)
Components
1. BJ Assembly2. Clip3. BJ Boot Band4. BJ Boot5. Dynamic Damper Band6. Dynamic Damp ...
 TJ Joint Components and Components Location
Components
[LH]
1. BJ assembly2. Circlip3. BJ boot band4. BJ boot 5. Dynamic damper band6. Dynamic damper7. Shaft8. TJ boot band 9. TJ boot10. Spider assembly11. Snap ring12. TJ case 13. Circl ...
See also:
Components and Components Location
Component Location
1. Fuel filler door open switch2. Fuel filler door release actuator
...
Injector Repair procedures
Inspection
1.
Turn the ignition switch OFF.
2.
Disconnect the injector connector.
3.
Measure resistance between the injector terminals 1 and 2.
4.
Check that the resistance is within t ...
Parking Assist Sensor Schematic Diagrams
Circuit diagram
...
Categories
Hyundai Azera Manuals

© 2011-2026 Copyright www.hgmanual.com