 Hyundai Azera: Dynamic Damper Repair procedures
Fifth generation HG (2011–2026) / Hyundai Azera 2011-2026 Service Manual / Driveshaft and axle / Driveshaft Assembly / Dynamic Damper Repair procedures
Hyundai Azera: Dynamic Damper Repair procedures
Fifth generation HG (2011–2026) / Hyundai Azera 2011-2026 Service Manual / Driveshaft and axle / Driveshaft Assembly / Dynamic Damper Repair procedures
Fifth generation HG (2011–2026) / Hyundai Azera 2011-2026 Service Manual / Driveshaft and axle / Driveshaft Assembly / Dynamic Damper Repair procedures
| Replacement |
| 1. |
Remove the front driveshaft.
(Refer to Driveshaft Assembly - “Front Driveshaft”) |
| 2. |
Remove the TJ joint assembly.
(Refer to Driveshaft Assembly - “TJ Joint”) |
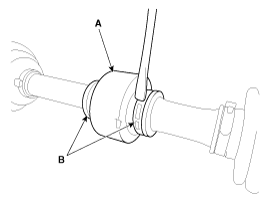
| 3. |
Using a pillar or flat-tipped(-) screwdriver, remove the both side of clamp(B) of the dynamic damper(A).
|
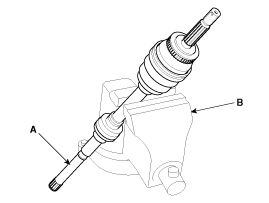
| 4. |
Fix the driveshaft (A) with a vice (B) as illustrated.
|
| 5. |
Apply soap powder on the shaft to prevent being damaged
between the shaft spline and the dynamic damper when the dynamic damper
is removed. |
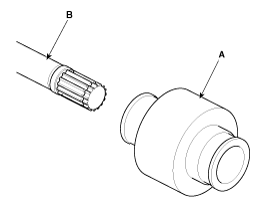
| 6. |
Seperate the dynamic damper (A) from the shaft (B) carefully.
|
| Installation |
| 1. |
Apply soap powder on the shaft to prevent being damaged between the shaft spline and the dynamic damper. |
| 2. |
Install the dynamic damper (A). |
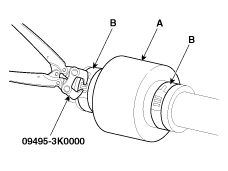
| 3. |
Using the SST(09495-3K000), secure the dynamic damper bands (B).
|
| 4. |
Install the TJ joint assembly.
(Refer to Driveshaft Assembly - “TJ Joint”) |
| 5. |
Install the front driveshaft.
(Refer to Driveshaft Assembly - “Front Driveshaft”) |
 Dynamic Damper Components and Components Location
Components
1. BJ assembly2. Circlip3. BJ boot band4. BJ boot 5. Dynamic damper band6. Dynamic damper7. Shaft8. TJ boot band 9. TJ boot10. Spider assembly11. Snap ring12. TJ case 13. Circlip
...
 BJ Boot Components and Components Location
Components
[LH]
1. BJ assembly2. Circlip3. BJ boot band4. BJ boot 5. Dynamic damper band6. Dynamic damper7. Shaft8. TJ boot band 9. TJ boot10. Spider assembly11. Snap ring12. TJ case 13. Circl ...
See also:
Output Speed Sensor Description and Operation
Description
The output speed sensor is a vital unit that measures the
rate of rotation of the transaxle's turbine shaft and output shaft, and
delivers the readings to the Transaxle Control Modu ...
Cruise control system
➀ Cruise indicator
➁ SET indicator
The cruise control system allows you to program the vehicle to maintain a constant
speed without depressing the accelerator pedal.
This system is ...
General Information
The Micro 570 Analyzer (Canada only)
The Micro 570 Analyzer provides the ability to test the
charging and starting systems, including the battery, starter and
alternator.
...
Categories
Hyundai Azera Manuals

© 2011-2026 Copyright www.hgmanual.com