 Hyundai Azera: Rear Hub - Carrier Repair procedures
Fifth generation HG (2011–2026) / Hyundai Azera 2011-2026 Service Manual / Driveshaft and axle / Rear Axle Assembly / Rear Hub - Carrier Repair procedures
Hyundai Azera: Rear Hub - Carrier Repair procedures
Fifth generation HG (2011–2026) / Hyundai Azera 2011-2026 Service Manual / Driveshaft and axle / Rear Axle Assembly / Rear Hub - Carrier Repair procedures
Fifth generation HG (2011–2026) / Hyundai Azera 2011-2026 Service Manual / Driveshaft and axle / Rear Axle Assembly / Rear Hub - Carrier Repair procedures
| Replacement |
| 1. |
Loosen the wheel lug nuts slightly.
Raise the vehicle, and make sure it is securely supported. |
| 2. |
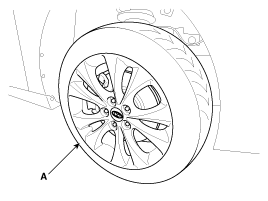
Remove the rear wheel and tire (A) from front hub.
|

| 3. |
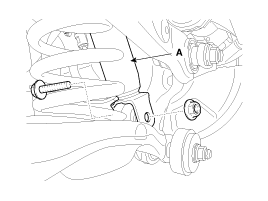
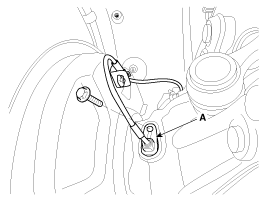
Loosen the bolt & nut and then disconnect the shock absorber (A) with the rear axle.
|
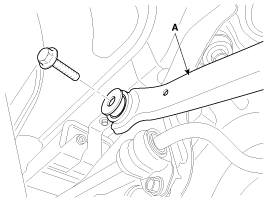
| 4. |
Loosen the rear upper arm bolts and nut and then remove the rear upper arm (A).
|
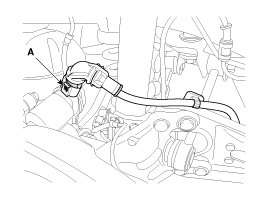
| 5. |
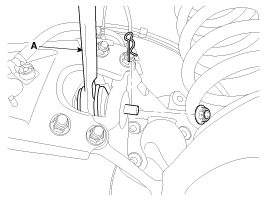
Disconnect the parking brake connector (A).
|
| 6. |
Remove the brake caliper mounting bolts, and then hold the brake caliper assembly (A) with wire.
|
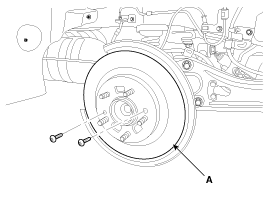
| 7. |
Loosen the disc mount screw and then brake disc (A).
|
| 8. |
Remove the wheel speed sensor (A) and brake hose.
|
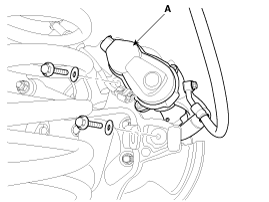
| 9. |
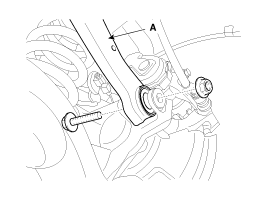
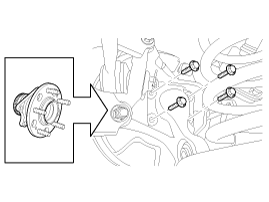
Loosen the hub bearing mounting, and then remove the hub bearing (A) from knuckle.
|
| 10. |
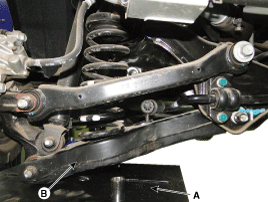
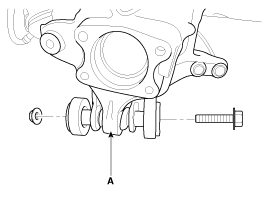
Loosen the assist arm mounting nut and then remove the assist arm (A).
|
| 11. |
Loosen the trailing arm mounting nuts, and then remove the trailing arm (A),
|

| 12. |
Loosen the lower arm mounting bolt and nut and then remove the rear hub assembly (A).
|
| Inspection |
| 1. |
Check the hub for cracks and the splines for wear. |
| 2. |
Check the brake disc for scoring and damage. |
| 3. |
Check the rear axle carrier for cracks. |
| 4. |
Check the bearing for cracks or damage.
|
| Installation |
| 1. |
Installation is the reverse of removal.
|
 Rear Hub - Carrier Components and Components Location
Components
1. Parking Brake Assembly2. Rear Carrier Assembly3. Rear Hub Assembly4. Rear Brake Disc
...

See also:
Repair procedures
Replacement
•
Be careful not to damage the fender and body.
•
When removing the clips, use a clip remover.
1.
Remove the head lamps.
(Refer to Body Elect ...
General Information
General Troubleshooting Information
Before Troubleshooting
1.
Check applicable fuses in the appropriate fuse/relay box.
2.
Check the battery for damage, state of charge, and clean and tight c ...
Front Oil Seal Repair procedures
Removal
1.
Remove the crankshaft damper pulley.
(Refer to Timing System - "Crankshaft Damper Pulley")
2.
Remove the front oil seal (A).
Installation
1.
Using SST(09231-3C100), install t ...
Categories
Hyundai Azera Manuals

© 2011-2026 Copyright www.hgmanual.com