 Hyundai Azera: Rear Upper Arm Repair procedures
Fifth generation HG (2011–2026) / Hyundai Azera 2011-2026 Service Manual / Suspension System / Rear Suspension System / Rear Upper Arm Repair procedures
Hyundai Azera: Rear Upper Arm Repair procedures
Fifth generation HG (2011–2026) / Hyundai Azera 2011-2026 Service Manual / Suspension System / Rear Suspension System / Rear Upper Arm Repair procedures
Fifth generation HG (2011–2026) / Hyundai Azera 2011-2026 Service Manual / Suspension System / Rear Suspension System / Rear Upper Arm Repair procedures
| Removal |
| 1. |
Remove the rear wheel & tire (A).
|


| 2. |
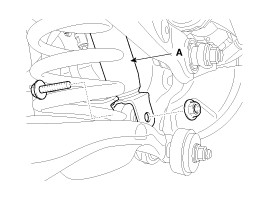
Loosen the bolt & nut and then disconnect the shock absorber (A) with the rear axle.
|
| 3. |
Loosen the bolt & nut and then remove the rear upper arm (A) with the rear axle.
|
| 4. |
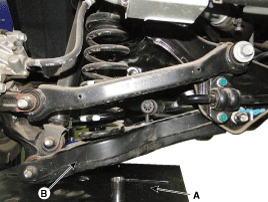
Set up the transmission jack (A) under the lower arm (B).
|
| 5. |
Loosen the bolt & nut and then remove the rear upper arm (A) with the rear axle.
|

| 6. |
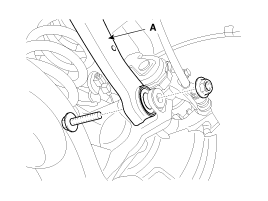
Loosen the bolt & nut and then remove the rear upper arm (A) with the sub frame.
|
| Installation |
| 1. |
Installation is the reverse of removal.
|
| Inspection |
| 1. |
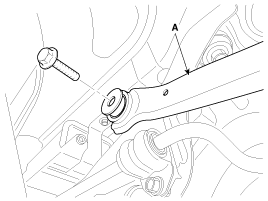
Check the bushing for wear and deterioration. |
| 2. |
Check the rear upper arm or damage and deformation. |
| 3. |
Check for all bolts and nut. |
 Rear Shock Absorber Repair procedures
Replacement
1.
Remove the rear wheel & tire (A).
Tightening torque:
88.3 ~ 107.9N.m (9.0 ~ 11.0kgf.m, 65.1 ~ 79.6lb-ft)
Be careful not to damage to the hub bolts w ...
 Rear Lower Arm Repair procedures
Removal
1.
Remove the rear wheel & tire (A).
Tightening torque:
88.3 ~ 107.9N.m (9.0 ~ 11.0kgf.m, 65.1 ~ 79.6lb-ft)
•
Be careful not to damage to the hub bolt ...
See also:
Defogging logic
To reduce the probability of fogging up the inside of the windshield, the air
intake or air conditioning are controlled automatically according to certain conditions
such as or
positio ...
Door Lamp Repair procedures
Removal
Mood lamp
1.
Disconnect the negative (-) battery terminal.
2.
Remove the front door trim panel.
(Refer to Body - "Front Door Trim")
3.
Remove the connector(A) and door LED mood l ...
Camshaft Repair procedures
Removal
[RH]
1.
Remove the RH bank timing chain.
(Refer to Timing System - "Timing Chain")
2.
Remove the RH exhaust CVVT oil control valve.
(Refer to Fuel System - "CVVT Oil Control Valv ...
Categories
Hyundai Azera Manuals

© 2011-2026 Copyright www.hgmanual.com