 Hyundai Azera: Rear Stabilizer Bar Repair procedures
Fifth generation HG (2011–2026) / Hyundai Azera 2011-2026 Service Manual / Suspension System / Rear Suspension System / Rear Stabilizer Bar Repair procedures
Hyundai Azera: Rear Stabilizer Bar Repair procedures
Fifth generation HG (2011–2026) / Hyundai Azera 2011-2026 Service Manual / Suspension System / Rear Suspension System / Rear Stabilizer Bar Repair procedures
Fifth generation HG (2011–2026) / Hyundai Azera 2011-2026 Service Manual / Suspension System / Rear Suspension System / Rear Stabilizer Bar Repair procedures
| Replacement |
| 1. |
Remove the rear wheel & tire (A).
|


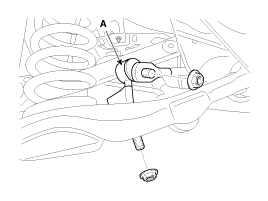
| 2. |
Loosen the nut and then remove the rear stabilizer link (A) from the lower arm and subframe.
|
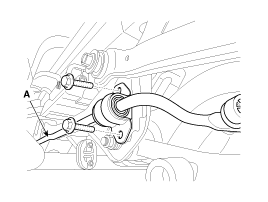
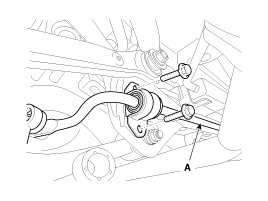
| 3. |
Loosen the mounting bolt and then remove the stabilizer bar (A) with the sub frame.
|
| 4. |
Installation is the reverse of removal. |
| Inspection |
| 1. |
Check the rear stabilizer bar for deformation. |
| 2. |
Check the rear stabilizer link ball joint for damage. |
 Rear Lower Arm Repair procedures
Removal
1.
Remove the rear wheel & tire (A).
Tightening torque:
88.3 ~ 107.9N.m (9.0 ~ 11.0kgf.m, 65.1 ~ 79.6lb-ft)
•
Be careful not to damage to the hub bolt ...
 Rear Assist Arm Repair procedures
Replacement
1.
Remove the rear wheel & tire (A).
Tightening torque:
88.3 ~ 107.9N.m (9.0 ~ 11.0kgf.m, 65.1 ~ 79.6lb-ft)
•
Be careful not to damage to the hub ...
See also:
Line Pressure Control Solenoid Valve Specifications
Specifications
Direct control VFS[LINE Pressure]
? Control type : Normal low type
Control Pressure [kpa (kgf/cm?, psi)]500.14 ~ 9.81(5.1~ 0.1, 72.54 ~ 1.42)Current value(mA)50 ~ 850 Inter ...
Microphone Repair procedures
Inspection
1.
Disconnect the negative(-) battery terminal.
2.
Remove the roof trim.
(Refer to Body - "Roof Trim Assembly")
3.
Remove the handsfree mic (A) after disconnect the connector f ...
Driver position memory system (If equipped)
A driver position memory system is provided to store and recall the driver’s
seat, outside rearview mirror and steering wheel position or the instrument panel
illumination intensity with a sim ...
Categories
Hyundai Azera Manuals

© 2011-2026 Copyright www.hgmanual.com