 Hyundai Azera: Seat Belt Pretensioner (BPT) Repair procedures
Fifth generation HG (2011–2026) / Hyundai Azera 2011-2026 Service Manual / Restraint / Seat Belt Pretensioner / Seat Belt Pretensioner (BPT) Repair procedures
Hyundai Azera: Seat Belt Pretensioner (BPT) Repair procedures
Fifth generation HG (2011–2026) / Hyundai Azera 2011-2026 Service Manual / Restraint / Seat Belt Pretensioner / Seat Belt Pretensioner (BPT) Repair procedures
Fifth generation HG (2011–2026) / Hyundai Azera 2011-2026 Service Manual / Restraint / Seat Belt Pretensioner / Seat Belt Pretensioner (BPT) Repair procedures
| Removal |
| 1. |
Disconnect the battery negative cable, and wait for at least three minutes before beginning work. |
| 2. |
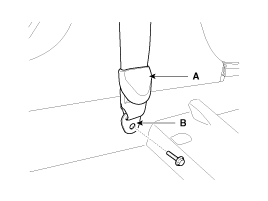
Left side - Remove the seat belt lower anchor cover (A).
After loosening the mounting bolt, then remove the seat belt lower
anchor (B).
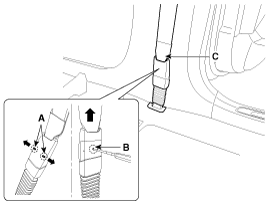
Right side - To remove the seat belt anchor pretensioner (C),
keep on pushing the lock pin (A) as arrow direction. And then remove
the seat belt after pushing the lock pin (B).
|
| 3. |
Remove the door scuff trim.
|
| 4. |
Remove the center pillar trim.
|
| 5. |
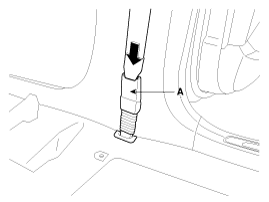
Remove the upper anchor bolt. |
| 6. |
Disconnect the seat belt pretensioner connector (C).
|
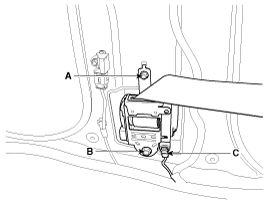
| 7. |
Loosen the seat belt pretensioner mounting bolts (A,B) and remove the seat belt pretensioner. |
| Installation |
| 1. |
Remove the ignition key from the vehicle. |
| 2. |
Disconnect the battery negative cable and wait for at least three minutes. |
| 3. |
Install the seat belt pretensioner with a bolts (A,B).
|
| 4. |
Connect the seat belt pretensioner (BPT) connector (A). |
| 5. |
Install the upper anchor bolts.
|
| 6. |
Install the center pillar trim.
|
| 7. |
Install the door scuff trim.
|
| 8. |
Left side - Install the lower anchor bolts.
Right side - Insert the seat belt to the anchor pretensioner (A).
|

| 9. |
Reconnect the battery negative cable. |
| 10. |
After installing the seat belt pretensioner, confirm proper system operation:
|

 Anchor Pretensioner (APT) Description and Operation
Description
Front seat belt anchor pretensioner operates as well as belt
pretensioner at the same time If it gets into its deploy condition after
a collision. It is located at near anchor on fr ...
See also:
Brake fluid
...
Sunshade
To open the sunshade, press the sunshade control switch (1).
To close the sunshade, press the sunshade control switch (2). If you press
the switch when the sunroof glass is opened, the s ...
Schematic Diagrams
Circuit Diagram
...
Categories
Hyundai Azera Manuals

© 2011-2026 Copyright www.hgmanual.com