 Hyundai Azera: Front Mud Guard Repair procedures
Fifth generation HG (2011–2026) / Hyundai Azera 2011-2026 Service Manual / Body (Interior and Exterior) / Body Side Molding / Front Mud Guard Repair procedures
Hyundai Azera: Front Mud Guard Repair procedures
Fifth generation HG (2011–2026) / Hyundai Azera 2011-2026 Service Manual / Body (Interior and Exterior) / Body Side Molding / Front Mud Guard Repair procedures
Fifth generation HG (2011–2026) / Hyundai Azera 2011-2026 Service Manual / Body (Interior and Exterior) / Body Side Molding / Front Mud Guard Repair procedures
| Replacement |
|

| 1. |
After loosening the mounting clip and screws, then remove the front mud guard (A).
|
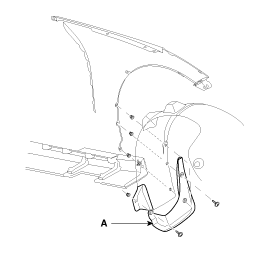
| 2. |
Installation is the reverse of removal.
|

 Rear Wheel Guard Repair procedures
Replacement
•
When prying with a flat-tip screwdriver, wrap it with
protective tape, and apply protective tape around the related parts, to
prevent damage.
•
...
 Rear Mud Guard Repair procedures
Replacement
•
When prying with a flat-tip screwdriver, wrap it with
protective tape, and apply protective tape around the related parts, to
prevent damage.
•
...
See also:
Repair procedures
On-vehicle Inspection
Spark Test
1.
Remove the ignition coils.
(Refer to Ignition System - "Ignition Coil")
2.
Using a spark plug socket, remove the spark plug.
3.
Install the spark p ...
Reservoir Tank Components and Components Location
Components
1. Reservoir tank2. Over flow hose
...
Rear Disc Brake Components and Components Location
Components
1. Guide rod bolt2. Bleed screw3. Caliper carrier4. Caliper body5. Inner pad shim6. Brake pad7. Pad retainer
...
Categories
Hyundai Azera Manuals

© 2011-2026 Copyright www.hgmanual.com