| ‚ÄĘ |
When prying with a flat-tip screwdriver, wrap it with
protective tape, and apply protective tape around the related parts, to
prevent damage. |
| ‚ÄĘ |
Put on gloves to protect your hands. |
| ‚ÄĘ |
Take care not to scratch the body surface. |
|
| 1. |
Remove the front tire. |
| 2. |
After loosening the mounting clips and screws, then remove the front wheel guard (A). 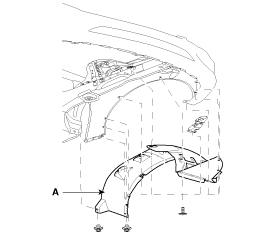
|
| 3. |
Installation is the reverse of removal.
| ‚ÄĘ |
Replace any damaged clips. |
|
|
Replacement
‚ÄĘ
When prying with a flat-tip screwdriver, wrap it with
protective tape, and apply protective tape around the related parts, to
prevent damage.
‚ÄĘ
...
Replacement
‚ÄĘ
When prying with a flat-tip screwdriver, wrap it with
protective tape, and apply protective tape around the related parts, to
prevent damage.
‚ÄĘ
...
See also:
Fuel Pump Motor Repair procedures
Removal
1.
Remove the fuel pump.
(Refer to Fuel Delivery System - ‚ÄúFuel Pump‚ÄĚ)
2.
Disconnect the electric pump wiring connector (A) and the fuel sender connector (B).
3.
Remove the c ...
Variable Intake Solenoid (VIS) Valve Specifications
Specification
ItemSpecificationCoil Resistance (?)30.0 ~ 35.0 [20¬įC(68¬įF)]
...
Oil Filter Body Repair procedures
Removal and Installation
1.
Remove the water pipe.
(Refer to Cooling System - "Water Pipe")
2.
Wait for 5 minutes after loosening the oil filter cap to drain well the oil in the oil filter.
...
 Hyundai Azera: Front Wheel Guard Repair procedures
Fifth generation HG (2011‚Äď2026) / Hyundai Azera 2011-2026 Service Manual / Body (Interior and Exterior) / Body Side Molding / Front Wheel Guard Repair procedures
Hyundai Azera: Front Wheel Guard Repair procedures
Fifth generation HG (2011‚Äď2026) / Hyundai Azera 2011-2026 Service Manual / Body (Interior and Exterior) / Body Side Molding / Front Wheel Guard Repair procedures


 Fender Garnish Repair procedures
 Rear Wheel Guard Repair procedures