 Hyundai Azera: Timing Chain Cover Repair procedures
Fifth generation HG (2011–2026) / Hyundai Azera 2011-2026 Service Manual / Engine Mechanical System / Timing System / Timing Chain Cover Repair procedures
Hyundai Azera: Timing Chain Cover Repair procedures
Fifth generation HG (2011–2026) / Hyundai Azera 2011-2026 Service Manual / Engine Mechanical System / Timing System / Timing Chain Cover Repair procedures
Fifth generation HG (2011–2026) / Hyundai Azera 2011-2026 Service Manual / Engine Mechanical System / Timing System / Timing Chain Cover Repair procedures
| Removal |
| 1. |
Remove the LH/RH cylinder head cover.
(Refer to Cylinder Head Assembly - "Cylinder Head Cover") |
| 2. |
Remove the lower oil pan.
(Refer to Lubrication System - "Oil Pan") |
| 3. |
Remove the drive belt auto tensioner.
(Refer to Timing System - "Drive Belt Tensioner") |
| 4. |
Remove the crankshaft damper pulley.
(Refer to Timing System - "Crankshaft Damper Pulley") |
| 5. |
Remove the engine mounting bracket.
(Refer to Engine And Transmission Assembly - "Engine Mounting") |
| 6. |
Lift up the engine assembly slightly by using a jack to get access to the side of engine. |
| 7. |
Remove the water pump and gasket.
(Refer to Cooling System - "Water Pump") |
| 8. |
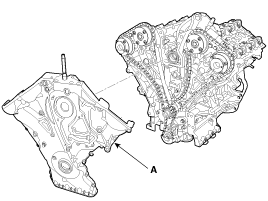
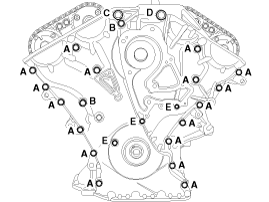
Remove the timing chain cover (A).
|

| Installation |
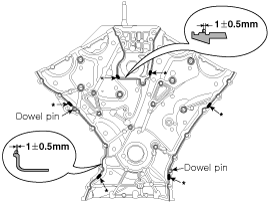
| 1. |
Install the timing chain cover.
|

| 2. |
Install the front oil seal.
(Refer to Timing System - "Front Oil Seal") |
| 3. |
Install the other parts reverse order of removal.
|
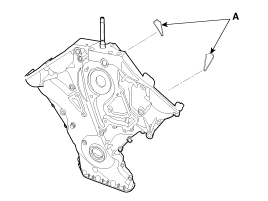
 Timing Chain Cover Components and Components Location
Components
1. Timing chain cover2. Gasket
...
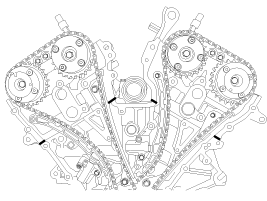
 Timing Chain Components and Components Location
Components
1. Oil pump chain cover2. Oil pump sprocket3. Oil pump chain 4. Oil pump tensioner assembly5. Crankshaft oil pump sprocket6. Crankshaft RH chain sprocket7. RH Timing chain auto tension ...
See also:
Jump starting
Jump starting can be dangerous if done incorrectly. Therefore, to avoid harm
to yourself or damage to your vehicle or battery, follow the jump starting procedures.
If in doubt, we strongly recommend ...
Rear Seat Back Cover Repair procedures
Replacement
•
Use a plastic panel removal tool to remove interior trim pieces to protect from marring the surface.
•
Take care not to bend or scratch the trim and ...
Description and Operation
Description
•
EPS (Electric power steering, Column assist type) system uses
an electric motor to assist the steering force and it is an engine
operation independent steering system.
...
Categories
Hyundai Azera Manuals

© 2011-2026 Copyright www.hgmanual.com