| 2. |
Loosen the bolts and nuts and then remove the smart cruise control unit assembly (A) from the vehicle. 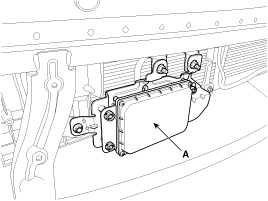
|
| 3. |
Disconnect the FEM joint connector (B) band cable and smart cruise control unit connector (A). 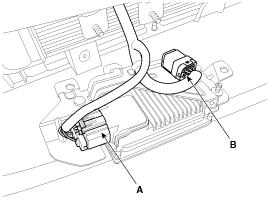
|
| 1. |
Fix the band cable of FEM joint connector (B) and connect the smart cruise control unit connector (A).
|
| 2. |
Install the smart cruise control unit assembly (A) on the vehicle.
Tightening torque
Bolts :
7.8 ~ 11.8 N.m(0.8 ~ 1.2kgf.m, 5.8 ~ 8.7lb-ft)
Nuts :
6.9 ~ 10.8N.m (0.7 ~ 1.1kgf.m, 5.1 ~ 8.0lb-ft)
|
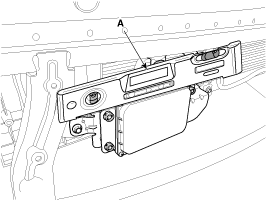
|
When installing the sensor, align the direction of sensor
with the vehicle motion vector and adjust the upside of sensor
horizontally using level meter (A). |
|
| 3. |
Align the smart cruise control sensor.
(Refer to Smart Cruise Control System - "Smart Cruise Control (SCC) SensorAlignment") |
| Smart Cruise Control (SCC) Sensor Alignment |
The objective of the alignment is to ensure correct SCC
performance. In order for the sensor to perform correctly, the sensor
must be aligned correctly. The sensor alignment has major impact on road
estimation, lane prediction, and target processing. When the sensor is
misaligned, the performance of SCC cannot be guaranteed. Therefore, when
the sensor is reinstalled or a new sensor is installed on a vehicle,
the sensor shall be aligned by service personnel.
|
The sensor must be aligned when;
| • |
The sensor is reinstalled after removing. |
| • |
A new sensor is installed on a vehicle. |
| • |
The sensor or nearby parts are impacted in a collision. |
| • |
The sensor can not recognize a vehicle ahead. |
|
|
The sensor can not recognize a vehicle ahead.
| • |
Remove heavy objects, such as luggage in the trunk, from the vehicle. |
| • |
Remove heavy objects, such as luggage in the trunk, from the vehicle. |
| • |
Check the pollution condition of sensor cover |
|
Check the pollution condition of sensor cover
Radar sensor should be aligned in vertical and horizontal
direction. Vertical alignment should be performed using level/tilt meter
and horizontal alignment should be performed by driving on a road.
| 1. |
To maintain the horizontal condition between a vehicle and ground, park a vehicle on a lift or level ground. |
| 3. |
Check out the vertical alignment of sensor using a level/tilt meter. (Tolerance: ±1.25° less)
If verticality of the sensor is out of the tolerance, turn the adjustment screw (B) to adjust it within the tolerance. 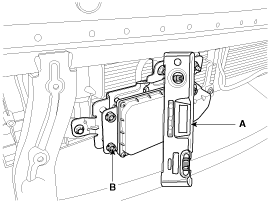
|
For the vertical sensor alignment, use a digital tilt meter for better accuracy. If not available, a bubble meter can be used. |
|
| 5. |
To perform the horizontal sensor alignment, connect GDS after starting the engine and choose “SCC Alignment”
|
Erase the DTC code before the sensor alignment procedure. |
|
| 6. |
Select “Driving Mode” to start sensor alignment. 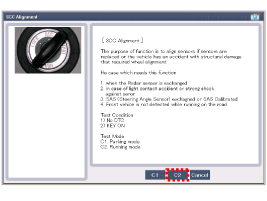
|
| 7. |
Drive the vehicle after checking the alignment start on the GDS. Check the red light of instrument cluster is on. 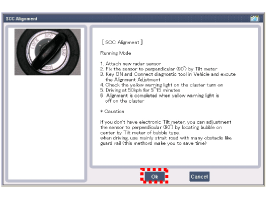
|
The sensor alignment will last about 5~15 minutes. Depending
on the traffic situation or road condition, the duration of the
procedure can shorten or extend.
To complete the alignment in minimum time, if it is possible,
drive the vehicle considering the driving/road conditions as follows.
| • |
To shorten the duration of the alignment; |
| - |
Drive at more than 65km/h (40.4mph). |
| - |
Drive on a straight road without any curve and incline. |
| - |
Drive on a thick and wide asphalt road. |
| - |
Drive on a road with repetitive static targets. |
| - |
– Drive on a dry and good road without rain and snow. |
| • |
The alignment process can be interrupted when the following condition exists; |
| - |
When the vehicle encounter curves with a radius smaller than 100m (328.0ft). |
| - |
Drive below minimum demand speed or stop (waiting at a red light, etc.) |
| - |
When the vehicle is in a tunnel or under overpass. |
| - |
When there are excessive steering wheel actions such as turning to the right or left and sudden lane change. |
| - |
Drive on a road with few repetitive static targets. |
|
|
Be careful when driving the vehicle for sensor alignment as follows;
| • |
Observe a regulation speed on the road. |
| • |
Do not stick to the previous driving/road conditions
excessively to shorten the duration of the alignment and drive the
vehicle safely considering traffic situations. |
| • |
When driving the vehicle, do not operate the GDS and look at
the GDS display for a long time. You can lose your steering control. |
| • |
Operate the GDS only when the vehicle stops. |
|
|
| 8. |
After the sensor alignment is completed, the instrument cluster warning light is off.
|
If sensor alignment has not completed, check horizontal angle using GDS.
If the vertical angle of the sensor is out of ±3°, check
the back beam or mounting area. If there is no abnormality, replace the
SCC unit with new one.
After replacing the SCC unit with new one, align the sensor again. |
|
 Hyundai Azera: Smart Cruise Control Unit Repair procedures
Fifth generation HG (2011–2026) / Hyundai Azera 2011-2026 Service Manual / Engine Electrical System / Smart Cruise Control System / Smart Cruise Control Unit Repair procedures
Hyundai Azera: Smart Cruise Control Unit Repair procedures
Fifth generation HG (2011–2026) / Hyundai Azera 2011-2026 Service Manual / Engine Electrical System / Smart Cruise Control System / Smart Cruise Control Unit Repair procedures


 Smart Cruise Control Unit Schematic Diagrams
 Smart Cruise Control Switch Schematic Diagrams