 Hyundai Azera: Hood Assembly Repair procedures
Fifth generation HG (2011–2026) / Hyundai Azera 2011-2026 Service Manual / Body (Interior and Exterior) / Hood / Hood Assembly Repair procedures
Hyundai Azera: Hood Assembly Repair procedures
Fifth generation HG (2011–2026) / Hyundai Azera 2011-2026 Service Manual / Body (Interior and Exterior) / Hood / Hood Assembly Repair procedures
Fifth generation HG (2011–2026) / Hyundai Azera 2011-2026 Service Manual / Body (Interior and Exterior) / Hood / Hood Assembly Repair procedures
| Replacement |
|

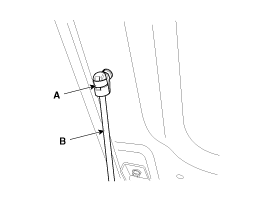
| 1. |
Using a screwdriver, lift the socket clips (A) up slightly on both ends of the lifter (B).
|
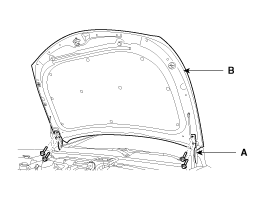
| 2. |
After loosening the hood hinge (A) mounting bolts, remove the hood panel (B).
|
| 3. |
Installation is the reverse of removal.
|

 Hood Assembly Components and Components Location
Component Location
1. Hood assembly
...
 Hood Insulator Pad Repair procedures
Replacement
1.
Using a clip remover, detach the clips, and remove the hood insulator pad (A).
•
Be careful not to scratch the hood panel.
2.
Installation is th ...
See also:
Don't let ice and snow accumulate underneath
Under some conditions, snow and ice can build up under the fenders and interfere
with the steering. When driving in severe winter conditions where this may happen,
you should periodically check unde ...
SRS Control Module (SRSCM) Description and Operation
Description
The primary purpose of the SRSCM (Supplemental Restraints
System Control Module) is to discriminate between an event that warrants
restraint system deployment and an event that does ...
Glove box
The glove box can be locked and unlocked with the mechanical key (1).
To open the glove box, push the button (2) and the glove box will automatically
open. Close the glove box after use.
WARNIN ...
Categories
Hyundai Azera Manuals

© 2011-2026 Copyright www.hgmanual.com